{
    "componentChunkName": "component---src-templates-knowledgebasecategory-js",
    "path": "/knowledge-base/quick-base-outside-of-the-box/",
    "result": {"data":{"post":{"id":"-dc095853-fb86-5354-8647-e35dd8636ed2","title":"Quickbase Outside Of The Box","icon":"fa fa-magic","slug":{"current":"quick-base-outside-of-the-box"},"subCategory":[],"knowledgebasepage":[{"id":"-2a153b79-679a-534c-bdd4-a58f4599a832","title":"Quickbase Developers’ Guide: Webhooks 101 | BEGINNER","slug":{"current":"quickbase-developer-guide-webhooks-101"}},{"id":"-582b1cdb-096c-5eef-9f22-7351d780dc1b","title":"How to Set Up Notifications in Quickbase  | BEGINNER","slug":{"current":"how-to-create-quickbase-notifications"}},{"id":"-b078d9e8-c370-50a1-98ae-f17d720a10e3","title":"Creating High-Quality Quickbase Forms (with Examples)","slug":{"current":"creating-high-quality-quickbase-forms"}},{"id":"-622a476d-790e-5cb8-b385-e038ef2f1dcd","title":"How to Add Users to Quickbase Applications","slug":{"current":"how-to-add-users"}},{"id":"-0ef5d981-8d13-582e-b97a-ee1d482377e5","title":"10 Quickbase Application Best Practices | BEGINNER","slug":{"current":"quickbase-application-best-practices"}},{"id":"-f7705514-7dd1-5204-a72a-3139112390f5","title":"Quickbase Home Pages: Uses and Functionality | INTERMEDIATE TO ADVANCED","slug":{"current":"quickbase-home-pages-uses-functionality-walkthrough"}},{"id":"-ad76e3c4-c4c3-52d4-b440-32c6b355ccc2","title":"Using docparser and Workato to Create Records in Quick Base | INTERMEDIATE","slug":{"current":"using-docparser-and-workato-to-create-records-in-quick-base-intermediate"}},{"id":"-c9ff4279-cbf3-527b-b293-190bacdb95ed","title":"Integrating Power BI with Quickbase","slug":{"current":"integrating-power-bi-with-quick-base"}},{"id":"-517481c2-ea0f-53e3-bd54-8a6ec1f39d57","title":"Implementing Custom Imports","slug":{"current":"implementing-custom-imports"}},{"id":"-5931518a-8e39-5db1-9ea4-45b7540ac95e","title":"Formulas + Webhooks = Dynamic Record Creation","slug":{"current":"formulas-webhooks-dynamic-record-creation"}},{"id":"-698f3dc9-b6c7-52c6-8bfd-d434780a2096","title":"Google Maps for Data Visualization","slug":{"current":"google-maps-for-data-visualization"}},{"id":"-733512c2-9bf3-527f-963e-51fdfe333b01","title":"Sync-for-CSV","slug":{"current":"sync-for-csv"}},{"id":"-bb86f98d-e9cf-515e-ae26-6934c42b54e2","title":"Workato for Logging Quickbase Emails","slug":{"current":"workato-for-logging-quick-base-emails"}}]},"categoryBase":{"edges":[{"node":{"id":"-8fc0a1e5-ff85-5026-a772-2cf6f31be45c","title":"Quickbase Knowledge Center","icon":"fa fa-pie-chart","slug":{"current":"quickbase-knowledge-center"},"subCategory":[{"id":"-5bed183e-fc97-5f28-8c58-da9094825c0d","title":"Tables","slug":{"current":"quick-base-tables"},"knowledgebasepage":[{"id":"-8747f676-873d-5064-9455-b52af034ccd6","title":"Changing A Table Key And When To Use It | INTERMEDIATE","slug":{"current":"changing-a-table-key-and-when-to-use-it-intermediate"}},{"id":"-efbc16a5-08c1-587b-8d52-505f43e86e2a","title":"Importing Data into Quickbase","slug":{"current":"importing-data-into-quick-base"}},{"id":"-b4d0d983-0610-585c-81e1-9f35100950b6","title":"Table-to-Table Import | INTERMEDIATE","slug":{"current":"table-to-table-import-intermediate"}},{"id":"-1598d8a7-eaf5-594c-9c85-7337c3916fb3","title":"How to Create Tables, Fields, and Records in Quickbase | BEGINNER","slug":{"current":"how-to-create-quickbase-tables-fields-records"}}]},{"id":"-14942e20-302e-57b3-a12c-de473ea4cc86","title":"Admin / Application Set Up / Security","slug":{"current":"admin-application-setup-security"},"knowledgebasepage":[{"id":"-2ad6fdb9-a138-5ef2-8985-abb95b9a83d3","title":"Application Diagram in Quickbase | BEGINNER","slug":{"current":"application-diagram-beginner"}},{"id":"-a6069491-10dc-58ca-9bfe-74cb6661af7d","title":"Copying Quickbase App Components | BASICS","slug":{"current":"copying-quick-base-app-components-basics"}},{"id":"-07f4490b-3e3c-5659-91f7-26fdca3b510b","title":"Navigating the My Apps Page in Quickbase | BASICS","slug":{"current":"navigating-the-my-apps-page-basics"}},{"id":"-eef60999-f306-585b-a361-bcd8e75bcc99","title":"How to Create a Code Page in Quickbase | ADVANCED","slug":{"current":"code-pages-advanced"}},{"id":"-e146d07b-82b9-5924-9c2a-c0e327233f6d","title":"Managing and Deleting Reports in an App in Quickbase","slug":{"current":"managing-and-deleting-reports-in-an-app-beginner"}},{"id":"-b35cb5ae-cc84-5bd9-80e5-c53061b7387f","title":"Many-to-Many Relationships in Quickbase | INTERMEDIATE","slug":{"current":"many-to-many-relationships-intermediate"}},{"id":"-bdfb8078-1165-56d7-81a3-2adf4199c426","title":"Creating Cross-App Relationships in Quickbase | INTERMEDIATE","slug":{"current":"creating-cross-app-relationships-intermediate"}},{"id":"-acc865b2-6ad7-56f6-87e2-1e2cb7f3b2b5","title":"Changing the Record Title Seen on Forms | BEGINNER","slug":{"current":"changing-the-record-title-seen-on-forms-beginner"}},{"id":"-c41c1109-10d1-5e33-bd6e-df813e938f07","title":"How to Set Up Reminders in Quickbase | BEGINNER","slug":{"current":"how-to-create-quickbase-reminders"}},{"id":"-582b1cdb-096c-5eef-9f22-7351d780dc1b","title":"How to Set Up Notifications in Quickbase  | BEGINNER","slug":{"current":"how-to-create-quickbase-notifications"}}]},{"id":"-3711bc9d-2dc7-582c-b894-03c210cdb205","title":"Roles & Permissions","slug":{"current":"roles-and-permissions"},"knowledgebasepage":[{"id":"-8445dd5f-1584-5ddd-8edf-2b8e16076b00","title":"Switching a Client to a New Quickbase Developer | INTERMEDIATE","slug":{"current":"switching-client-to-new-developer-quickbase"}},{"id":"-ca281f25-948d-5423-aae7-a67b681fe6fa","title":" User Groups | BEGINNER","slug":{"current":"user-groups-beginner"}},{"id":"-c71a53ab-ce17-528d-8700-316fd6183280","title":"How to Archive Records Using Role Permissions | INTERMEDIATE","slug":{"current":"how-to-archive-records-using-role-permissions-intermediate"}},{"id":"-53386712-5a3c-5cf1-9f3e-3a485c4040ef","title":"Conditional Filters for Record Permissions Using Roles | INTERMEDIATE","slug":{"current":"conditional-filters-for-record-permissions-using-roles-intermediate"}},{"id":"-dc13ff6d-baba-5f86-9a50-109b3bcdecba","title":"Displaying Information for Certain Roles | BEGINNER","slug":{"current":"displaying-information-for-certain-roles-beginner"}},{"id":"-b88f52ac-4cb4-555b-bab5-c509a9fc30be","title":"Sharing with Everyone On The Internet | BEGINNER","slug":{"current":"sharing-with-everyone-on-the-internet-beginner"}},{"id":"-0cd0c5da-d2c5-594a-828b-da9c99cee099","title":"Adding a new User Role | BEGINNER ","slug":{"current":"adding-a-new-user-role-beginner"}},{"id":"-35d04a6b-f106-52ed-ac7d-b2de131a5bb7","title":"Denying User Access | BEGINNER","slug":{"current":"denying-user-access-beginner"}},{"id":"-4fc8c68c-e9cd-5787-a77c-66faeb0bdd1c","title":"How to Use and Adjust Roles in Quickbase | Beginner","slug":{"current":"how-to-use-and-adjust-roles-in-quickbase"}}]},{"id":"-27382539-ae20-5f0a-ace9-391d7b9a149f","title":"Reporting & Dashboards","slug":{"current":"reporting-and-dashboards"},"knowledgebasepage":[{"id":"-d087aec7-e48e-5b33-a1f6-a827c701bd71","title":"How to Build an Operations Dashboard in Quickbase | INTERMEDIATE to ADVANCED","slug":{"current":"build-an-operations-dashboard"}},{"id":"-8999a198-44ff-5681-af53-655ab0bfc0f7","title":"How to Build Standard Reports in Quickbase | BEGINNER","slug":{"current":"building-standard-quickbase-reports"}},{"id":"-66ca6ec0-5557-526b-ad06-66ad4d26e414","title":"Understanding and Using Subscription Emails in Quickbase | BEGINNER","slug":{"current":"understanding-and-using-quickbase-subscription-emails"}},{"id":"-922c4548-386e-5677-b4a0-cce217eb44ec","title":"Creating External Stakeholder Forms, Reports and Dashboards | INTERMEDIATE","slug":{"current":"creating-external-stakeholder-forms-reports-and-dashboards-intermediate"}},{"id":"-61d13020-e19f-5af0-ae24-bd52533ecc46","title":"Using Report Formulas as a Filter in a Report in Quickbase","slug":{"current":"using-report-formulas-calculated-columns-as-a-filter-in-a-report-intermediate"}},{"id":"-151df36c-1bd8-5a72-91ed-b00f75b608d8","title":"Set Up Personalized Dashboards Using User-Filtered Reports","slug":{"current":"setting-up-personalized-dashboards-using-user-filtered-reports-beginner"}},{"id":"-2a32dd4d-28e0-5740-af90-fe46360427da","title":"Setting up Pie Reports in Quickbase | BASICS","slug":{"current":"pie-reports-basics"}},{"id":"-06190cd6-f160-5109-bd41-ff9b27af5062","title":"Setting Up Report and Chart Types in Quickbase | BASICS","slug":{"current":"report-and-chart-types-basics"}},{"id":"-b291fe3d-6622-531c-a766-c6357da26dd3","title":"Using Automations to Log Approval Time and User in Quickbase","slug":{"current":"using-automations-to-log-approval-time-and-user-intermediate"}},{"id":"-e35f6a67-8915-5394-b730-ae5c98464f74","title":"Kanban Reports | BEGINNER","slug":{"current":"kanban-reports-beginner"}},{"id":"-19df9259-a56c-5821-9ff5-3d223719569e","title":"Organizing & Assigning Groups To Reports | BEGINNER","slug":{"current":"organizing-assigning-groups-to-reports-beginner"}},{"id":"-d9f435ea-b4fe-59c6-88d4-e145892fb57a","title":"Create Audit/Change Logs with Automations | INTERMEDIATE","slug":{"current":"create-audit-change-logs-with-automations-intermediate"}},{"id":"-2b16bb50-c18b-508b-9abf-3d53dc848412","title":"Embedding an I-Frame (Webpage Widget) in a Dashboard | BEGINNER","slug":{"current":"embedding-an-i-frame-webpage-widget-in-a-dashboard-beginne"}},{"id":"-6a5d522a-47f1-5029-94d1-0402726bae1d","title":"Creating a Summary Report in Quickbase | BEGINNER","slug":{"current":"creating-a-summary-report-beginner"}},{"id":"-1407e422-e4bd-5e55-bfbf-94a26165519e","title":"How and When to Use Calculated Columns in Reports | BEGINNER","slug":{"current":"how-and-when-to-use-calculated-columns-in-reports-beginner"}},{"id":"-298cd1a9-80ff-5f0c-93a4-dfe943702af6","title":"Color-Coding Rows in Reports | BEGINNER","slug":{"current":"color-coding-rows-in-reports-beginner"}},{"id":"-cbf6b9a5-238f-596d-be61-7fb496ca9618","title":"Updating the Default Table Home Page and Default Report Columns | BEGINNER","slug":{"current":"updating-the-default-table-home-page-and-default-report-columns-beginner"}},{"id":"-d53be182-d001-59cd-996b-f4bdf9a6348c","title":"Linking Dashboards Together | BEGINNER","slug":{"current":"linking-dashboards-together-beginner"}},{"id":"-9725a381-5c1b-5ed5-9d48-a185fa566423","title":"Utilizing the Dashboard Side Bar | BEGINNER","slug":{"current":"utilizing-the-dashboard-side-bar-beginner"}},{"id":"-422a1316-baf1-5803-86c4-c2d37c320881","title":"Using Rich Text to make your Dashboard Pop | BEGINNER","slug":{"current":"using-rich-text-to-make-your-dashboard-pop-beginner"}},{"id":"-a6690de8-bda6-5973-8b7b-a1487d6c3fa8","title":"What Are Dashboards | BEGINNER","slug":{"current":"what-are-dashboards-beginner"}},{"id":"-10337215-cc81-5aed-aefd-5d49d123e5f8","title":"Adding Reports to Dashboards | BEGINNER","slug":{"current":"adding-reports-to-dashboards-beginner"}},{"id":"-cd9bb040-4e3b-5ee3-84cf-75d22bb64827","title":"Creating a new Dashboard | BEGINNER","slug":{"current":"creating-a-new-dashboard-beginner"}}]},{"id":"-540552b6-6aca-5fc6-ab8e-c34778837055","title":"Forms","slug":{"current":"quick-base-forms"},"knowledgebasepage":[{"id":"-73d4340b-48c1-5a28-804d-5cfc837f3493","title":"Radio Buttons (Hiding the None of the Above) | INTERMEDIATE","slug":{"current":"radio-buttons-hiding-the-none-of-the-above-intermediate"}},{"id":"-4efcdb76-d9ee-52c2-8b09-a2a40881562c","title":"Putting Custom HTML as a Form Element Quickbase | INTERMEDIATE","slug":{"current":"putting-custom-html-as-a-form-element-intermediate"}},{"id":"-f2d2540e-546a-597c-a1a4-fdc7dddeec86","title":"When to Use Grid Edit | BEGINNER","slug":{"current":"when-to-use-grid-edit-beginner"}},{"id":"-9495d546-fc91-5093-968f-a5e6b9b46976","title":"Creating User-Friendly Forms in Quickbase | BEGINNER","slug":{"current":"creating-user-friendly-forms-beginner"}},{"id":"-c0feaed2-1c42-5c63-bc6f-671f203895ab","title":"Creating Form Rules | BEGINNER","slug":{"current":"creating-form-rules-beginner"}}]},{"id":"-51554930-c85d-504e-b1fc-9e93b25a4991","title":"Fields & Formulas","slug":{"current":"quick-base-fields-and-formulas"},"knowledgebasepage":[{"id":"-0214807a-8993-576e-b934-b13335a68174","title":"File Download Button in Quickbase | INTERMEDIATE","slug":{"current":"file-download-button-intermediate"}},{"id":"-7f6cf0ac-0817-5533-82e8-b956fe7ae44c","title":"Using Combined Text Summary Field in Quickbase | INTERMEDIATE","slug":{"current":"using-combined-text-summary-field-intermediate"}},{"id":"-c545e882-edc9-5f77-88a1-6ffb10df7e80","title":"Conditional Drop Downs in Quickbase | BEGINNER","slug":{"current":"conditional-dropdowns-beginner"}},{"id":"-84ecb0d4-39f5-5cb8-9cab-dcd6463c9055","title":"Using a Formula-URL Field in Quickbase - INTERMEDIATE","slug":{"current":"using-a-formula-url-field-intermediate"}},{"id":"-3c4eaf54-706e-5817-9381-c0fb35401773","title":"Using Application Variables (Global Params) | ADVANCED","slug":{"current":"using-application-variables-global-params-advanced"}},{"id":"-92e078ad-d883-5ca1-8c1e-770a898348a2","title":"Tables, Fields, and Relationships in Quickbase | BEGINNER","slug":{"current":"quickbase-tables-fields-relationships"}}]},{"id":"-00366782-bad9-5d54-90e3-d3f86c145de0","title":"Notifications/Subscriptions/Reminders","slug":{"current":"notifications-subscriptions-reminders"},"knowledgebasepage":[{"id":"-8de45284-572b-5b75-9f39-e8ea949fb00f","title":"Setting up a Notification in Quickbase | BEGINNER","slug":{"current":"setting-up-a-notification-beginner"}},{"id":"-c58bb305-926e-5def-a87d-8d4de197405b","title":"Setting up Reminders | BEGINNER","slug":{"current":"setting-up-reminders-beginner"}},{"id":"-f93bbfd5-20bd-5f4e-a308-fad3447ab9f7","title":"Setting up a Subscription | BEGINNER","slug":{"current":"setting-up-a-subscription-beginner"}}]},{"id":"-46109a16-4c3d-593f-a8f1-11046af26ef6","title":"Quickbase API","slug":{"current":"quick-base-api"},"knowledgebasepage":[{"id":"-4450819a-044d-54fe-86e3-0da1734b4530","title":"API_CopyMasterDetail | ADVANCED","slug":{"current":"api_copymasterdetail-advanced"}},{"id":"-0568121c-7672-5421-9ed9-cdc252771b2c","title":"API_DoQuery | ADVANCED","slug":{"current":"api_doquery-advanced"}},{"id":"-a609b92a-e5e3-5ed6-80ac-8c96260a2d0c","title":"API_PurgeRecords | ADVANCED","slug":{"current":"api_purgerecords-advanced"}},{"id":"-787fcf32-2028-5b3e-af97-c01acb03fc9e","title":"API ImportFromCSV | ADVANCED","slug":{"current":"api-importfromcsv-advanced"}},{"id":"-57d312cb-6486-52ca-98f5-49e7a58855a2","title":"API EditRecord | ADVANCED","slug":{"current":"api-editrecord-advanced"}},{"id":"-5b3eeeb6-fe59-594c-b0ba-af20401e8cdf","title":"How to Utilize API AddRecord in Quickbase (Guide) | ADVANCED","slug":{"current":"api-addrecord-advanced"}}]},{"id":"-95a5c11c-fb39-526f-a713-ac5e88ca2f1d","title":"Pipelines","slug":{"current":"pipelines"},"knowledgebasepage":[{"id":"-662f743b-316d-5155-b368-0ddcd14f0958","title":"How to Use Quickbase Pipelines to Elevate Your Notifications | INTERMEDIATE to ADVANCED","slug":{"current":"using-pipelines-for-notifications"}},{"id":"-8a677377-f48e-571e-9c22-4fb6f2c3ac92","title":"How to Connect Quickbase Pipelines with Salesforce","slug":{"current":"quick-base-pipelines-connecting-with-salesforce"}},{"id":"-3289a4e9-e3c3-54ca-9330-f96b943a8601","title":"How to Turn Quickbase Webhooks into Pipelines | ADVANCED","slug":{"current":"turning-webhooks-into-pipelines"}}]}],"knowledgebasepage":[]}},{"node":{"id":"-dc095853-fb86-5354-8647-e35dd8636ed2","title":"Quickbase Outside Of The Box","icon":"fa fa-magic","slug":{"current":"quick-base-outside-of-the-box"},"subCategory":[],"knowledgebasepage":[{"id":"-2a153b79-679a-534c-bdd4-a58f4599a832","title":"Quickbase Developers’ Guide: Webhooks 101 | BEGINNER","publishedAt":"2024-11-14T05:13:00.000Z","slug":{"current":"quickbase-developer-guide-webhooks-101"}},{"id":"-582b1cdb-096c-5eef-9f22-7351d780dc1b","title":"How to Set Up Notifications in Quickbase  | BEGINNER","publishedAt":"2024-09-24T06:17:33.598Z","slug":{"current":"how-to-create-quickbase-notifications"}},{"id":"-b078d9e8-c370-50a1-98ae-f17d720a10e3","title":"Creating High-Quality Quickbase Forms (with Examples)","publishedAt":"2024-09-06T08:14:00.000Z","slug":{"current":"creating-high-quality-quickbase-forms"}},{"id":"-622a476d-790e-5cb8-b385-e038ef2f1dcd","title":"How to Add Users to Quickbase Applications","publishedAt":"2024-08-23T00:50:00.000Z","slug":{"current":"how-to-add-users"}},{"id":"-0ef5d981-8d13-582e-b97a-ee1d482377e5","title":"10 Quickbase Application Best Practices | BEGINNER","publishedAt":"2024-08-08T02:23:00.000Z","slug":{"current":"quickbase-application-best-practices"}},{"id":"-f7705514-7dd1-5204-a72a-3139112390f5","title":"Quickbase Home Pages: Uses and Functionality | INTERMEDIATE TO ADVANCED","publishedAt":"2024-06-10T07:58:00.000Z","slug":{"current":"quickbase-home-pages-uses-functionality-walkthrough"}},{"id":"-ad76e3c4-c4c3-52d4-b440-32c6b355ccc2","title":"Using docparser and Workato to Create Records in Quick Base | INTERMEDIATE","publishedAt":"2019-06-18T16:00:00.000Z","slug":{"current":"using-docparser-and-workato-to-create-records-in-quick-base-intermediate"}},{"id":"-c9ff4279-cbf3-527b-b293-190bacdb95ed","title":"Integrating Power BI with Quickbase","publishedAt":"2019-10-10T16:00:00.000Z","slug":{"current":"integrating-power-bi-with-quick-base"}},{"id":"-517481c2-ea0f-53e3-bd54-8a6ec1f39d57","title":"Implementing Custom Imports","publishedAt":"2019-06-30T16:00:00.000Z","slug":{"current":"implementing-custom-imports"}},{"id":"-5931518a-8e39-5db1-9ea4-45b7540ac95e","title":"Formulas + Webhooks = Dynamic Record Creation","publishedAt":"2019-06-30T16:00:00.000Z","slug":{"current":"formulas-webhooks-dynamic-record-creation"}},{"id":"-698f3dc9-b6c7-52c6-8bfd-d434780a2096","title":"Google Maps for Data Visualization","publishedAt":"2019-06-18T16:00:00.000Z","slug":{"current":"google-maps-for-data-visualization"}},{"id":"-733512c2-9bf3-527f-963e-51fdfe333b01","title":"Sync-for-CSV","publishedAt":"2019-10-10T16:00:00.000Z","slug":{"current":"sync-for-csv"}},{"id":"-bb86f98d-e9cf-515e-ae26-6934c42b54e2","title":"Workato for Logging Quickbase Emails","publishedAt":"2019-06-18T16:00:00.000Z","slug":{"current":"workato-for-logging-quick-base-emails"}}]}},{"node":{"id":"-b055b1e3-c062-5785-865b-8ca556d0886f","title":"Quickbase News","icon":"fa fa-bullhorn","slug":{"current":"quick-base-news"},"subCategory":[],"knowledgebasepage":[]}},{"node":{"id":"-f68d4f8a-0604-5b70-a9d0-441d118b24ba","title":"Pipefy Knowledge Center","icon":"fa fa-bullhorn","slug":{"current":"pipefy-knowledge-center"},"subCategory":[],"knowledgebasepage":[{"id":"-b0d5c319-1eef-5be7-a476-08f3f99dfcc1","title":"Pipefy AI Automation: How to Build a Mini App","publishedAt":"2025-02-14T05:49:47.878Z","slug":{"current":"pipefy-ai-mini-build"}},{"id":"-28adead1-cc4f-5fbf-a580-3705ad2e341c","title":"Mastering Pipefy Interfaces: A Comprehensive How-To Guide | BEGINNER","publishedAt":"2024-10-22T01:25:00.000Z","slug":{"current":"pipefy-interface-guide"}}]}},{"node":{"id":"-743da374-345f-56b2-bc72-8b800437838b","title":"Pipefy News","icon":"fa fa-bullhorn","slug":{"current":"pipefy-news"},"subCategory":[],"knowledgebasepage":[]}},{"node":{"id":"-19639513-515e-5bd2-b0ac-4fddcab7d3be","title":"Workato Knowledge Center","icon":"fa fa-cogs","slug":{"current":"workato-knowledge-center"},"subCategory":[],"knowledgebasepage":[{"id":"-b82a3f26-b3ef-5c99-b7ae-e7c8d8b841de","title":"Workato and Sending HTTP Requests | ADVANCED","publishedAt":"2019-06-18T16:00:00.000Z","slug":{"current":"workato-and-sending-http-requests-or-advanced"}},{"id":"-cc79ed3a-51dd-57c9-aed7-136a1e462f0e","title":"Workato and Custom Connectors | ADVANCED","publishedAt":"2019-06-18T16:00:00.000Z","slug":{"current":"workato-and-custom-connectors-advanced"}},{"id":"-c6c823da-b494-5d0e-b466-40c7e55e74fc","title":"Syncing your Survey Monkey Data | BEGINNER","publishedAt":"2019-06-27T16:00:00.000Z","slug":{"current":"syncing-your-survey-monkey-data-beginner"}},{"id":"-4273344e-3a41-5688-b4cb-f995a6f03f30","title":"Workato For Handling Files | BEGINNER","publishedAt":"2019-06-19T16:00:00.000Z","slug":{"current":"workato-for-handling-files-beginner"}},{"id":"-4dde28cf-e50a-51e2-ac9c-f282e01f9280","title":"Adding Conditional Actions to Your Workato Recipe | INTERMEDIATE","publishedAt":"2019-10-10T16:00:00.000Z","slug":{"current":"adding-conditional-actions-to-your-workato-recipe-intermediate"}},{"id":"-173c52a2-fe81-53c9-ad2a-97cf0efa0a47","title":"Using Workato to Send an Email Through Outlook | BEGINNER","publishedAt":"2019-06-19T16:00:00.000Z","slug":{"current":"using-workato-to-send-an-email-through-outlook-beginner"}},{"id":"-be685b54-dbed-5ec4-b53b-447150b89b81","title":"What is Workato | BASICS","publishedAt":"2019-06-09T16:00:00.000Z","slug":{"current":"what-is-workato-basics"}},{"id":"-2eb7b721-d75a-5cce-a9d8-fd8be02cbeae","title":"Creating Your First Workato Recipe | INTERMEDIATE","publishedAt":"2019-10-10T16:00:00.000Z","slug":{"current":"creating-your-first-workato-recipe-intermediate"}},{"id":"-f1d2727a-7d19-5c91-bfe3-95079e2c2d9f","title":"Creating a New App Connection in Workato | BEGINNER","publishedAt":"2019-10-10T16:00:00.000Z","slug":{"current":"creating-a-new-app-connection-in-workato-beginner"}},{"id":"-358b020e-d6c5-5702-b726-ca29daee5edd","title":"Logger by Workato | BEGINNER","publishedAt":"2019-06-19T16:00:00.000Z","slug":{"current":"logger-by-workato-beginner"}}]}},{"node":{"id":"-d52e9bd0-2c0b-50a4-805f-801909df825a","title":"Workato News","icon":"fa fa-bullhorn","slug":{"current":"workato-news"},"subCategory":[],"knowledgebasepage":[]}}]},"allPosts":{"edges":[{"node":{"id":"-0ef5d981-8d13-582e-b97a-ee1d482377e5","title":"10 Quickbase Application Best Practices | BEGINNER","metaDescription":"Knowing what Quickbase best practices are and following them separates professional developers from everyday citizen developers. Discover our top 10 tips.","body":"When developing a [Quickbase application](https://quandarycg.com/quandary-build/) internally or for a client, you should follow best practices to prevent technical debt or produce a better outcome for the client.\n\n\n## Why Use Best Practices?\n\nBest practices are a set of rules/guidelines to ensure positive development outcomes. They’re universally useful regardless of application or use case. Following them will benefit both the developer and the client.  \n\nKeep in mind that the client may request a developer not implement an item listed among these best practices. While it’s a developer’s duty to inform the client on why this is a best practice, the client has the final decision on their development.\n\nBest Practices exist in several different areas of the application. Make sure you implement these development/design choices in every case.\n\n\n## 10 Quickbase Best Practices\n\n\n### 1. Take Away Delete Capabilities From All Users (Except for the Developer)\n\nYou can set the delete functions per table in the **User Roles permissions**. With an unknown number of users in any system and the problems that can arise from deleting parent records with child records, it is best to remove this function from ALL other Users except for the **Dev/Admin role** unless a client requests otherwise.\n\n<p align=\"center\">\n  <img src=\"https://cdn.sanity.io/images/55lcecww/production/10628bcd56fe16a451e3d6a5f16b58f3c3845f7b-1284x459.jpg\" alt=\"Quickbase screenshot of the Role Permission page where Deletion Capabilities has been removed.\">\n</p>\n\n\n_**Example**: Deletion capabilities here have been removed from several critical tables within the **Role Permissions**. The Green checkmark identifies the few remaining places users in this role CAN delete records._\n\n\n### 2. Stick to Uniform Formatting\n\nYou should format every table form, regardless of anticipated use by non-admin users, similarly (section headers, tab coloring, etc.).\n\nAs developers, we often have to demo/screen share our work. Inevitably, you will find yourself on a functional table that is not ordinarily for end-user consumption. Formatting these forms takes seconds and prevents them from looking disorganized and sloppy to our clients.\n\n<p align=\"center\">\n  <img src=\"https://cdn.sanity.io/images/55lcecww/production/26cc2853020ac2272cac55124810ebe846443a0c-640x372.jpg\" alt=\"Quickbase screenshot of an example of how universal formatting, regardless of chances of use, makes the development appear professional.\">\n</p>\n\n_**Example**: In this application, it is highly unlikely that an end user will ever travel to the **Documents** table, as it is available as an embedded report in many other forms._\n \n_However, it is formatted to match other forms (with the client’s logo coloring and stylized section headers) since the capability of visiting the table has not been blocked._\n\n\n### 3. Use Comments to Avoid Confusion\n\nAdd comments to field settings to describe how/where you use the fields, especially when you use them in formulas. \n\nWith proper documentation, other people, even non-developers, can understand how/where/why you use different formula fields and various functions within those formulas. This can be essential in troubleshooting errors and preventing accidental deletion of critical fields.\n\n<p align=\"center\">\n  <img src=\"https://cdn.sanity.io/images/55lcecww/production/69a1c5fd03191ef9ad6139b0015fb99ec82eb770-719x321.jpg\" alt=\"Screenshot of a comment added to an Invoice Field in Quickbase.\">\n</p>\n\n_**Example**: A comment was added to the **Invoice # field** to explain how it should and should not be utilized. Note that the developer also identified that they use this field in a Pipeline, which is not always clear from the field Usage tab._\n\n<p align=\"center\">\n  <img src=\"https://cdn.sanity.io/images/55lcecww/production/04cd65a72cde8156e94e5a354e5732520da73d7f-1571x306.jpg\" alt=\"Screenshot of a formula with commentary on its purpose within the overall workflow.\">\n</p>\n\n_**Example**: This formula contains commentary explaining its purpose within the overall workflow of the application, which may not be clear from the field title._\n\n_Commentary within the formula field is identified by **“//”** which does not allow the string of text to interfere with the rest of the formula syntax. This can be done at the top or bottom of the formula window, or within the formula between lines._\n\n\n###  4. Take Away Shared Reporting Capabilities\n\nSimilar to deleted permissions, this best practice can prevent problems that arise when users remove or edit critical common reports. \n\n_**Note**: You can also set reporting permissions in the **User Role permissions**._\n\nWith an unknown number of users in any system, we generally do not want them to create unnecessarily complex reports for teams. Taking away reporting capabilities will also prevent users from saving edits to common reports with filters in place. Instead, limit report creation/deletion to Dev/Admin roles unless requested by client.\n\n<p align=\"center\">\n  <img src=\"https://cdn.sanity.io/images/55lcecww/production/43180b2a6d907ece34243b22af2672af29b47f6f-721x513.jpg\" alt=\"Screenshot of Role User Interface setup to demonstrate how it's possible to set up permissions for individual reports.\">\n</p>\n\n_**Example**: You can make this rule for individual reports on each table, or you can disable reporting capabilities in their entirety within the **Role User Interface** setup. Neither of these options prevents end users from creating personal reports. They only affect reports already created within the app._\n\n\n### 5. Never Leave Default Dashboards Empty/Blank\n\nInevitably, clients will eventually add users into a role not meant for them. When that happens, landing on a blank page does not look good. \n\nDuring development, if client end users access the app, they should land on a dashboard that provides information. This gives them the impression that you are making progress. \n\nIn contrast, a blank looks like you have not done your work (even if you did). That is because relationship diagrams and other back-end work do not mean anything to end users, visuals do.\n\n<p align=\"center\">\n  <img src=\"https://cdn.sanity.io/images/55lcecww/production/a627b212856bd9183bab946103ae84fd5890fe55-1193x647.jpg\" alt=\"Screenshot of a blank default dashboard.\">\n</p>\n\n_**Example**: In this case, the developers created a complex series of **Tables, Table Relationships**, and **Pipelines** to support an invoicing process. However, the **Default Dashboard** was blank, so end users could not see the intricate architecture. To them, it looked like little work had been accomplished in this build._\n\n\n### 6. Separate Administrator and Development Roles\n\nSetting this feature will help control visibility, even if the permissions are identical.\n\n\n\n<ul style=\"list-style: disc\">\n<li><strong>Developers</strong> should see everything at all times, every table, testing report, record, and all still-in-development items, especially when there will be a knowledge transfer later. </li>\n<li><strong>Administrators</strong> are the eventual recipients of the application. They do not need to see items still in development and functional background tables not intended for the end user. This keeps their view clean and professional-looking.</li>\n</ul>\n\n<p align=\"center\">\n  <img src=\"https://cdn.sanity.io/images/55lcecww/production/905f8fea273b2f921a29761330371152d05eb1ec-1182x74.jpg\" alt=\"Example of separated Administrator and Developer roles in QuickBase.\">\n</p>\n\n_**Example**: In this client application, the **Administrator** still has all capabilities. However, because they are separated, the **Developer** can easily hide essential tables that are not for end-user consumption. Without this feature, these tables would unnecessarily bloat the **Table** list, making navigation more difficult for the Administrator._\n\nYou can set this up easily by making a copy of the Administrator role and assigning it to all developers within the app. Then, maintain the Administrator role to limit visibility in the role permissions.\n\n\n### 7. Limit Access to User Tokens\n\n**User Tokens** visibility (especially those created by **Administrators** and **Developers**—who have full access to everything within an application) should be limited to those with the corresponding role. \n\n**Tokens** in plain text in your code pages, emails, or other areas are a security risk because they expose administrator access.\n\n<p align=\"center\">\n  <img src=\"https://cdn.sanity.io/images/55lcecww/production/73511ba923e6f0a0441178ad4bc82bbe503718fa-635x111.jpg\" alt=\"Example of a publicly visible User Token in a custom button's URL.\">\n</p>\n\n_**Example**: In this case, a developer **User Token** is in a custom button. Hovering over this button allows anyone with this URL link to see and record the **User Token**. This would grant them the same level of access as the developer, creating a security risk._\n\n\n### 8. Never Use Automations and Quickbase Actions\n\nIn some **Client realms**, access to **Automations** and **Actions** is still available. A sufficiently knowledgeable **Developer** could access them via URL in almost any realm. However, Quickbase will  will eventually sunset these items. Additionally,  and there is nothing these features can do that a **Pipeline** or **Webhook** cannot. \n\nThese features create tech debt and could cause issues down the road when Quickbase finally removes these deprecated automation tools. If you still use them, the sunset will break your workflows, and you’ll need a rapid overhaul and pipeline build for legacy systems to stay operational.\n\n\n### 9. Filter Your Dropdown Results\n\nYou can adjust drop-downs from related tables to look at a specific report by editing the form. Having a filtered/sorted report can eliminate old/redundant records. \n\nIt also allows for refinement of the field output to a value that makes sense in a field, rather than defaulting to a **Record ID#** or other value end users will not recognize.\n\n<p align=\"center\">\n  <img src=\"https://cdn.sanity.io/images/55lcecww/production/fc582294f0e00490131ce25829d87ad6bbb8117c-457x226.jpg\" alt=\"Quickbase screenshot of the settings behind an Invoice Form to demonstrate how filtering the dropdown results can make the process more efficient.\">\n</p>\n\n_**Example**: This invoicing application has 51 Companies listed. However, only a few of these companies are active. To prevent sending an invoice to an Inactive Company, you can adjust the form settings to only include **Active Companies** on the **Invoices form**. This reduces the list to only 12. This can also make it easier for end users to make a selection, as the shorter list is easier to scan for the correct Company value._\n\n\n### 10. Always Keep Future Scalability in Mind\n\nSometimes performing more complex development and spending more time on it can lead to higher scalability in the future. Developing for scalability can take many forms:\n\n\n\n<ul style=\"list-style: disc\">\n<li>Try not to develop so specifically that you have trouble quickly adapting to change. Allow for the potential for change to occur rapidly by not staying too narrow in your structure or design.</li>\n<li>If you use <strong>Lists</strong> to support functions in the app that could change or grow in number over time with the business need, consider developing a table for <strong>Administrators</strong> to manage these rather than creating a multiple-choice field that only a Developer can edit.</li>\n<li>When performing discovery or consulting with a client on their workflow, point out opportunities for making the process more scalable. </li>\n<li>Ask questions to help identify parts of the workflow that may need to change over time to support the business so you can develop with those qualities in mind. </li>\n</ul> \n\n\n\n## There Are More Best Practices Out There\n\nBest practices set professional developers apart from subpar developers who create inefficiencies and introduce risk to a business  \n\nFollowing these 10 in our own development is a necessary and integral part of developing QuickBase to the highest standard for all our clients. We know from experience that they ultimately result in easier handoffs, better applications, and a reduction in technical debt that can push projects off-track. \n\nThis list does not represent every Best Practice. You may identify items that fall under the definition of a Best Practice (items that are true regardless of the application or use case) that are not outlined here. Discuss these with other members of the team to gain further insight while considering adopting them.","slug":{"current":"quickbase-application-best-practices"},"categories":[{"id":"-dc095853-fb86-5354-8647-e35dd8636ed2","title":"Quickbase Outside Of The Box","slug":{"current":"quick-base-outside-of-the-box"}}]}},{"node":{"id":"-b0d5c319-1eef-5be7-a476-08f3f99dfcc1","title":"Pipefy AI Automation: How to Build a Mini App","metaDescription":"The Pipefy AI tool is an amazing out-of-the-box solution to make application build easier. But you need to know how to use it. Here are some tips.","body":"[The Pipefy AI Automation tool](https://www.pipefy.com/) is an out-of-the-box solution you can use to build applications. It is included with all Pipefy licenses, including the free Starter program. This means you can experiment with it freely. (Just remember to be specific in your prompts.)\n\nIn this walkthrough, we will show how to build a mini-app using Pipefy AI and provide actionable tips (best practices) for future application builds.\n\n## How to Build a Mini-App with Pipefy AI in 45 Minutes\n\nFor this exercise, we will build an automated process to analyze customer satisfaction from online testimonials. \n\n### Pipefy Basics\n\n<p style=\"margin: 20px 0; text-align: center;\">\n  <img src=\"https://cdn.sanity.io/images/55lcecww/production/6f7768350697fa24819f874958c6193a144ff1f6-1248x562.png\" alt=\"Pipefy screenshot of a typical pipe in detail.\">\n</p>\n\nThe graphic above shows a typical Pipe in Pipefy. Pipes are Kanbanized processes, with cards (i.e. “Sample Company 1”), moving to different Phases (i.e. “Final Decision”) to gather data. \n\nTypically, you receive initial data via a “Start Form”, which creates a card on the Kanban board. In the following use case, we will use a public Start Form to collect Customer Testimonial data, then, we will use Pipefy’s AI Automation to gather data.\n\n### Create a New Pipe\n\n1. Select New pipe from the home page.\n\n<p style=\"margin: 20px 0; text-align: center;\">\n  <img src=\"https://cdn.sanity.io/images/55lcecww/production/6f2743fb5006998da6b779c173116efdaced2248-140x175.png\" alt=\"Pipefy screenshot of New pipe button.\">\n</p>\n\n2. Please select “Start from Scratch” from the template gallery.\n\n<p style=\"margin: 20px 0; text-align: center;\">\n  <img src=\"https://cdn.sanity.io/images/55lcecww/production/4436c46eddc36a90fab8a5bb79c62228655fd73e-1047x475.png\" alt=\"Pipefy screenshot of \"Start from scratch\" button when creating a new pipe.\">\n</p>\n\n3. Give your Pipe a descriptive name. (I’ve named mine **ACME Manufacturing Customer Satisfaction Analyzer**.)\n\n### Set Up the Application\n\nFollow these steps to ensure your application is as clean as possible.\n\n1. Delete the middle Phase. For any implementation, keep your workspace clean. In this mini-use case, we only need one process phase before the pipe finishes, so deleting the middle phase makes sense.\n\n2. Rename Phase 1 to Analyze.\n\n3. Rename Phase 2 to Send to DB or keep it as Done. I like to archive my data and use it for reporting, so a logical next step is to send the finished cards to a Database. However, we won’t be using it.\n\nYour Pipe should look like the picture below.\n\n<p style=\"margin: 20px 0; text-align: center;\">\n  <img src=\"https://cdn.sanity.io/images/55lcecww/production/5bfbc94c5af6b82a6178a7488e788325decfa2fa-1246x552.png\" alt=\"Pipefy screenshot of ideal pipe setup.\">\n</p>\n\n### Edit the Start Form\n\n 1. Rename the Start form to Satisfaction Survey.\n\n 2. Create two short text fields:\n a. Customer Name (Required)\n b. Company (Required)\n\n 3. Create one long text field: \n a. Customer Testimonial (Required)\n\n4. Create one numeric field:\na. Customer Rating\n\n5. Check your work with the screenshot below.\n\n<p style=\"margin: 20px 0; text-align: center;\">\n  <img src=\"https://cdn.sanity.io/images/55lcecww/production/9145806f0874ee2555cbca32aeb8022811389a04-1199x622.png\" alt=\"Pipefy Screenshot of ideal Start form setup.\">\n</p>\n\n### Edit the Analyze Phase\n\nFirst, let’s create fields to store Pipefy’s AI analysis. Go to phase settings.\n\n1. Edit the Analyze Phase.\n\n2. Create a long text field:\na. Analysis Output\n\n3. Create a numeric field:\na. AI Rating\n\n 4. Check your work with the screenshot below.\n\n<p style=\"margin: 20px 0; text-align: center;\">\n  <img src=\"https://cdn.sanity.io/images/55lcecww/production/36abd269f8cdd674d94341e5efc9a1eea996aaef-997x449.png\" alt=\"Pipefy screenshot of Analyze phase.\">\n</p>\n\n### Build the Automation\n\nYou will create an automation to analyze the text string collected in “Customer Testimonial.” The output will be an analysis and a numeric rating of the testimonial.\n\n1. Navigate to **Phase Settings**.\n\n2. Create a new automation (under the **Automations**) tab.\n\n3. Select a trigger. (In this case, we want to trigger when a new testimonial or “card” is created. (See Screenshot under “Write the AI Prompt”)\n\n4. Select “Generate with AI”\n\n### Write the AI Prompt\n\nThe Pipefy AI tool is a powerful automation tool, but clear and specific prompts are still necessary. \n\nTo succeed, you must iterate over multiple prompts and configurations to ensure the best possible outcome. You will likely need additional setup, especially as a beginner user of the AI tool. \n\nAttempting large, complicated AI prompts is not recommended until you have experience with the tool. Instead, consider breaking large prompts with many attempted functions into a series of smaller automations until you gain experience.\n\n#### Follow These Steps\n\n1. Copy and paste this prompt template for AI Analysis of a customer testimonial:\n\n*Analyze the following customer testimonial for key themes, sentiments, and insights. Identify the main aspects the customer appreciates or criticizes, any emotions expressed, and how these elements could inform potential improvements or marketing strategies. Highlight any specific phrases that indicate strong feelings or experiences. Additionally, please provide a rating of 1-5 for customer satisfaction.*\n\n**Analysis Goals:**\n\n1. Determine overall sentiment (positive, negative, neutral).\n2. Extract specific benefits and drawbacks mentioned.\n3. Suggest actionable insights for marketing and product development.\n4. Provide a rating of 1-5 based on the customer’s satisfaction. Using an AI to help write initial prompts is highly recommended. I have found ChatGPT sufficient for writing prompts that Pipefy AI understands (with tweaks).\n\n\n2. Replace “Customer Testimonial” with the field tag. (See Below). \n3. Additionally, you can map the fields; as seen below the prompt.\n\n<p style=\"margin: 20px 0; text-align: center;\">\n  <img src=\"https://cdn.sanity.io/images/55lcecww/production/471fc13bd3c6729878815306ba20951932fb9e6b-1074x477.png\" alt=\"Pipefy screenshot of AI prompt.\">\n</p>\n\n### Sample Testimonials for This Exercise \n\nThese are a few AI-generated testimonials with names from ChatGPT you can use to test the application.\n\n**Positive Testimonial:**\n\n*\"I've been working with ACME Manufacturing for over five years, and I can honestly say they are one of the best suppliers in the industry. Our company, **GlobalTech Solutions**, has demanding production schedules, and ACME has consistently provided the quality materials we need, right on time. The team at ACME goes above and beyond to understand our specific requirements and has even customized some of their processes to better fit our needs. This flexibility has been a huge asset for us, especially as we've grown and had to scale up production. The quality control at ACME is top-notch, and we rarely, if ever, find defects or issues with their products. I also want to mention how great their customer service team is – any time we've had a question or needed to make adjustments to an order, they've responded quickly and professionally. ACME Manufacturing has become a trusted partner for us, and I look forward to many more years of successful collaboration.\"*\n\n– **Sarah J.**, Procurement Manager, GlobalTech Solutions \n\n**Neutral Testimonial:**\n\n*\"Our experience with ACME Manufacturing has been mostly satisfactory, though there have been a few hiccups along the way. We chose ACME because of their reputation and competitive pricing, and they’ve generally lived up to that. Their products meet our specifications, and the quality is what we expected – no complaints there. The order processing and delivery have been reliable, although there was one instance where a shipment was delayed. The customer service team was responsive, but we didn't receive a clear explanation for the delay, which left us a little frustrated at the time. Overall, we continue to use ACME because they deliver solid products at a fair price, and we've only had one minor issue in the year we've been working with them. They might not be exceptional in all areas, but they get the job done well enough for us to keep coming back.\"*\n\n– **Michael R.**, Operations Director, BlueWave Components\n\n**Negative Testimonial:**\n\n*\"Our experience with ACME Manufacturing was, unfortunately, disappointing. We initially chose them for a large project at **InnoSteel Industries** because they offered competitive pricing and appeared to have a solid reputation. However, several aspects of our dealings fell short. Our first order was delayed by over two weeks, which caused major disruptions to our own timelines. When we contacted customer service to get updates, it was difficult to get a clear answer, and we were passed around to multiple representatives before anyone could provide us with real information. Additionally, when the materials finally arrived, we noticed several pieces did not meet the quality standards we’d specified. While ACME did eventually replace the defective items, this took additional time and cost us further delays. The experience as a whole was stressful and put us in a tough position with our own clients. Although ACME might work well for some, I would advise caution and make sure you have a backup plan in case things don’t go smoothly.\"*\n\n– **Daniel T.**, Project Manager, InnoSteel Industries\n\n## Actionable Tips for Future Builds\n\n1. Keep your automations simple, then begin testing and adding other desired functionality.\n2. Consider data integrity: Provide your AI with a clear prompt that highlights any constraints needed. Consider using a different automation when a strict rule is needed for field updates.\n3. Filter data inputs to ensure AI success. Consider the integrity of your data intake method and apply constraints to ensure data is well structured for AI consumption.\n4. Don’t fully trust the AI (yet). The AI might have been trained on the entire internet, but sometimes you need to monitor it, especially when running the Automation extensively. I like to use the test action provided by Pipefy, which allows for easy observation of outputs and prompt tweaking.\n\n## Useful Resources\n\nStarter Account\n[Pipefy Licensing Breakdown with Link to Free Starter Account](https://www.pipefy.com/pricing/)\n\n\nBeginner Certification (Free with account)\n[Pipefy Process Manager Certification](https://pipefyacademy.teachable.com/p/process-management-certification)\n\n\nPipefy AI Course (Free with account)\n[Artificial Intelligence with Pipefy AI](https://pipefyacademy.teachable.com/p/pipefy-artificial-intelligence)\n","slug":{"current":"pipefy-ai-mini-build"},"categories":[{"id":"-f68d4f8a-0604-5b70-a9d0-441d118b24ba","title":"Pipefy Knowledge Center","slug":{"current":"pipefy-knowledge-center"}}]}},{"node":{"id":"-92e078ad-d883-5ca1-8c1e-770a898348a2","title":"Tables, Fields, and Relationships in Quickbase | BEGINNER","metaDescription":"This guide will explain what tables, fields, and relationships are in Quickbase and how to set them up to build efficient and easy-to-manage applications.","body":"Tables and fields are foundational building blocks of a database in [Quickbase](https://quandarycg.com/quick-base-solutions/). \n\nTables store data in a row/column format, similar to a spreadsheet. Relationships connect tables to map data together. These elements help you organize related information so it is easy to access and manage.\n\nUnderstanding these basics will help you build a solid foundation for[ your Quickbase app](https://quandarycg.com/quandary-build/) to support your organization’s needs.\n\n## Understanding Tables in Quickbase\n\n### What Are Tables?\nTables are where all your data lives in Quickbase. Think of them as groups or containers that store information in rows and columns. Each row represents a unique record, and each column represents a field in the record that holds a specific type of information.\n\n*Example:* A table that contains employee data for a company will have a row for each employee and columns representing employee information such as employee number, name, address, job title, and phone number.\n\n<p style=\"margin: 20px 0; text-align: center;\">\n  <img src=\"https://cdn.sanity.io/images/55lcecww/production/a987e068cdb5d04a3fcb0a9a5c96aba3b8697d86-1147x591.png\" alt=\"This screenshot of a Quickbase table highlights which sections are the fields and records on a table.\">\n</p>\n\n### Why Use Tables?\n\nUsing tables allows you to separate different types of data so your database stays organized. \n\nFor example, you can create an “Employees” table to store basic employee information and a “Payroll” table to track monthly payroll. Instead of creating a new table for each employee, you would add each individual employee as a separate record in the “Employees” table. \n\nGrouping data in this way makes it easy to manage.\n\n### Table-to-Table Relationships\n\nUsing database tables and relationships improves efficiency by allowing you to enter data once and reuse it multiple times throughout your app. This is known as a [table-to-table relationship](https://helpv2.quickbase.com/hc/en-us/articles/4570287263636-What-are-table-to-table-relationships).\n\nFor example, you can create a relationship between the “Employees” and “Payroll” tables, where one employee can have multiple monthly payroll records (a one-to-many relationship). This relationship will allow you to link a payroll record to the appropriate employee so you can create a new payroll record without having to re-enter the employee’s information each time. \n\n## How to Create a Table from Scratch in Quickbase\n\n### Tips Before You Start\n<ul style=\"list-style: disc\">\n    <li>If you find yourself entering the same type of data repeatedly, consider creating a table.\n</li>\n    <li>Keep table names short and consistent for easy reference.\n</li>\n    <li>Add a description in the table settings to help provide insight into each table’s purpose and usage.</li>\n  \n</ul>\n\nUsing [Quickbase’s new navigation](https://helpv2.quickbase.com/hc/en-us/articles/25457213788692-Updates-to-Quickbase-navigation), you can create a table in one of two ways:\n\n### Option A: Using the Visual Builder\n\n1. From the [My Apps page](https://helpv2.quickbase.com/hc/en-us/articles/4570317651220-What-is-the-My-Apps-Page), open the app to which you want to add a table.\n2. Click **App Settings** in the sidebar or from the App Home page.\n\n<p style=\"margin: 20px 0; text-align: center;\">\n  <img src=\"https://cdn.sanity.io/images/55lcecww/production/512a67f26090c57704b98bf4e029b2a9b9f767dd-640x428.png\" alt=\"Quickbase screenshot showing where users can find the App Settings button.\">\n</p>\n\n3. Click on **Structure** to open the Visual Builder.\n <p style=\"margin: 20px 0; text-align: center;\">\n  <img src=\"https://cdn.sanity.io/images/55lcecww/production/d4576979223605a9b92e8c30ef2723d5a2f6043a-767x558.png\" alt=\"Quickbase users can find the Structure button thanks to this screenshot.\">\n</p>\n4. From the left column, drag and drop the table element onto the canvas to add a new table. \n<p style=\"margin: 20px 0; text-align: center;\">\n  <img src=\"https://cdn.sanity.io/images/55lcecww/production/ad54d0447684720181ef809bad4574ee1cbf62fc-803x466.png\" alt=\"Quickbase screenshot showing users where to click to add a new table.\">\n</p>\n\n5. Enter the **Table Name** and **Description** (optional).\n<p style=\"margin: 20px 0; text-align: center;\">\n  <img src=\"https://cdn.sanity.io/images/55lcecww/production/0b42cc994672a1d2befb98eb4b8217b54e818a76-900x392.png\" alt=\"Quickbase screenshot showing where users can add details when creating a new table.\">\n</p>\n\n6. Click **Exit** when you are finished. All changes are saved automatically.\n<p style=\"margin: 20px 0; text-align: center;\">\n  <img src=\"https://cdn.sanity.io/images/55lcecww/production/4849e7fb8cba75f9447e62eedddd3cff85b03059-621x429.png\" alt=\"Screenshot showing where the Exit button is in Quickbase when users are creating a new table.\">\n</p>\n\n### Option B: Using the New Table Feature\n\n1. From the [My Apps page](https://helpv2.quickbase.com/hc/en-us/articles/4570317651220-What-is-the-My-Apps-Page), open the app to which you want to add a table.\n2. Click the + button in the Tables section on the sidebar to add a new table.\n<p style=\"margin: 20px 0; text-align: center;\">\n  <img src=\"https://cdn.sanity.io/images/55lcecww/production/5dff4f0ebe1df6a08b947cf8c87e174571796ad8-543x382.png\" alt=\"Quickbase screenshot showing an alternative way to start the setup of creating new tables.\">\n</p>\n3. Click on **From scratch**.\n<p style=\"margin: 20px 0; text-align: center;\">\n  <img src=\"https://cdn.sanity.io/images/55lcecww/production/d5f3e3cb9b7711901ced2e84d8e3a8b0ed0aff81-542x406.png\" alt=\"Quickbase screenshot showing a user select From scratch when creating a new table.\">\n</p>\n4. Enter the **Table name**.\n<p style=\"margin: 20px 0; text-align: center;\">\n  <img src=\"https://cdn.sanity.io/images/55lcecww/production/393e67e6dea671bcc7ab39a7830d540253714287-550x480.png\" alt=\"Quickbsae screenshot showing where users can add a table name.\">\n</p>\n5. Select an icon that best represents your table. Quickbase will suggest icons based on your table name.\n<p style=\"margin: 20px 0; text-align: center;\">\n  <img src=\"https://cdn.sanity.io/images/55lcecww/production/b0ccc105033936ad95ba4a2064f49a9c20cb0f40-610x434.png\" alt=\"Screenshot in Quickbase showing how you can set up icons.\">\n</p>\n6. Enter a single record name (e.g., \"Employee\").\n<p style=\"margin: 20px 0; text-align: center;\">\n  <img src=\"https://cdn.sanity.io/images/55lcecww/production/75d0495895e157001cc1a32bd550bf6a3fc58a5e-584x369.png\" alt=\"Quickbase screenshot showing a record being named.\">\n</p>\n7. Add a description (optional).\n<p style=\"margin: 20px 0; text-align: center;\">\n  <img src=\"https://cdn.sanity.io/images/55lcecww/production/122210dc53ac31f94c94e45c5ad4a9a9825adeb0-643x442.png\" alt=\"Quickbase screenshot showing a table description being added.\">\n</p>\n8. Click **Create Table** to save your changes and add the new table to Quickbase.\n<p style=\"margin: 20px 0; text-align: center;\">\n  <img src=\"https://cdn.sanity.io/images/55lcecww/production/a2c1507edcf69aa0935a48490369e64cec5326af-469x290.png\" alt=\"Quickbase screenshot showing users which button to click when they want to create a new table.\">\n</p>\n\n## Understanding Fields in Quickbase\n\n### What Are Fields?\n\nFields are the columns within a table that store data points for each record. They are where you enter the details for each record and define the type of data that goes into your table, such as text, date, number, etc. Fields are crucial because they keep the information in each record organized and ensure the data remains consistent across the table. \n\n*Example:* An “Employees” table might include fields for Employee Number, Name, Address, Job Title, and Phone Number. Each represents information that applies to every employee record in the table.\n\n### Why Use Fields?\n\nFields help you organize data in a record that is easy to understand and use. Avoid replicating fields when the data already exists in the database. \n\nFor example, do not create an additional Employee Name field in the Payroll table since this information is already stored in the Employees table. Instead, you can use the table-to-table relationship to add a lookup field in the Payroll table that displays the Employee Name from the Employees table.\n\n## How to Create Fields in Quickbase\n\n### Tips Before You Start\n\n<ul style=\"list-style: disc\">\n<li>Field names should be consistent across the application.</li>\n<li>Names should be short and descriptive.</li>\n<li>Add a field description in the field settings to explain the purpose of the field.</li>\n<li>Do not forget to list any dependencies, formulas or notes (if they are an important part of a specific process, such as a pipeline, webhook, or code page).</li>\n</ul>\n\nSimilar to Tables, there are two ways to create Fields in Quickbase:\n\n### Option A: Using the Visual Builder\n1. From the [My Apps page](https://helpv2.quickbase.com/hc/en-us/articles/4570317651220-What-is-the-My-Apps-Page), open the app to which you want to add a table.\n2. Click **App Settings** in the sidebar or from the App Home page.\n\n<p style=\"margin: 20px 0; text-align: center;\">\n  <img src=\"https://cdn.sanity.io/images/55lcecww/production/8d6f80ae91072d94ef3467f1c1b1c2dfbb8c2548-523x350.gif\" alt=\"Quickbase screenshot showing where users can find the App Settings button.\">\n</p>\n\n3. Click on **Structure** to open the Visual Builder.\n<p style=\"margin: 20px 0; text-align: center;\">\n  <img src=\"https://cdn.sanity.io/images/55lcecww/production/ea2e4f68f7c34dac3ef8497928961900aea2856a-523x372.gif\" alt=\"This is where users can find the Structure button in Quickbase.\">\n</p>\n4. From the left column, drag and drop the desired field type into the table where you want to create fields.\n<p style=\"margin: 20px 0; text-align: center;\">\n  <img src=\"https://cdn.sanity.io/images/55lcecww/production/5f095696090962b967c804c6113fd68414a66aad-592x470.png\" alt=\"Screenshot showing where users need to drag and drop a field to create it.\">\n</p>\n\n5. Enter the Field name.\n<p style=\"margin: 20px 0; text-align: center;\">\n  <img src=\"https://cdn.sanity.io/images/55lcecww/production/863f9bb55901e3b71eb4ccc11e761067a3b7cb0e-776x513.png\" alt=\"Screenshot showing where users can name a new Field in Quickbase.\">\n</p>\n6. You can also use the add field options within the table to add a field name and choose a field type.\n<p style=\"margin: 20px 0; text-align: center;\">\n  <img src=\"https://cdn.sanity.io/images/55lcecww/production/1e020915500309e272bc58f6aeb1a63c527d52ad-477x351.png\" alt=\"Quickbase screenshot showing field options during setup.\">\n</p>\n7. Repeat steps 4 and 5 or 6 for additional fields.\n8. Click **Exit** when you’re finished. All changes are saved automatically.\n<p style=\"margin: 20px 0; text-align: center;\">\n  <img src=\"https://cdn.sanity.io/images/55lcecww/production/a8b096dfcba937060c1b7e58a3ae0af15ddff649-668x507.png\" alt=\"Quickbase screenshot showing where the Exit button is when they're done setting Fields up.\">\n</p>\n\n## Option B: Using the Table Settings\n\n1. In the sidebar, click the three dots next to the table you want to add fields to.\n<p style=\"margin: 20px 0; text-align: center;\">\n  <img src=\"https://cdn.sanity.io/images/55lcecww/production/696ac0a0f86d651b63af5f38248cbe46850ec902-428x281.png\" alt=\"Quickbase screenshot showing an alternative way to set up a new field.\">\n</p>\n2. Click on **Fields**.\n<p style=\"margin: 20px 0; text-align: center;\">\n  <img src=\"https://cdn.sanity.io/images/55lcecww/production/83f8a621136f0457155961a5b9ca2f881e8f0f8f-508x418.png\" alt=\"Quickbase screenshot step-by.step guide to setting up a new field.\n\">\n</p>\n3. Click on + **New Fields**.\n<p style=\"margin: 20px 0; text-align: center;\">\n  <img src=\"https://cdn.sanity.io/images/55lcecww/production/b03cfd98985dd1547ce058c82f74e1bd59780429-416x267.png\" alt=\"Quickbase screenshot showing where the New Fields button is.\">\n</p>\n4. Enter a Field name\n<p style=\"margin: 20px 0; text-align: center;\">\n  <img src=\"https://cdn.sanity.io/images/55lcecww/production/22ee824da3aeae32af095d49f1fd3009611d69af-512x342.png\" alt=\"Screenshot showing a user name a new field in Quickbase.\">\n</p>\n5. Select the appropriate field type from the drop-down.\n<p style=\"margin: 20px 0; text-align: center;\">\n  <img src=\"https://cdn.sanity.io/images/55lcecww/production/ea5ca6a187e1b4edea9c6e8bd5a7ebaf33de3b78-655x515.png\" alt=\"Dropdown options for setting up a new field in Quickbase.\">\n</p>\n6. After entering the field name and type, Quickbase will automatically add a row below, allowing you to enter details for the next field. Repeat this process to add as many fields as needed.\n<p style=\"margin: 20px 0; text-align: center;\">\n  <img src=\"https://cdn.sanity.io/images/55lcecww/production/0bc763590ee2a1387ff0c4023a0038df3d2096a2-457x339.png\" alt=\"How to add labels to your fields in Quickbase.\">\n</p>\n7. When you have added all fields, select the Add Fields button.\n<p style=\"margin: 20px 0; text-align: center;\">\n  <img src=\"https://cdn.sanity.io/images/55lcecww/production/fce4afc3784fe126689bb850a274aafd390e5e3b-417x288.png\" alt=\"The final step of setting up a field in Quickbase.\">\n</p>\n\n## Keep Your Quickbase Data Organized with Tables\n\nTables organize different types of data, fields define specific details for each record, and relationships link tables to avoid data duplication. Following these practices helps you create a Quickbase app that is efficient, scalable, and easy to manage.\n\n","slug":{"current":"quickbase-tables-fields-relationships"},"categories":[{"id":"-51554930-c85d-504e-b1fc-9e93b25a4991","title":"Fields & Formulas","slug":{"current":"quick-base-fields-and-formulas"}}]}},{"node":{"id":"-f93bbfd5-20bd-5f4e-a308-fad3447ab9f7","title":"Setting up a Subscription | BEGINNER","metaDescription":"Subscriptions allow you to send a report to yourself or others on a scheduled basis. Learn how to set up in this simple 4 step Quickbase guide.","body":"**Subscriptions** allow you to send a report to yourself or others on a regularly scheduled basis.\n\n✓ Email a report of unapproved time-off.\n\n✓ Email a report of open projects.\n\n✓ Email a list of tasks with a status of ‘in-progress’.\n\n> EDITORS NOTE:\nSubscriptions can only be sent to users of your application\n\nLet’s say you’re a project manager and would like to have a list of tasks with a status of ‘in-progress’ emailed to you on a daily basis so everyone can have their finger on the pulse of the project.\n\n1. Start by going to the table where your task records are contained. Then, click the ‘Settings’ link in the upper-left corner of the page\n2. Once there, find the option for Notifications, Subscriptions, and Reminders.\n3. Click ‘New’ and a pop-up box will appear. Select ‘Subscription’ and click the button labeled ‘Create’.\n4. You will now be presented with a few simple options to configure your subscription..\n\n\n1. Subscription Name: Enter a name for your subscription.\n   - Select Report: You can select from any report in your table\n2. Deliver by Email: Select the frequency the email is sent – in this case daily.\n3. Deliver To: Select the recipient of the email. In this case I chose myself. If you wanted to add yourself, as well as additional team members to your subscription, choose the option ‘A list of users” and enter the individual emails of the intended recipients\n\n![](https://res.cloudinary.com/dnla85pdq/image/upload/v1580794478/QuandaryCG/sub-begin-01.png)\n\n5. You may also customize the email your recipients receive by updating Email Options.\n\n\n1. Change the ‘From Address’ to control the sender listed on your subscription email.\n2. Edit your email subject line or message text.\n3. Send your email with the report embedded inline, or change this default option to attach either a PDF or CSV files (This option can be particularly useful if you want to send files to a storage folder or other system via email).\n\n![](https://res.cloudinary.com/dnla85pdq/image/upload/v1580794478/QuandaryCG/sub-begin-02.png)\n\n* * *\nFor more information regarding triggered emails in Quickbase, checkout our articles on [Notifications](/knowledge-base/notifications-subscriptions-reminders/setting-up-a-notification-beginner/) and [Reminders](/knowledge-base/notifications-subscriptions-reminders/setting-up-reminders-beginner/).\n* * *","slug":{"current":"setting-up-a-subscription-beginner"},"categories":[{"id":"-00366782-bad9-5d54-90e3-d3f86c145de0","title":"Notifications/Subscriptions/Reminders","slug":{"current":"notifications-subscriptions-reminders"}}]}},{"node":{"id":"-be685b54-dbed-5ec4-b53b-447150b89b81","title":"What is Workato | BASICS","metaDescription":"Let’s start with a common problem many companies have. In a world where software platforms have become a dime a dozen and different companies have 10 different systems that all do very specific functions – you wind up in situations where you have data all over the place. You have Salesforce for all of your …","body":"Let’s start with a common problem many companies have. In a world where software platforms have become a dime a dozen and different companies have 10 different systems that all do very specific functions – you wind up in situations where you have data all over the place.\n\nYou have Salesforce for all of your sales activities, Asana to manage your day to day projects, NetSuite to handle your accounting, and Google Sheets just because someone in your HR department likes to put together lists in an Excel format. The above example might seem bizarre to some, or par for the course to others.\n\nIf you’re in the latter camp – where the above sounds just like your company, you’ve likely wondered what it would be like if they could all talk to each other. An unreasonable amount of time is spent re-entering data between systems. Wouldn’t it be great to have an easy way that when sales closes a new deal in SalesForce, that a new project is started in Asana and your project team can hit the ground running? No time spent re-entering, no errors made.\n\nEnter <a href=\"https://www.workato.com\" target=\"_blank\">Workato</a>, think work automation, a market leading iPaaS (Integration Platform as a Service). While it sounds like a lot – at its core, what Workato provides is an integration engine. It has built in connectors to integrate with a borderline infinite number of systems, ranging from enterprise solutions like Oracle, to workplace chat pioneer, Slack.\n\nWhat does that actually mean? Workato essentially takes all the ‘custom’ work out of integrations. Historically – if you wanted to make systems talk, you needed custom code and servers to have the pull and push data from one place to another. With Workato – you, a newly minted integration specialist, can log in – pick which systems you want to start with – sign yourself into those systems – and start making them talk to one another using what are called ‘Recipes’.\n\n‘Recipes’ are the user friendly interface that Workato has built to provide you with a step by step of what your integration should do. Each recipe starts with a ‘trigger’, dictating the ‘when’ your integration kick starts. It can be on a schedule, when you push a button, when someone edits an existing lead or job in your system, etc. Each recipe can then have one or more ‘actions’ – these are the actual step by step procedures that you actually want performed via your recipe. Actions might be things like creating a new Task in Asana, logging a new Deal in Salesforce, sending an automatic email through outlook when statuses change. Actions are the actual work happening behind the scenes to accomplish you end goal.\n\nSo take the example from above – your sales team closes a deal in Salesforce – this is your trigger. With Workato – that trigger event is picked up almost immediately. Next – Workato looks at that, and the first action is to download any files that you’ve put in the Deal in SalesForce, and then create a brand new project in Asana with all of the supporting documents as attachments as another action. As a final action – Workato sends a message to your Slack channel, and alerts everyone that a new project is created, with a link to assign it.\n\nEverything from the above is an out-of-the-box feature of Workato, with no coding experience required. It provides a front-end to connect with all of these systems and many more, and all you have to do is sign in to get started. For the more advanced users, Workato has customized HTTP connectors which allow for code and custom development. This means as an integration specialist, you’re able to create more robust recipes with any system that has an API available. The opportunities are endless.\n\nTo learn more about the capabilities of Workato with helpful step-by-steps, visit our other [Workato](/knowledge-base/workato-knowledge-center/) articles!","slug":{"current":"what-is-workato-basics"},"categories":[{"id":"-19639513-515e-5bd2-b0ac-4fddcab7d3be","title":"Workato Knowledge Center","slug":{"current":"workato-knowledge-center"}}]}},{"node":{"id":"-698f3dc9-b6c7-52c6-8bfd-d434780a2096","title":"Google Maps for Data Visualization","metaDescription":"Using the Google Maps API in a Code Page removes limitations associated with Quickbase's native Map Report option. Learn how to customize your maps efficiently.","body":"Maps are a very useful way to convey location details in your applications. Quick Base offers a native **Map Report** option which can be great for doing this, however, it does have some drawbacks.\n\n✓ Limited to 100 locations. Will default to first 100 based on sorting filter.\n\n✓ Only display data from a single table.\n\n✓ Provide limited record details.\n\n✓ Cannot drive workflow.\n\nUsing the **Google Maps API** in a **Code Page** removes these limitations and allows you to create awesome maps with more detail and workflow power. Including but not limited to the following:\n\n✓ Unlimited number of locations can be displayed (use at your discretion, crowded maps can look UGLY)\n\n✓ Display data from any table.\n\n✓ Display any fields from any record.\n\n✓ Drive workflow by allowing users to add/edit/delete data using the map UI.\n\n* * *\n\n### EXAMPLE: Custom map using Quick Base data\n\n![](https://res.cloudinary.com/dnla85pdq/image/upload/v1580197361/QuandaryCG/google-map-01.png)\n\nThe map above combines data from an **Employees** table and a **Projects** table. Address fields are converted to lat/long values allowing the Quick Base records to become pins on the map. Project Managers can view locations and detailed information and assign Employees to Projects directly from the map interface. This is just one of the many ways custom maps can provide data visualization and drive workflow from a single interface.\n\n> BEST PRACTICE:\nWhen working with the Google Maps API, you must convert Address Fields to latitudinal/longitudinal values. Although this can be accomplished on the client-side, there are API call limits that can interfere with the loading process. If possible, use a server-side script to geocode your Address Fields and write to lat/long fields in your record. This will dramatically increase your map’s responsiveness. For more on the Google Maps API, check out their <a href=\"https://developers.google.com/maps/documentation/s://developers.google.com/maps/documentation/\" target=\"_blank\">documentation</a>.\n\n* * *\n\nQuick Base dashboards allow you to add **Code Page widgets**, meaning you can easily place a custom map on any user’s Home page. Check out our article on [Adding Reports to Dashboards](/knowledge-base/reporting-and-dashboards/adding-reports-to-dashboards-beginner/) to learn how to get started.\n\n* * *","slug":{"current":"google-maps-for-data-visualization"},"categories":[{"id":"-dc095853-fb86-5354-8647-e35dd8636ed2","title":"Quickbase Outside Of The Box","slug":{"current":"quick-base-outside-of-the-box"}}]}},{"node":{"id":"-422a1316-baf1-5803-86c4-c2d37c320881","title":"Using Rich Text to make your Dashboard Pop | BEGINNER","metaDescription":"Utilize Rich Text elements to show people what makes your business unique. Learn how to customize your company's style with this quick guide.","body":"Part of the overall experience when using a dashboard is the branding and messaging that it contains by using Rich Text elements. These are the elements that make it look and feel like its your company system when people log in. Some common examples of ways you might add your own company style and personal touch include:\n\n✓ Adding your company logo or application name\n\n✓ Providing instructions or how to’s to your end user\n\n✓ Adding additional imagery or styled text to make your homepage more appealing\n\nTo add Rich-Text to to your dashboard:\n\n1. From the Home Page – click ‘Customize this Page’\n2. Drag the icon at the top of the page for ‘Text’ and drag it onto your home page where you’d like to place it\n3. With your new text widget, you can start typing or utlizing the various attributes available, like changing font size/color/style, adding images, links etc. Think of a Word doc – if you would think about doing it there – you can try it here.\n\nA short video is shown below to walk through the above\n\n<iframe src=\"https://res.cloudinary.com/dnla85pdq/video/upload/v1580708275/QuandaryCG/using-rich-text-vid.mov\" style=\"border:0px #ffffff none;\" name=\"myiFrame\" scrolling=\"no\" frameborder=\"1\" marginheight=\"0px\" marginwidth=\"0px\" height=\"400px\" width=\"600px\" allowfullscreen></iframe>\n\nFor more – check out using the [Dashboard Side Bar](/knowledge-base/reporting-and-dashboards/utilizing-the-dashboard-side-bar-beginner/)","slug":{"current":"using-rich-text-to-make-your-dashboard-pop-beginner"},"categories":[{"id":"-27382539-ae20-5f0a-ace9-391d7b9a149f","title":"Reporting & Dashboards","slug":{"current":"reporting-and-dashboards"}}]}},{"node":{"id":"-06190cd6-f160-5109-bd41-ff9b27af5062","title":"Setting Up Report and Chart Types in Quickbase | BASICS","metaDescription":"Reports and charts are effective tools to display and view your data in Quickbase and provide valuable insights need to improve processes. Learn more.","body":"Reports and charts are effective tools to display and view your data in Quickbase and provide the valuable insight you need to improve processes, be more efficient, and plan the next steps.\n\nThe main challenge with using charts is selecting the correct type from the wide variety available in Quickbase. It can be difficult to understand the strengths and weaknesses of each chart and report type. \n\nMany people will either decide off the cuff which looks the nicest or stay in their comfort zone by overloading their dashboard with table, pie, or vertical bar charts. It's important for users to use the most effective chart to display their data results.\n\nThis article will review basic report and chart types and when to successfully implement them into Quickbase. Let’s get started!\n\n## Benefits of Quickbase Reports and Charts\nReports and charts in Quickbase let you:\n\n✓ Be more specific with which records you want to view.\n\n✓ Place and order your records exactly as you want.\n\n✓ Be creative in designing the layout and set colors to highlight your purpose.\n\n✓ Allow users the opportunity to choose which data they want to see.\n\n**In this article, we will cover the following reports and charts available in Quickbase and when to use them. The reports and charts we will be discussing are:**\n\n✓ Table Reports\n\n✓ Kanban Reports\n\n✓ Summary Reports\n\n✓ Grid Edit Reports\n\n✓ Map\n\n✓ Calendar\n\n✓ Timeline\n\n✓ Chart (such as pie, bar, horizontal bar, line, and area charts)\n\n* * *\n\n## Quickbase Reports\n\n### Table Reports \n\nA table report is a list of records that consist of rows (each row is one record) and columns (fields). This is the most commonly used report in Quickbase and is great for listing records and managing/sorting data that best suits your needs.\n\n![](https://res.cloudinary.com/dnla85pdq/image/upload/v1580458175/QuandaryCG/report-and-chart-01.png)\n\n> EDITORS NOTE:\nWhile table reports can calculate totals and averages for you, these values themselves do not actually exist in a field within Quickbase.\n\n_To learn how to create a table report, see: <a href=\"https://help.quickbase.com/user-assistance/creating_a_table_view.html\" target=\"_blank\">Creating table reports</a>._\n\n### Kanban Reports\n\nA kanban report helps you manage large teams or projects across multiple stages and resources. It allows you to instantly view, share, update and act on work-in-progress tasks. \n\nThey make it easier than ever to keep your teams focused and productive. You can display work items as cards organized in columns, and instantly update progress by dragging cards. Calculated fields, color, and filtering dynamically update in real-time as well.\n\n![](https://res.cloudinary.com/dnla85pdq/image/upload/v1580458177/QuandaryCG/report-and-chart-02.png)\n\n_To learn how to create a kanban report, see: [Kanban Reports | BEGINNER](/knowledge-base/reporting-and-dashboards/kanban-reports-beginner/)_\n\n## Summary Reports\n\nSummary reports allow you to group and total records to help make sense of the data from many records in a table. \n\nYou can sort and group summary reports to specify which records should appear first, how all records should be ordered, and whether similar records should be grouped together.\n\n![](https://res.cloudinary.com/dnla85pdq/image/upload/v1580458175/QuandaryCG/report-and-chart-03.png)\n\n_To learn how to create  a summary report, see: [Creating a Summary Report | BEGINNER](/knowledge-base/reporting-and-dashboards/creating-a-summary-report-beginner/)_\n\n## Grid Edit Reports\n\nGrid edit reports are derived from table reports, but give you a style similar to an excel spreadsheet where you can make changes at will. Grid edit reports are helpful to users in your app to enter data more efficiently.\n\n![](https://res.cloudinary.com/dnla85pdq/image/upload/v1580458176/QuandaryCG/report-and-chart-04.png)\n\nHere are some features of grid edit reports:\n\n✓ The ability to delete multiple records at a time\n\n✓ Add multiple records at a time\n\n✓ Directly modify multiple records at a time\n\n✓ Fill down records\n\n✓ Copy and paste between cells\n\n_To learn how to create grid edit reports, see: <a href=\"https://help.quickbase.com/user-assistance/grid_edit.html\" target=\"_blank\">Grid edit</a>_\n\n### Map Reports\n\nMap reports can be created using tables with at least one address field. In Quickbase, some features can make map reports unique. \n\nFor example, when viewing a map report, hovering or clicking on a pin shows a pop-up dialog with basic information about that specific record. \n\nYou can click edit to update a record’s information or view to review the record's information. Pressing the get directions button will provide standard map directions in a separate tab.\n\n![](https://res.cloudinary.com/dnla85pdq/image/upload/v1580458176/QuandaryCG/report-and-chart-05.png)\n\n_To learn how to create map reports, see: <a href=\"https://help.quickbase.com/user-assistance/create_map_reports.html\" target=\"_blank\">Creating map reports</a>_\n\n### Calendar Reports\n\nSimply put, calendar reports let you view and manage all your events for a given day, week, or month in one place.\n\n![](https://res.cloudinary.com/dnla85pdq/image/upload/v1580458176/QuandaryCG/report-and-chart-06.png)\n\nHere are some features you can take advantage of in Quickbase for calendar reports:\n\n✓ Manage and switch between daily, weekly, and monthly views via tabs.\n\n✓ Directly manage events in the calendar view.\n\n✓ Ability to color-code events so you can tell at a quick glance what type of events or tasks are approaching. _To learn more about color-coding in reports, see here: [Color-Coding Rows in Reports | BEGINNER](/knowledge-base/reporting-and-dashboards/color-coding-rows-in-reports-beginner/)_\n\n✓  Ability to email calendar reports. This will send a report of the events that are visible to the sender.\n\nTo learn how to create calendar reports, see: <a href=\"https://help.quickbase.com/user-assistance/creating_a_calendar.html\" target=\"_blank\">Creating Calendar Reports</a>\n\n### Timeline Reports\n\nA timeline report is a graphic representation of records in relation to time. Each bar on a timeline represents the duration of an event based on the start/end times set. \n\nQuickbase allows you to gather records into groups. Please view an example of a timeline report below.\n\n![](https://res.cloudinary.com/dnla85pdq/image/upload/v1580458176/QuandaryCG/report-and-chart-07.png)\n\n_To learn on how to create a timeline report, see: <a href=\"https://help.quickbase.com/user-assistance/creating_a_timeline.html\" target=\"_blank\">Create a Timeline</a>_\n\n* * *\n\n##  Quickbase Charts\n\n### Pie Charts\n\nIf you want to show percentages in a certain category or any other type of proportional data, using a pie chart is a great way to illustrate this. For example, what department in a grocery store has the highest monthly sales? \n\nBelow you will find an example of what this might look like using a pie chart:\n\n![](https://res.cloudinary.com/dnla85pdq/image/upload/v1580457396/QuandaryCG/pie-reports-08.png)\n\nTo learn how to create a pie chart, see: <a href=\"https://help.quickbase.com/user-assistance/chart_view_pie.html\" target=\"_blank\">Getting Data into a Pie Chart</a>\n\n### Bar Charts\n\nBar charts are a great way to compare values. Which quarter was the best for business last year? Compare them all with a bar chart. Additionally, with bar charts, you can break down the bar chart data even further by using a series. \n\nFor example, if you owned a grocery store, in addition to comparing store sales for each month or quarter, you can include details like sales by department within each month.\n\n![](https://res.cloudinary.com/dnla85pdq/image/upload/v1580458177/QuandaryCG/report-and-chart-09.png)\n\nYou can also add a goal line to a bar chart to measure performance against, for example, sales of $5,000,000 per month.\n\n![](https://res.cloudinary.com/dnla85pdq/image/upload/v1580458177/QuandaryCG/report-and-chart-10.png)\n\n_To learn how to create a bar chart, see: <a href=\"https://help.quickbase.com/user-assistance/chart_view_bar_line_area.html\" target=\"_blank\">Get Data into Bar, Line and Area Charts</a>_\n\n### Horizontal Bar Charts\n\nHorizontal bar charts are similar in format and purpose to a bar chart but turned on their side. It comes down to preference on how you would like to display your data between a bar or horizontal chart.\n\n![](https://res.cloudinary.com/dnla85pdq/image/upload/v1580458177/QuandaryCG/report-and-chart-11.png)\n\n_To learn how to create a horizontal bar chart, see: <a href=\"https://help.quickbase.com/user-assistance/chart_view_bar_line_area.html\" target=\"_blank\">Get Data into Bar, Line and Area Charts</a>_\n\n### Stacked Bar Charts\n\nStacked bar charts are designed to help you simultaneously compare totals and notice sharp changes at the item level that are likely to have the most influence on movements in category totals.\n\nFor example, the image below shows monthly sales for the grocery store, just like the bar chart above. \n\nThe stacked bar chart below breaks each bar down into percentages by department, just like a pie chart would. The percentages **stack** up to form the total bar.\n\n![](https://res.cloudinary.com/dnla85pdq/image/upload/v1580458177/QuandaryCG/report-and-chart-12.png)\n\nRemember that the main purpose of a stacked bar chart is to enable a better understanding of the big picture, without much focus on details such as light changes.\n\n_To learn how to create a stacked bar chart, see: <a href=\"https://help.quickbase.com/user-assistance/chart_view_bar_line_area.html\" target=\"_blank\">Get Data into Bar, Line and Area Charts</a>_\n\n### Horizontal Stacked Bar Charts\n\nLike the horizontal bar chart, pictured in an earlier example, a horizontal stacked bar takes in the same data as a stacked bar but flips the format on its side.\n\n![](https://res.cloudinary.com/dnla85pdq/image/upload/v1580458177/QuandaryCG/report-and-chart-13.png)\n\n_To learn how to create a horizontal stacked bar chart, see: <a href=\"https://help.quickbase.com/user-assistance/chart_view_bar_line_area.html\" target=\"_blank\">Get Data into Bar, Line and Area Charts</a>_\n\n### Line Charts\n\nThe line chart is often used to visualize data changes over time by a series of data points connected with a straight line. Have sales of various products been increasing or declining? \n\nThe example below tracks a variety of grocery products over a period of a few months. In Quickbase, you have the ability to click each square to see the records that comprise that figure.\n\n![](https://res.cloudinary.com/dnla85pdq/image/upload/v1580458177/QuandaryCG/report-and-chart-14.png)\n\n> EDITORS NOTE:\nWhen using a line chart in Quick Base, there might be times when data is missing. When Quickbase encounters such an instance, you will see a dotted line. Quickbase treats it as a zero, but lets you know that it has no actual value for that x-axis point with a dotted line.\n\n_To learn how to create a line chart, see: <a href=\"https://help.quickbase.com/user-assistance/chart_view_bar_line_area.html\" target=\"_blank\">Get Data into Bar, Line and Area Charts</a>_\n\n### Line and Bar Charts\n\nA line and bar chart sounds exactly what the chart type is: a combination of features of both a bar and a line chart in one visual representation.\n\n![](https://res.cloudinary.com/dnla85pdq/image/upload/v1580458177/QuandaryCG/report-and-chart-15.png)\n\nHere are some examples you might use a line and bar chart to:\n\n✓ See how projects stack up against an average.\n\n✓ Provide a quick view of profitability across an organization.\n\n✓ Visualize seasonality in your data\n\n✓  Identify high or poor functioning areas within your organization.\n\n_<a href=\"https://help.quickbase.com/user-assistance/creating_a_line_and_bar_chart.html\" target=\"_blank\">To learn how to create a line and bar chart, see: Creating a Line and Bar Chart</a>_\n\n### Area Charts\n\nThink of an area chart as a combination of a line chart (track time component) and the proportion measurements of a pie chart. Area charts are a good choice to use when you want to show a trend over time but aren’t as concerned with showing exact values.\n\nFor example, should the grocery store continue to carry more variety of meat and seafood options, what percentage of sales do meat and seafood represent, and how have they performed over time.\n\n![](https://res.cloudinary.com/dnla85pdq/image/upload/v1580458177/QuandaryCG/report-and-chart-16.png)\n\nAn area chart, such as the one above, can help you see the numbers clearly.\n\n_To learn how to create an area chart, see: <a href=\"https://help.quickbase.com/user-assistance/chart_view_bar_line_area.html\" target=\"_blank\">Get Data into Bar, Line and Area Charts</a>_\n\n### Scatter Charts\n\nScatter charts (scatter plots) are used when you want to show the correlations and relationships within your data without regard to time. \n\nThis is a very powerful chart type that is effective when trying to show the relationship between variables (x- and y-axis). For example, a person’s weight and height. A good example of this can be seen below.\n\n![](https://res.cloudinary.com/dnla85pdq/image/upload/v1580458178/QuandaryCG/report-and-chart-17.png)\n\nThe data type in this chart is generally statistical or scientific and can suggest various kinds of correlations between the variables. \n\nRemember, correlations have two properties, direction, and strength. The direction is determined by whether the correlation is positive or negative, and the numeric value is determined by the strength of a correlation.\n\n_To learn how to create an area chart, see: <a href=\"https://help.quickbase.com/user-assistance/creating_a_scatter_chart.html?Highlight=scatter%20chart\" target=\"_blank\">Creating a Scatter Chart</a>_\n\n### Bubble Charts\n\nSimilar to a scatter chart, bubble charts communicate two dimensions of data: one, a numerical value visualized in the scale of its circular bubbles, and second in what each bubble represents. \n\nSimply put, larger bubbles equal larger values. Some good examples of when to use a bubble chart are:\n\n✓ Prospective sales opportunities per week by dollar value, the probability to close, and stage in the sales cycle.\n\n✓ Percentage of personal social networks and age range for those individuals.\n\n✓ Compare median household income, life expectancy, and total population.\n\n![](https://res.cloudinary.com/dnla85pdq/image/upload/v1580458178/QuandaryCG/report-and-chart-18.png)\n\n_To learn how to create a bubble chart, see: <a href=\"https://help.quickbase.com/user-assistance/creating_a_bubble_chart.html?Highlight=bubble%20chart\" target=\"_blank\">Creating a Bubble Chart</a>_\n\n#### Guage Charts\n\nUse a gauge chart to measure progress against a goal that you set, as the total annual sales.\n\nThe gauge displays in a single color but based on how you set up the chart, you can have certain milestones within your goal be represented by a particular color to help visually determine where you are currently at with your overall goal.\n\n![](https://res.cloudinary.com/dnla85pdq/image/upload/v1580458178/QuandaryCG/report-and-chart-19.png)\n\n_To learn how create a gauge chart, see: <a href=\"https://help.quickbase.com/user-assistance/creating_a_gauge_chart.html?Highlight=gauge%20chart\" target=\"_blank\">Creating a Gauge Chart</a>_\n\n### Funnel Charts\n\nA funnel chart is traditionally used to display progress through any process. For example, represent stages in a sales process or show the amount of potential revenue for each stage.\n\n![](https://res.cloudinary.com/dnla85pdq/image/upload/v1580458178/QuandaryCG/report-and-chart-20.png)\n\n_To learn how to create a funnel chart, see: <a href=\"https://help.quickbase.com/user-assistance/creating_a_funnel_chart.html?Highlight=funnel%20chart\" target=\"_blank\">Creating a Funnel Chart</a>_\n\n### Waterfall Chart\n\nA waterfall chart can be useful to illustrate a series of column graphs that show positive and negative values over time. The example below shows a starting amount, gains, and losses resulting in a closing balance:\n\n![](https://res.cloudinary.com/dnla85pdq/image/upload/v1580458178/QuandaryCG/report-and-chart-21.png)\n\n* * *\nTo find out more on how to leverage additional Quick Base functions and features, take a look at the rest of our Knowledge Center: [Knowledge Center](/knowledge-base/quickbase-knowledge-center/).\n* * *","slug":{"current":"report-and-chart-types-basics"},"categories":[{"id":"-27382539-ae20-5f0a-ace9-391d7b9a149f","title":"Reporting & Dashboards","slug":{"current":"reporting-and-dashboards"}}]}},{"node":{"id":"-8a677377-f48e-571e-9c22-4fb6f2c3ac92","title":"How to Connect Quickbase Pipelines with Salesforce","metaDescription":"Pipelines by Quickbase make it possible to integrate multiple systems and automate different actions in sequence once certain conditions are met. Learn more.","body":"In 2020, Quickbase purchased a product called CloudPipes and released a built-in tool called Pipelines. It’s a great way to integrate multiple systems and automate different actions in sequence once certain conditions are met. \n\nIn this article, we will be looking at how to connect Pipelines with the Salesforce CRM platform.\n\nFrom creating a Pipeline that will update data in both Salesforce and [Quickbase](/quick-base-solutions/) to search out the correct Opportunity or Contact in Salesforce from Quickbase, using both Salesforce and Quickbase together is now better than ever!\n\n## Follow these Steps to Connect Quickbase Pipelines with Salesforce\nBegin by going into “Manage my account” on your My Apps main page and go to the Pipelines tab.\n\n![](https://res.cloudinary.com/dnla85pdq/image/upload/v1589506192/QuandaryCG/salesforce-01.png)\n\nFrom there, scroll down to the Salesforce channel and click the slider on the right to turn the channel on.\n\n![](https://res.cloudinary.com/dnla85pdq/image/upload/v1589506191/QuandaryCG/salesforce-02.png)\n\n> Note: If you do not have access to the “Manage my account” option on your My Apps main page, contact your Realm or Account Admin about opening the Salesforce Pipeline channel.\n\nOnce an open channel has been confirmed, go to the Pipelines tab at the top of your window and select “Create new Pipeline”. \n\nNext, scroll down the list of channels on the right-hand side of your screen and select Salesforce. Then, click the “Connect to Salesforce” button.\n\n![](https://res.cloudinary.com/dnla85pdq/image/upload/v1589506192/QuandaryCG/salesforce-03.png)\n\nIf you are not already logged into the Salesforce account, you will be prompted to log in. From there, you'll need to authorize the connection to the Pipelines.\n\n![](https://res.cloudinary.com/dnla85pdq/image/upload/v1589506192/QuandaryCG/salesforce-04.png)\n\n> Note: Quickbase is only able to connect Pipelines to a single Salesforce org. Once a Pipeline connection is authenticated and authorized, every subsequent Pipeline created will use that channel and only that channel. Connecting to a different org may disrupt any previously created Pipelines.\n\nAfter a connection has been authorized the list of options for creating the pipeline will appear. These are similar to other pipeline actions and triggers for a Quickbase connection with one major difference. \n\nWhen querying several objects, or a filtered single object, all queries must be written out in the SOQL format in order for the Salesforce org to properly read the data.\n\n![](https://res.cloudinary.com/dnla85pdq/image/upload/v1589506192/QuandaryCG/salesforce-05.png)\n\n![](https://res.cloudinary.com/dnla85pdq/image/upload/v1589506192/QuandaryCG/salesforce-06.png)\n\nFor more information about how to correctly write out SOQL queries, follow the links below!\n\n- Salesforce Introduction to SOQL\n- <a href=\"https://developer.salesforce.com/docs/atlas.en-us.soql_sosl.meta/soql_sosl/sforce_api_calls_soql.htm\" target=\"_blank\">Salesforce API Calls SOQL</a>\n\nOnce the proper queries have been declared, you are ready to go on into more steps of the Pipeline and configure nearly any kind of automation that you like!\n\n![](https://res.cloudinary.com/dnla85pdq/image/upload/v1589506192/QuandaryCG/salesforce-07.png)\n\n## Why Use Quickbase Pipelines?\nThere is a multitude of possibilities on how to use Pipelines to [streamline your workflow](/tech-consulting/) using Quickbase connected to your Salesforce org.\n\nA good use case would be in using a Pipeline in conjunction with a Quickbase connected table that is getting data from a Salesforce org. The Pipeline could read the data and any updates from the connected table, then update the records in Salesforce accordingly. \n\nAnother example would be having a Pipeline that would automatically update any Knowledge articles about Salesforce into Quickbase as help files or training tips.\n\nBeing able to search records in both Salesforce and Quickbase just became much more efficient with Quickbase Pipelines.","slug":{"current":"quick-base-pipelines-connecting-with-salesforce"},"categories":[{"id":"-95a5c11c-fb39-526f-a713-ac5e88ca2f1d","title":"Pipelines","slug":{"current":"pipelines"}}]}},{"node":{"id":"-1ae7d708-88aa-5b2d-9a98-2131eaaf862a","title":"Quickbase Release Notes: September 2020","metaDescription":"The Quickbase Pipelines team has been hard at work enhancing the DocuSign channel. That is just one of the many enhancements coming in the September release","body":"## New Quickbase Features\n\n### 1. Pipelines Updates\n\n#### Significant DocuSign Channel Enhancements\n\nThe Quickbase Pipelines team has been hard at work enhancing the DocuSign channel. That is just one of the many enhancements coming in the September release:\n- The ability to connect to a demo account.\n- Filter events are based on the envelope subject.\n- Sending an Envelope for signature from the template step (all signees with their respective fields are visible, and the fields can be dynamically filled in with data from third-party services).\n- PATCH Method available in Webhook Channel\n\n#### Quickbase File Attachments\n\nThe Quickbase channel is now supporting File attachments, which will allow users to send file attachments, uploaded to Quickbase, external services, and upload attachments from external services to Quickbase.\n\n#### Fields Panel Search\n\nIn lieu of scrolling through a long list of fields, users can now search in the Fields Panel, per step, being output from a previous step in your pipeline.\n\n### 2. Report Updates\n\n#### More New Features for The New Table Report\n\nWith the new Save/Save As functionality, users can now save any modifications made to their table report as they work. \n\nQuickbase has updated the interaction and visual design to lessen accidental saving over standard report settings, all without changing the functionality of the old report.\n\n### 3. API Updates\n\n#### Improved RESTful API HTTP Status Codes\n\nQuickbase updated the HTTP status messages for RESTful API upsert requests to include HTTP 207 (Multi-Status) in the September release. The status provides a more accurate indication of variable success and failure of the request which previously returned HTTP 200 (OK) status.\n\n#### Edit RESTful API Summary and Lookup Fields\n\nBuilders can now modify the summary and lookup fields’ properties when modifying them in the /fields endpoint.\n\n### 4. Mobile Updates\n\n#### Mobile Offline Specific Forms\n\nQuickbase builders will now be able to designate a particular form to be displayed when a user is using offline mode in the Quickbase mobile app with the new Mobile Offline Specific Forms.\n\n### 5. Coming Soon\n\n#### Upcoming Change for Exchange Connections for Connected Tables\n\nMicrosoft will end Basic Authentication (username and password) access for Office 365 customers On October 13th, 2020. \n\nDue to Microsoft’s decision, Quickbase will soon be adding OAuth 2.0 as an authorization type for Exchange connections used by Quickbase Sync. Quickbase will send additional information to existing Exchange connection owners before this change.\n\n#### Updated Map Styles\n\nQuickbase will be modernizing the Map reports. \n\nAn important note about this upgrade: Quickbase will be retiring rarely used styles, which means Maps that use the retired styles will be migrated to the default report behavior. Quickbase will send notifications to users that will encounter this change.\n\n#### New Dashboards\n\nQuickbase’s new dashboards provide a modern interface and new functionality for users. Users can now filter across selected reports by field values in the underlying data and view collections of reports from across all of your Quickbase applications.\n\n#### New Table Report Experience\n\nThe new Table Report provides a modern interface to view, sort, filter, and group data when offline. To turn the feature on, users will use the toggle found at the top on each report.\n\n#### Audit Log API Access\n\nQuickbase is offering RESTful API access to Audit Logs for customers with that feature on their accounts.\n\nPlease check your profile in the <a href=\"https://qbearlyaccess.quickbase.com/db/bn5kksx3g\" target=\"_blank\">Early Access application</a>, or create a new one, to ensure Extending Quickbase is selected.\n\n## What’s Fixed in Quickbase\n\nBelow are the issues Quickbase fixed this month.\n\n**Note:** Platform security, billing changes, back-end tooling, and performance are all ongoing commitments. Each release may include changes in these areas:\n- Corrected a problem in the RESTful APIs with the Currency Field quietly accepting invalid strings.\n- Quickbase fixed an issue with tables not being deleted and errors being generated when saving changes to a sandbox environment.\n- Fixed an issue with the color of buttons for URL Fields not displaying in the new report.\n\nTo read in more about the entire September release and see the full list of issues fixed, <a href=\"https://help.quickbase.com/release-notes/september-2020-release-notes.html\" target=\"_blank\">click here</a>.","slug":{"current":"quick-base-release-notes-september-2020"},"categories":[{"id":"-b055b1e3-c062-5785-865b-8ca556d0886f","title":"Quickbase News","slug":{"current":"quick-base-news"}}]}},{"node":{"id":"-1407e422-e4bd-5e55-bfbf-94a26165519e","title":"How and When to Use Calculated Columns in Reports | BEGINNER","metaDescription":"Add a calculated column to any Quickbase report when the column is limited to a single report. Reduce the workflow clutter using these easy-to-follow steps. ","body":"#### Calculated Columns in Reports – Background\n\nA calculated column can be added to any Quick Base report.  They can be used to create anything a normal formula field could.  However, the new column is only defined within its report.  It is not a field in the Quick Base table and cannot be added to other reports (except if you create a calculated column in another report and copy the formula).\n\nThis limitation is actually incredibly useful.  Many times, a calculation only has to be performed once or it is only relevant for one report.  It does not make sense to create a new formula field in the table if the formula will only be used on one report.  If this inefficient practice is followed, eventually, there will be dozens of unnecessary, one-off formula fields that clutter up the field list of a table.  Calculated columns are an convenient solution to get the information you need while not adding too many formula fields to a table.\n\n> EDITORS NOTE:\nIf you find yourself copying and pasting the same calculated column into multiple reports, it may be time to create a new formula field in the table.\n\n#### Calculated Columns – Navigation\n\nFrom any report, click the ‘Customize this Report’ in the top, right-hand corner. \n\n✓ For Table, Grid Edit, and Timeline reports, scroll to the ‘Columns to Display’ section;\n\n✓ For Kanban reports, scroll to the ‘Card Details’ section;\n\n✓ For Summary reports, scroll to the ‘Summarize Data’ section;\n\n✓ For Chart and Calendar reports, scroll to the ‘Options’ section;\n\n✓ For the Map reports, scroll to the ‘Pin Details’ section.\n\n> EDITORS NOTE:\nFor Table, Kanban, Grid Edit, Map, and Timeline reports, the ‘Custom columns’ radio button must be checked. Then the ‘Define a calculated column’ checkbox can be checked and you can enter your formula.\n\nOnce a calculated column has been made, it can be used any way a normal field in a report can: summarized, grouped, filtered, sorted, etc.  The only additional limitation is the formula you write.\n\n![](https://res.cloudinary.com/dnla85pdq/image/upload/v1580701115/QuandaryCG/how-and-when-01.png)\n\nIf you want to learn more about writing formulas, check out these two articles: [Using If-statements in formulas](/knowledge-base/quick-base-fields-and-formulas/using-if-statements-in-formulas-intermediate/) and [Using the CASE function](/knowledge-base/quick-base-fields-and-formulas/using-the-case-functions-intermediate/)","slug":{"current":"how-and-when-to-use-calculated-columns-in-reports-beginner"},"categories":[{"id":"-27382539-ae20-5f0a-ace9-391d7b9a149f","title":"Reporting & Dashboards","slug":{"current":"reporting-and-dashboards"}}]}},{"node":{"id":"-8445dd5f-1584-5ddd-8edf-2b8e16076b00","title":"Switching a Client to a New Quickbase Developer | INTERMEDIATE","metaDescription":"Learn how to switch Quickbase level access and transfer applications, pipelines, webhooks, and table access to new users in this knowledge base article.","body":"You’ll eventually work with a new client who has existing projects in Quickbase. That’s the nature of development. Regardless, you should follow best practices to transition the client from the current developer to the new one. \n\nSometimes, the existing developer still works with the client and can help expedite the process, removing obstacles that would negatively impact new Quickbase users. Other times, you’ll need to walk your client through the process of finding the relevant items to ensure you can continue your work with minimal delays.\n\n## Background: Architecture and Logic\n\nYou need to understand the architecture and logic of the process before making any changes to a new client’s existing [Quickbase applications](https://quandarycg.com/quandary-build/).\n\nWhen a client retires a developer, you’ll need to transfer ownership of crucial elements to prevent delays and code issues that could render the application unusable. These include:\n\n- ◦ Pipelines\n- ◦ Webhooks\n- ◦ Notifications\n- ◦ User Tokens\n- ◦ Code Pages\n- ◦ Table Syncs\n\n \n&nbsp;\n \n\nOnce you address these transfers, you can focus on \"nice-to-have\" elements. These items will provide insight into the client's development status and highlight existing issues:\n\n- ◦ Technical Documentation\n- ◦ User Guides\n- ◦ Defect Lists\n- ◦ Manual Processes\n- ◦ Recent and Upcoming Changes\n- ◦ Key Stakeholders\n- ◦ Knowledge Transfers\n\n\n&nbsp;\n \n\n_**Note**: These may or may not be readily available from the departing developer._\n\nYou’ll ensure a smooth transition for the Quickbase application to the new developer by addressing these aspects of the project. This knowledge-base article will walk you through that process.\n\n## Getting Started With the Client Transfer: Six Levels of Access\n\nThe transition process consists of multiple levels of transferring. The client can provide three levels of access and three additional access levels to be aware of. You’ll need to consider these elements during the transfer process. \n\n**The six levels of access are:**\n\n- ◦ Realm Access \n- ◦ Account Level Access \n- ◦ Application Level Access \n- ◦ Table Level Access \n- ◦ Record Level Access \n- ◦ Field Level Access\n\n\n&nbsp;\n \n\nDepending on the client's needs, they can grant the consultant access at the realm, account, or application level. Ideally, the only access needed is the full account level access. \n\n[![Screenshot of Quickbase Access Controls: Realm, Full Manamagent Account Admins, Application Manager, and Application Admins illustrating level permissions and access.](https://cdn.sanity.io/images/55lcecww/production/6910ac53927fbfa16803360427217c441a9d5eed-365x512.png)](https://cdn.sanity.io/images/55lcecww/production/7c8f0647a3273d0c4df90ac32255480034ab5e6c-804x1129.png)\n\n### 1. Realm-Level Access: \n\nThis is the highest level of access control in Quickbase. Realm-level access controls apply to the entire Quickbase realm (i.e., the entire account). \n\nUsers with realm-level access can manage account-wide settings, users, roles, and permissions. They can create, delete, and manage applications within the realm. \n\n[![Screenshot of Quickbase Account and Realm Admin Access](https://cdn.sanity.io/images/55lcecww/production/6af00bb63b524ac3fbdd8069233429906c473673-418x512.png)](https://cdn.sanity.io/images/55lcecww/production/078543414cd6326d2c5bd8bb68589d1717332130-693x849.png)\n\n\nTypically, the client will not need to provide Realm Access to the consultant. However, access can provide useful insight into the transfer items over to the user like reviewing pipelines and webhooks. \n\n### 2. Account-Level Access:\n\nTechnically this is not a separate level of access. Still, specific users with administrative roles may manage account-wide settings and privileges. Account administrators can manage billing, subscription plans, and other account-related settings.\n\n_**Note:** Consultants do not necessarily need access to billing and subscription for development._\n\n### 3. Application-Level Access:\nWithin Quickbase, applications serve as containers for organizing and managing data. Clients may grant users access to specific applications based on their roles and permissions. Application-level access controls include the ability to create, modify, and delete records within the application.\n\n### 4. Table-Level Access:\n\nIn Quickbase, applications are composed of tables that hold specific types of data. Access to individual tables within an application can be controlled separately, and users may have various levels of access to different tables within the same application.\n\n### 5. Record-Level Access:\n\nQuickbase allows for fine-grained control over who can view, edit, or delete individual records within a table. You can base record-level access on criteria such as field values or user roles. Users may have various levels of access to different records within the same table.\n\n### 6. Field-Level Access:\n\nQuickbase also supports access control to specific fields within a table. You can restrict users from viewing or editing certain fields based on their roles or permissions. Field-level access control helps enforce data privacy and security policies.\n\n## App Transfer Process:\n\nYou can find the app transfer under the app settings → app properties and under the manager's name. The user can choose to transfer the application to the person who needs control. The intended user will receive a notification and control over the new application once this is done.\n\nWith access granted at the application level, the user can transfer the needed pieces (including webhooks, pipelines, emails, and table syncs.) \n\n[![Screenshot of Quickbase application properties for access transfer.](https://cdn.sanity.io/images/55lcecww/production/f8cb4f321d7234298986c6eb733609c120b2e4a4-512x120.png)](https://cdn.sanity.io/images/55lcecww/production/a2191ca7c79bffc8410e675d0e439c84f1a069ff-1600x375.png)\n\n_**Note:** These items will continue to work until you remove the owner from the application._\n\n## Pipelines Transfer Process:\n\nPipeline ownership happens at the administrative level. You must grant users permission to access pipelines. \n\n1. Previous users should refresh the schema and Fix any issues that occur.\n2. Export the pipeline as a YAML. \n\n[![Screenshot of Quickbase Pipelines Designer Showing How to Transfer Access and Refresh Schemas](https://cdn.sanity.io/images/55lcecww/production/55fe0692bcf813b0147a9ffda31c4eb170797bed-348x512.png)](https://cdn.sanity.io/images/55lcecww/production/3c769ff988edfddf15e51a996b0087b0babf67f1-539x793.png)\n\n3. The new user should create a new pipeline to capture the account slug. \n\n[![Screenshot Showing How to Create a New Pipeline to Capture Account Slug YAML in Quickbase](https://cdn.sanity.io/images/55lcecww/production/b8dfd1e27eac53823df326a3ac02cc09b3067010-512x408.png)](https://cdn.sanity.io/images/55lcecww/production/b920225284819e82663f76f54e52b121d0ad914c-999x796.png)\n\n4. Importing the Pipeline consists of selecting the Import pipeline on the Pipeline’s screen and then uploading a YAML File. If any issues exist in the uploaded YAML File, the import will not work. If a correct YAML has been downloaded from Quickbase and then re-uploaded, this tool will correctly identify the existing name and tags associated with the pipeline so one does not need to rename it. \n\n[![IScreenshot Showing How to Create Pipeline in Quickbase](https://cdn.sanity.io/images/55lcecww/production/047250574f81af2a65101c619c2b7175da635204-512x247.png)](https://cdn.sanity.io/images/55lcecww/production/59054a0483848cc778ad02d2b7aff06f6e546a6c-1208x582.png)\n\n5. Once completed, you should run the process of turning off and turning on the new pipeline in a meeting in case any issues arise.\n\n[![Screenshot Showing How to Toggle Quickbase On/Off for new Pipeline in Case Issues Arise.](https://cdn.sanity.io/images/55lcecww/production/23543f741c794d6b9e221cb6a45d021b8051d448-512x93.png)](https://cdn.sanity.io/images/55lcecww/production/40ea2874a2754ab889297b412061a094a4d53ce5-1011x183.png)\n\n_**Note:** Pipelines are user-based, so Realm access may be necessary to view all pipelines_\n\nDocumentation of pipelines is helpful for coordinating transition efforts. Additionally, it can serve as a general guide to anyone using the application. \n\nUtilizing another table for storing the pipelines YAML and providing details that describe the process flow is useful for maintaining pipelines because it creates a backup in case there are issues with Quickbase and creates version control (this does not currently doesn’t exist inside the Pipeline page.)\n\nSome pipelines may need to call a webhook or another application. To do so, the user would need to update the alias/user token and have sufficient permission control to run the pipeline.\n\n## Webhooks Transfer Process: \n\n_[∗To be deprecated by Quickbase by End of 2024∗](https://helpv2.quickbase.com/hc/en-us/sections/4572545802900-Webhooks)_\n\nWebhooks are like pipelines in the sense that they need to have an updated alias or user token to work. Once the new token is in place, then ownership and has been updated in the webhook code or the pipeline callable webhook code, then it has been transferred to the new user.\nThe user token can be found or generated [here](https://helpv2.quickbase.com/hc/en-us/articles/4570374095124-Creating-and-using-user-tokens#:~:text=You%20can%20create%20your%20own,URL%2C%20and%20also%20with%20API_GrantedDBs.). \n\n## Connected Tables/Sync\n\nYou may transfer tables connected to another application. This is under → “Settings” → “Quickbase  Connection”→ “Use Different Connection”.\n\n[![Screenshot Showing How to Transfer Tables Connected to Another Application](https://cdn.sanity.io/images/55lcecww/production/5a9ce897ee35f3812ed4c9a45d5c05e502850def-512x128.png)](https://cdn.sanity.io/images/55lcecww/production/094dcaed04ac145f37e92c2925edd9d4289ab536-1448x361.png)\n\nIt will show the existing table owner and require the new user to have a table connection in place before connecting to their ownership. \n\nThis is set up in “My Preferences” and under  → “My Connections” to see if a connection exists. [(If not, the user must set up a user token.)](https://helpv2.quickbase.com/hc/en-us/articles/4570374095124-Creating-and-using-user-tokens#:~:text=You%20can%20create%20your%20own,URL%2C%20and%20also%20with%20API_GrantedDBs.)\n\nNext, it is advisable to refresh the table to see if any issues exist when using the new connection.\n\n[![Screenshot Showing How to Refresh Data Table to See if Any Issues Exist When Using New Connection](https://cdn.sanity.io/images/55lcecww/production/92557657562547e3ed9aa555c6bf7097355ea60d-1600x58.png)](https://cdn.sanity.io/images/55lcecww/production/92557657562547e3ed9aa555c6bf7097355ea60d-1600x58.png)\n\n## Items to Consider When Transitioning Quickbase Access:\n\n### Technical Documentation:\n\nIf technical documentation exists or you can request it, then it would be helpful to have. This technical documentation can be from a user's viewpoint and/or administrative level.\n\n**At the administrative level, the details should include:**\n\n- ◦ Pipelines\n- ◦ Webhooks\n- ◦ Permissions\n- ◦ Dashboards\n- ◦ Notifications\n- ◦ Access\n- ◦ How the System Works\n- ◦ Logical Processes\n- ◦ Descriptions of Tables\n- ◦ Use Cases\n- ◦ Important Formula Queries (if they exist)\n\n\n\n&nbsp;\n \n&nbsp;\n**At the user level, it could include:**\n\n- ◦ How to navigate the system\n- ◦ What process to follow and who to contact if issues arise\n\n\n&nbsp;\n \n\n_**Note:** Documentation can also be created through recorded sessions._\n\n### Notification Access:\n\nYou can transfer notifications via the notification setting at the bottom of the screen. This will change ownership. That is all that is required. \n\n_**Note:** The notifications will continue to work without doing this. But, it is a best practice._\n\n### User Guides:\n\nThis falls under technical documentation, but you should request and review any user guides that exist before the transition process.\n\n### Defect List:\n\nA defect list can consist of outstanding items or issues at the time of transition. These items can be considered bugs (or bugs that result from incorrectly using a process).\n\n### Manual Processes:\n\nAny existing manual processes used by the user or business process should be documented as part of the documentation. \n\n_**Note:** You can identify these by asking yourself, ‘What does the user do on a typical day inside Quickbase?’_\n\n### List of Recent Changes:\n\nThis is a list of developments that have happened over the course of a specific period. \n\n_**Note:** The standard time frame for tracking developmental changes is 3 months._\n\n### Upcoming/Future Expected Changes:\n\nYou should document any future development changes or expected app development that is needed or to be developed by the new user.\n\n### Explanation of Processes/Knowledge Transfers:\n\nAsking the existing team for knowledge transfers is incredibly useful. These should be recorded with notes taken at the meetings. You should request additional meetings, as necessary. \n\n_**Note:** Meetings should consider general, in-depth, and outstanding questions._\n\n### Reverse Knowledge Transfers:\n\nOnce the general knowledge transfer is complete, the new users should recite the new information back to the original owners to make sure the information transfer was successful and no clarifying questions remain.\n\n### Key Stakeholders and Points of Contact:\n\nYou should document stakeholders and points of contact (most notably super users and billing account managers). Should the user need additional needs for Quickbase, these users could provide access. \n\n## Summary: Transitioning Quickbase Access to New Developers\n\nIn this how-to guide for transferring Quickbase access to new users, you learned the step-by-step process for transferring different access levels and functionalities. \n\nStarting with realm-level access (which governs entire account settings) you can navigate through account-level, application-level, table-level, record-level, and field-level access controls. \n\nThe guide emphasizes the importance of understanding and managing each level effectively. We have provided detailed instructions for transferring applications, pipelines, webhooks, and connected tables/syncs, ensuring a smooth transition between users or teams. \n\nAdditionally, the article highlights key considerations such as technical documentation, user guides, defect lists, and knowledge transfer sessions to facilitate a successful handover process. \n\nBy following these guidelines, users can confidently manage access and functionalities within Quickbase while transitioning between stakeholders or teams.\n\nFor more guides on Quickbase, [visit our knowledge base](https://quandarycg.com/knowledge-base/).","slug":{"current":"switching-client-to-new-developer-quickbase"},"categories":[{"id":"-3711bc9d-2dc7-582c-b894-03c210cdb205","title":"Roles & Permissions","slug":{"current":"roles-and-permissions"}}]}},{"node":{"id":"-f7705514-7dd1-5204-a72a-3139112390f5","title":"Quickbase Home Pages: Uses and Functionality | INTERMEDIATE TO ADVANCED","metaDescription":"Learn how to use, create, configure, and assign Home Pages to different user roles in Quickbase and give your team any critical information they need. ","body":"> NOTE:\n> Quickbase Dashboards have superseded Home Pages in many ways. You can still use them, but they offer limited functionality compared to dashboards. You should use dashboards unless there is a specific reason to use a Home Pages as they provide a more robust view of data across multiple apps and dashboards.\n\n\nYou can use Quickbase Home Pages to collect basic views of reports, charts, and other data in a single place.\n\nIn many applications, Home Pages may still be in use. As such, they may be the first page users see when they log into the app. The Home Page should include the most important information the user needs to perform their tasks and interact with the application daily.\n\nApplication developers should work closely with end users and product owners to ensure that Home Pages are consistent with the application purpose and meet the needs of ALL user roles. \n\n_**Note:**_ _You may need to create several Home Pages in your application to meet the needs of all user roles._\n\n## Pages: Location\n\nApplication Administrators can access Home Pages via **App Settings >**  **Pages** \n\nThe Pages settings appear beneath the User Interface section in the center column of the Application settings page.\n\n\n[![Screenshot of Quickbase User Interviews in Home Pages](https://cdn.sanity.io/images/55lcecww/production/c94170bb4b99d509dfff99e3ee86dbbff83e216c-320x105.png)](https://cdn.sanity.io/images/55lcecww/production/c94170bb4b99d509dfff99e3ee86dbbff83e216c-320x105.png)\n\n\n## Pages: Creating\n\nIn the **Pages** list, you will see all of the Home Pages, Dashboards, and other page types in your application.\n\nTo create a new page, click the New Page button located in the upper right corner of the window.\n\n\n[![Screenshot of QuickBase \"+ New Page\" button](https://cdn.sanity.io/images/55lcecww/production/e3dc617070449424ad98b0f5476055d204a5ea75-603x52.png)](https://cdn.sanity.io/images/55lcecww/production/e3dc617070449424ad98b0f5476055d204a5ea75-603x52.png)\n\n\nClick the **\\+ New Page** button.\n\nThe Create a New Page popup will be displayed. A list of different page types is shown in a list. \n\nClick the radio button beside **Home Page**, then click the **Create** button.\n\n[![Quickbase screenshot of the \"Create a New Page\" pop up with \"Dashboard checked under \"What type of page do you want to create\". Other options are \"Home Page\", \"Rich Text Page\", and \"Code Page\".](https://cdn.sanity.io/images/55lcecww/production/a19cc5b9831c29f4c5eb0d89421c74dc2379f0a3-812x762.png)](https://cdn.sanity.io/images/55lcecww/production/a19cc5b9831c29f4c5eb0d89421c74dc2379f0a3-812x762.png)\n\n\n## Pages: Editing\n\n\nTo edit an existing page, click on the name of the page.\n\n[![Screenshot of Quickbase Page list showing \"Default Dashboard\", \"New Home Page\", and \"Home Dashboard\".](https://cdn.sanity.io/images/55lcecww/production/c671a032cb6ee96dd60bce73ed8de0f07114c4b8-846x300.png)](https://cdn.sanity.io/images/55lcecww/production/c671a032cb6ee96dd60bce73ed8de0f07114c4b8-846x300.png)\n\n## How to Customize a Home Page:\n\nOnce you create a Home Page, you will see a blank page with different widgets at the top. You can drag these widgets down onto the blank page. And you can set them up in your preferred order. \n\n[![Screenshot of new Quickbase Home Page with options for creating and organizing widgets: options are: Report or Chart, Text, Button Bar, Link Bar, Search, Reports List, and Web Page](https://cdn.sanity.io/images/55lcecww/production/db9da481303fb3a5ade37b530cce141a11be2269-936x190.png)](https://cdn.sanity.io/images/55lcecww/production/db9da481303fb3a5ade37b530cce141a11be2269-936x190.png)\n\n**These options are:**\n\n*   ◦ Report or Chart\n    \n*   ◦ Text\n    \n*   ◦ Button Bar\n    \n*   ◦ Link Bar\n    \n*   ◦ Search\n    \n*   ◦ Reports List\n    \n*   ◦ Web Page\n    \n\n### Report or Chart:\n\nTo create a report or chart, click and drag the **Report** or **Chart** widget onto the page. \n\n[![Screenshot of Quickbase showing how to click and drag the Report or Chart widget onto the page.](https://cdn.sanity.io/images/55lcecww/production/e92f6e8ece2982b177bf8e36389e687ce7961c83-304x76.png)](https://cdn.sanity.io/images/55lcecww/production/e92f6e8ece2982b177bf8e36389e687ce7961c83-304x76.png)\n\nFrom there, you can select a report from any table in the application.\n\n[![Screenshot of Quickbase showing  \"Choosing a Report\".](https://cdn.sanity.io/images/55lcecww/production/1be361ffb05725b028f07f85ad445cf03e333460-360x168.png)](https://cdn.sanity.io/images/55lcecww/production/1be361ffb05725b028f07f85ad445cf03e333460-360x168.png)\n\n_**Note:**_ _You can set 3 reports or charts side-by-side in any row:_\n\n[![Screenshot of Quickbase showing the maximum number of widgets (3) in a row on the Home Page.](https://cdn.sanity.io/images/55lcecww/production/601e3ba45d70f490728334fc6ab904bc31e53a24-936x118.png)](https://cdn.sanity.io/images/55lcecww/production/601e3ba45d70f490728334fc6ab904bc31e53a24-936x118.png)\n\n**Reminder:** In Home Pages, you can display a maximum of 9 reports or charts.\n\n### Text:\n\nIf you want to display a text title, description, or picture, click and drag the **Text** widget down to the page.\n\n[![Screenshot of Quickbase Rich Text Widget for Home Pages](https://cdn.sanity.io/images/55lcecww/production/04acef1f45a8686ebe6cf13188eee0174ff3ef4a-554x98.png)](https://cdn.sanity.io/images/55lcecww/production/04acef1f45a8686ebe6cf13188eee0174ff3ef4a-554x98.png)\n\n### Button Bar:\n\nYou can add and configure Buttons for various functions. And you can drag the **Button Bar** widget into any position on the page. \n\nWhen you click on a button, you can create a new record on any table. It can also take you to another Quickbase Page, a report, or a link to any other URL.\n\n[![Screenshot of Quickbase Button Widget displaying a New Record and \"Return to this page\" displayed under, after saving the new record\"](https://cdn.sanity.io/images/55lcecww/production/38740726d43b0ae5a5623348fcb87eadfe21b174-282x226.png)](https://cdn.sanity.io/images/55lcecww/production/38740726d43b0ae5a5623348fcb87eadfe21b174-282x226.png)\n\n\nYou can arrange these buttons in any order you wish. You can also set the color and alignment to meet your needs.\n\n[![Screenshot of Quickbase button customization menu with color options and \"show a title\" checked.](https://cdn.sanity.io/images/55lcecww/production/659e8c3295ccd4b122c9b1e458ad61c2ad76a2c4-310x426.png)](https://cdn.sanity.io/images/55lcecww/production/659e8c3295ccd4b122c9b1e458ad61c2ad76a2c4-310x426.png)\n\n### Link Bar:\n\nSimilar to the **Button Bar**, the **Link Bar** displays different links users can click on that will take them to various locations. However, it simply displays text (instead of being formatted like a button).\n\n[![Screenshot of Quickbase Link Bar in Quickbase Home Page options.](https://cdn.sanity.io/images/55lcecww/production/93041c07823f0235550459478fb174995f230162-258x190.png)](https://cdn.sanity.io/images/55lcecww/production/93041c07823f0235550459478fb174995f230162-258x190.png)\n\n_**Note:**_ _You can also configure the link bar for alignment._\n\n### Search:\n\nThe **Search** Widget brings a search bar to the page. You can configure the search bar to look at one table or a specific report. Or, you can set it to search by specific fields in a table.\n\n[![Screenshot of Quickbase Search Widget for Home Pages with \"Search for\" Employeeses\" option checked and Search in \"All Searchable fields\" and Show Results \"In a new place\" and \"Show a title\" checked.](https://cdn.sanity.io/images/55lcecww/production/cb97acc90563cd133adb444f9814c000a8317831-476x592.png)](https://cdn.sanity.io/images/55lcecww/production/cb97acc90563cd133adb444f9814c000a8317831-476x592.png)\n\n### Reports List:\n\nMuch like the **Link** **Bar**, the **Report** **List** adds a list of reports to your page. \n\nIt will take the user to that specific **Table** **Report** when clicked. You can configure this list to include all reports from all tables or specific tables.\n\n<table>\n  <tr>\n     <td style=\"padding-right: 100px;\">\n      <a href=\"https://cdn.sanity.io/images/55lcecww/production/24da95ca9dd5a6323b4e24ce3dca8f464b974851-170x318.png\">\n        <img src=\"https://cdn.sanity.io/images/55lcecww/production/24da95ca9dd5a6323b4e24ce3dca8f464b974851-170x318.png\" alt=\"Screenshot of Quickbase Reports List with several options displayed.\" width=\"100%\">\n      </a>\n    </td>\n    <td>\n      <a href=\"https://cdn.sanity.io/images/55lcecww/production/5e24e547d42c68e2ae2347e1c6747b709c53f2b0-288x284.png\">\n        <img src=\"https://cdn.sanity.io/images/55lcecww/production/5e24e547d42c68e2ae2347e1c6747b709c53f2b0-288x284.png\" alt=\"Screenshot of Quickbase for customizing the reports list with toggle options between two columns displayed. The left column is a list of possible items. The right column is a list of all selected items.\" width=\"100%\">\n      </a>\n    </td>\n  </tr>\n</table>\n\n \n&nbsp;\n \n\nReports on this list are sorted by their report groups. Those in appropriate roles can view the pages through the report customization.\n\n[![Screenshot of Quickbase Reports widget showing who has access to which reports. \"No one; hide it\" is checked.](https://cdn.sanity.io/images/55lcecww/production/3efaa640d10dfe1240e2e3e4cd74b11df1742852-394x238.png)](https://cdn.sanity.io/images/55lcecww/production/3efaa640d10dfe1240e2e3e4cd74b11df1742852-394x238.png)\n\n### Web Page:\n\nThe **Web** **Page** widget provides a view to another page. Some of these may be restricted due to different iframe permissions from that URL.\n\n[![Screenshot of Quickbase of the webpage widget for Home Pages.](https://cdn.sanity.io/images/55lcecww/production/6739e7ebefda9ffd1b8c4fd1e873af608f3fd4a2-936x200.png)](https://cdn.sanity.io/images/55lcecww/production/6739e7ebefda9ffd1b8c4fd1e873af608f3fd4a2-936x200.png)\n\n### Widget Placement:\n\nWhenever you click and drag a new widget onto a Home Page, you will see a green bar indicating where and in what position the new widget will appear. \n\nTry it yourself to see where the green bar appears as you move the widget around.\n\n<table>\n  <tr>\n     <td style=\"padding-right: 100px;\">\n      <a href=\"https://cdn.sanity.io/images/55lcecww/production/60bc08bb10821754e6e756fa1376dde02407f143-168x236.png\">\n        <img src=\"https://cdn.sanity.io/images/55lcecww/production/60bc08bb10821754e6e756fa1376dde02407f143-168x236.png\" alt=\"Screenshot of Quickbase widget placement focusing on the vertical movement of the widget.\" width=\"100%\">\n      </a>\n    </td>\n    <td>\n      <a href=\"https://cdn.sanity.io/images/55lcecww/production/f2a7d4bc783b50b0b7417e76ba628aea057432a1-336x128.png\">\n        <img src=\"https://cdn.sanity.io/images/55lcecww/production/f2a7d4bc783b50b0b7417e76ba628aea057432a1-336x128.png\" alt=\"Screenshot of Quickbase widget placement focusing on the horizontal movement of the widget.\" width=\"100%\">\n      </a>\n    </td>\n  </tr>\n</table>\n\n \n&nbsp;\n \nIn Home Pages, you can also place a widget on the left panel or sidebar portion of the page.\n\n[![Screenshot of Quickbase showing widget placement on the left panel or sidebar portion of the page.](https://cdn.sanity.io/images/55lcecww/production/47d271a6c42bd487fa67db902b6c158108623070-196x280.png)](https://cdn.sanity.io/images/55lcecww/production/47d271a6c42bd487fa67db902b6c158108623070-196x280.png)\n\nYou can place all widgets (except for **Reports** and **Charts**) in the sidebar section.\n\n### Assigning Home Pages:\n\nYou can set each Home Page to appear for any User Role when they first log into the Quickbase Application. \n\nNavigate to the User Roles page, select the Role you wish to assign, navigate to the User Interface tab, and select the page for the Role Home Page.\n\n\n[![Screenshot of Quickbase showing how to assign Home Pages with user roles. The drop-down under \"Role Home Page\" has \"Home dashboard selected\".](https://cdn.sanity.io/images/55lcecww/production/62a81c13da82fe7fb0446b320e5d4f83f4794e8e-1600x1325.png)](https://cdn.sanity.io/images/55lcecww/production/62a81c13da82fe7fb0446b320e5d4f83f4794e8e-1600x1325.png)\n\n## Home Page Uses\n-------------\n\nYou can use Home Pages to display a group of reports and functions specific to that Application. They are much easier to set up and display than Dashboards. Typically, Home Pages are best used to display a limited amount of information from one specific application. \n\nYou can set these pages up in themes to display information from different groups (For example: Employee, Finance, or Inventory.)\n\n### Best Practices:\n\n*   ◦ Use tabs to collaborate data from different applications on the same subject (For example, finances or inventory use.)\n    \n*   ◦ While developing a new application, do not leave the initial Home Page ‘blank’. Instead, Create a Dashboard or Home Page with some initial information and navigation buttons.\n    \n*   ◦ **Reminder:** Always name your Home Page.\n    \n\n \n&nbsp;\n \n\n\n**For more information, see the following:**\n\n[https://helpv2.quickbase.com/hc/en-us/articles/4570350362644-Customize-the-App-Home-Page-](https://helpv2.quickbase.com/hc/en-us/articles/4570350362644-Customize-the-App-Home-Page-)\n\nFor more guides on Quickbase, [visit our knowledge base](https://quandarycg.com/knowledge-base/).","slug":{"current":"quickbase-home-pages-uses-functionality-walkthrough"},"categories":[{"id":"-dc095853-fb86-5354-8647-e35dd8636ed2","title":"Quickbase Outside Of The Box","slug":{"current":"quick-base-outside-of-the-box"}}]}},{"node":{"id":"-1598d8a7-eaf5-594c-9c85-7337c3916fb3","title":"How to Create Tables, Fields, and Records in Quickbase | BEGINNER","metaDescription":"This short walkthrough will show you how to add tables, fields, and records to a database in Quickbase from both a developer's and an end-user's perspective.","body":"**A database record** is a collection of data points related to a specific entity (person, place, or thing). A database record is similar to a row in a spreadsheet. \n\nEach **record** (row) can contain multiple **fields** (or columns), which hold individual pieces of data that define the entry. For example, in a customer database, a record might include fields for the customer’s name, address, phone number, and email. Fields are sometimes called **attributes,** which function the way adjectives do in grammar (modifying the record).\n\nA **table** is a structured collection of database records. We create tables to group similar records together. For example, a table called “Customers” will contain customer records. Most databases contain multiple tables, each containing a specific type of record and the fields that define it.\n\nFrom a [developer's perspective](https://quandarycg.com/quandary-build/), you create a record to define a collection of database fields to collect and store data. From an end-user perspective, any time you add data to a database, a record gets added or modified.\n\n\n\n\n## Developer: Add Table\n\nThe following steps outline one of several methods of creating a table within Quickbase. The method described here uses the current Quickbase UI with Side Navigation enabled. \n\nIf you don’t have Side Navigation enabled, this is how you can do that:\n\n\n \n<div class=\"video-container\" style=\"margin: 20px 0;\">\n  <video \n    src=\"https://cdn.sanity.io/files/55lcecww/production/6d7d21591865b6a06714e5047f27150d6e07ea47.mp4\" \n    width=\"720\" \n    height=\"420\" \n    controls \n    loop>\n  </video>\n</div>\n \n \n&nbsp;\n\n\n1. Create a new application or open the application that will host the new table.\n2. Move the mouse to the left of the screen to expand the navigation pane, and then click the **+** symbol adjacent to tables, as shown below.\n\n    \n\n<p style=\"margin: 20px 0; text-align: center;\">\n  <img src=\"https://cdn.sanity.io/images/55lcecww/production/0b90d5626fd530010bbc02f01e85bbbb24817470-346x516.gif\" alt=\"Gif showing an example of where to find the + symbol when adding tables in Quickbase.\">\n</p>\n\n\n3. Select **From Scratch** in the context menu. (This article does not cover creating tables with connected data)\n\n<p style=\"margin: 20px 0; text-align: center;\">\n  <img src=\"https://cdn.sanity.io/images/55lcecww/production/1879c4a74d40648063a999f78d3271e1f5144e38-364x269.png\" alt=\"Example screenshot showing where to find the \"From scratch\" button in Quickbase.\">\n</p>\n\n\n\n\n4. Use the fields in the displayed pop-up window to configure the table settings.\n<ol type=\"a\">\n  <li>Table Name</li>\n  <li>Icon shown in the application navigation menu</li>\n  <li>Single record (record name or type)</li>\n  <li>Description of the records in the table or its basic purpose</li>\n</ol>\n\n\n\n5. Click the **Create Table** button when you are ready to save the table settings.\n\n<p style=\"margin: 20px 0; text-align: center;\">\n  <img src=\"https://cdn.sanity.io/images/55lcecww/production/5c2d5a7ea682c9f94391d437c0537be3f18c6ae4-455x426.png\" alt=\"Quickbase screenshot showing an example of how to fill out the required information when creating a new table.\">\n</p>\n\n\nWhen you click the “Create Table” button, the browser will automatically navigate to the fields list for the new table. You may begin adding fields now. Or click “Cancel” to do it at a later date.\n\n\n\n<p style=\"margin: 20px 0; text-align: center;\">\n  <img src=\"https://cdn.sanity.io/images/55lcecww/production/bf988eaf2af1c56a7fef630373bbcb1ab03e29f7-532x417.png\" alt=\"Quickbase screenshot of adding a new field.\">\n</p>\n\n\n\n## Developer: Add Fields to a Table\n\nThe following steps outline one of several methods of creating fields within Quickbase. The method described here uses the current Quickbase UI with Side Navigation enabled.\n\n\n\n1. Move the mouse to the left of the screen to expand the navigation, as shown below.\n2. Hover the mouse over the name of the table where you want to add the fields.\n\n\n\n<p style=\"margin: 20px 0; text-align: center;\">\n  <img src=\"https://cdn.sanity.io/images/55lcecww/production/08eeaef4dcd6e2445ea7707bb5b10e7a109373bd-296x271.png\" alt=\"Quickbase screenshot showing the reader where to find the setting to add new fields.\">\n</p>\n\n\n\n\n3. Click the menu icon to access the Fields’ table settings context menu.\n\n\n\n<p style=\"margin: 20px 0; text-align: center;\">\n  <img src=\"https://cdn.sanity.io/images/55lcecww/production/14b0cf9c76dbb73ad2056625b8cb8906c77902bf-450x528.png\" alt=\"Quickbase screenshot showing where to find the Field's table settings.\">\n</p>\n\n\n\n\n4. Select Fields in the context menu. You’ll see the Table field settings page, as shown below.\n\n5. Click the **New Fields** button in the upper right corner of the page.\n\n\n<p style=\"margin: 20px 0; text-align: center;\">\n  <img src=\"https://cdn.sanity.io/images/55lcecww/production/d468acd18149a5d305e1fa57ae762a43d9262882-842x377.png\" alt=\"Screenshot showing different field types in Quickbase.\">\n</p>\n\n\n\n\n6. Type in the field name and select a field type, as shown below. Repeat this process to add multiple fields.\n\n\n\n<p style=\"margin: 20px 0; text-align: center;\">\n  <img src=\"https://cdn.sanity.io/images/55lcecww/production/6650d176cd395909e28ab2d9e9c4abdd1910c544-569x490.png\" alt=\"Screenshot showing the naming of a new field in Quickbase.\">\n</p>\n\n\n\n\n7. Click the **Add fields** button when you have finished entering fields.\n\n\n\n\n\n8. When you add a “Text – multiple choice” or “Multi-select text” field type, you will need to enter the choices for each one.\n    1. Type or paste the choices as shown below.\n    2. Use the radio button to select the sorting option for the choices\n    3. Use the checkbox to Allow or Deny users the ability to create new choices.\n    4. Click the Next button to apply the configuration.\n\n\n\n<p style=\"margin: 20px 0; text-align: center;\">\n  <img src=\"https://cdn.sanity.io/images/55lcecww/production/729af1e7916045938d30065c430cde02f0611f35-430x282.png\" alt=\"Screenshot of Quickbase settings showing the different choices you can create when creating multiple choice text boxes.\n\">\n</p>\n\n\n\n\n9. Click **Exit Settings** to return to the Table Homepage when finished.\n\n\n\n<p style=\"margin: 20px 0; text-align: center;\">\n  <img src=\"https://cdn.sanity.io/images/55lcecww/production/d468acd18149a5d305e1fa57ae762a43d9262882-842x377.png\" alt=\"Screenshot showing different field types in Quickbase.\n\">\n</p>\n\n\nAfter you have added fields to the table, users may begin adding records.\n\n\n\n\n## End User: Add Records to the Database\n\nThe following steps outline one of several methods of creating records within Quickbase. The method described here uses the current Quickbase UI with Side Navigation enabled.\n\n\n\n1. Move the mouse to the left of the screen to expand the navigation as shown below.\n2. Click the name of the table where you want to add the records.\n\n\n\n<p style=\"margin: 20px 0; text-align: center;\">\n  <img src=\"https://cdn.sanity.io/images/55lcecww/production/08eeaef4dcd6e2445ea7707bb5b10e7a109373bd-296x271.png\" alt=\"a screenshot showing how to Add records to database\n\">\n</p>\n\n\nThe browser will navigate to the selected table’s home page. In a new application or table, the homepage will display an empty report similar to the following screenshot.\n\n\n\n<ul style=\"list-style: disc\">\n  <li>The button to add a record to the table will be on the upper right corner of the page.</li>\n  <li>You’ll see the type of record you’re creating on the button label. In our example below, it’s “New Customer”.</li>\n</ul>\n\n3. Click the **New Record** button to open the add record form for the table.\n\n\n\n<p style=\"margin: 20px 0; text-align: center;\">\n  <img src=\"https://cdn.sanity.io/images/55lcecww/production/28c2d1c1fd2d1952cd168a6bfe98961a7c75f5c7-977x387.png\" alt=\"Screenshot of Quickbase without any records displayed.\n\">\n</p>\n\n \n\n\n\n\n4. Populate the form fields.\n5. Click the **Save** button.\n\n\n<p style=\"margin: 20px 0; text-align: center;\">\n  <img src=\"https://cdn.sanity.io/images/55lcecww/production/ae010b0242645e06c74b30a0b20eeaa641f1d7ac-892x173.png\" alt=\"Example screenshot of how a user might add records and their details in Quickbase.\n\">\n</p>\n\n\nThe browser will navigate to the table homepage. The added record will now be in the default report for the table.\n\n\n\n<p style=\"margin: 20px 0; text-align: center;\">\n  <img src=\"https://cdn.sanity.io/images/55lcecww/production/b4d43a581245b5d0ec9e1a886f171646ebaeb291-394x158.png\" alt=\"Screenshot showing how a record added becomes part of the default report for the table in Quickbase.\n\">\n</p>\n\n\n\n## Design Tips For Creating Records in Quickbase\n\n\n\n1. **Model your data** so that records contain relevant/similar data.  For example, an employee record should not include supply chain data. \n2. **Normalize your data** and keep redundancy to a minimum.\n3. **Use specified field types** to improve data accuracy, consistency, and portability.\n<ul style=\"list-style: disc\">\n  <li>For example, if you need a number value, use a number-type data field on the record instead of using the default text field.</li>\n  <li>Use a multi-choice text field instead of a free-form text field to normalize the values from record to record.</li>\n</ul>\n4. **Consider building conditions and rules** into records to ensure data integrity and desired user behavior within the application.\n5. **Always consider the type of reports and queries** you need when creating records. Model records in a way that will make reporting easy and straightforward.","slug":{"current":"how-to-create-quickbase-tables-fields-records"},"categories":[{"id":"-5bed183e-fc97-5f28-8c58-da9094825c0d","title":"Tables","slug":{"current":"quick-base-tables"}}]}},{"node":{"id":"-ca281f25-948d-5423-aae7-a67b681fe6fa","title":" User Groups | BEGINNER","metaDescription":"User Groups Quick Base has many native functions to try and improve the efficiency of its users.  Creating groups is one tool available to users that can save time. Groups are one of the most efficient way to add users to a new application. Rather than adding users one-by-one by entering their email addresses and …","body":"Quick Base has many native functions to try and improve the efficiency of its users.  Creating groups is one tool available to users that can save time. Groups are one of the most efficient way to add users to a new application. Rather than adding users one-by-one by entering their email addresses and assigning their role, you can add a group which will invite all users in that group to the new app (limitation: each member in the group will initially be given the same role until it is overridden after granting access).  Below, the processes for creating a group and adding and deleting members is outlined.\n\n> !EDITORS NOTE:\nNote: the ability to create groups is limited to users with permission to create applications.\n\n### Creating a Group\n1. Click the **‘Users’** icon in the top-left of your browser;\n\n![](https://res.cloudinary.com/dnla85pdq/image/upload/v1580183212/QuandaryCG/user-groups-01.jpg)\n\n2. Click the **‘Share app with new user’** button;\n\n![](https://res.cloudinary.com/dnla85pdq/image/upload/v1580183212/QuandaryCG/user-groups-02.jpg)\n\n3. Next, click the Address Book icon;\n\n![](https://res.cloudinary.com/dnla85pdq/image/upload/v1580183212/QuandaryCG/user-groups-03.jpg)\n\n4. In the pop-up, choose **‘Groups’** in the drop-down, then click **‘Create a new group’**;\n\n![](https://res.cloudinary.com/dnla85pdq/image/upload/v1580183212/QuandaryCG/user-groups-04.jpg)\n\n5. Give a name and add a descriptions for your group and click **‘Create Group’**\n\n> !EDITORS NOTE:\nA group name cannot contain spaces; it must start with a letter, be between 2 and 50 characters, contain only letters, numbers, hyphens, periods, and underscores. For example, **‘quandary.Example’**\n\n### Creating a Group (Alternative if user is Billing Account Administrator)\n\n1. Click the dropdown arrow icon next to your name in the top-right of your browser.  Then click the Manage Company link;\n\n![](https://res.cloudinary.com/dnla85pdq/image/upload/v1580183211/QuandaryCG/user-groups-05.jpg)\n\n2. Navigate to the **‘Groups’** tab on the left hand men\n\n![](https://res.cloudinary.com/dnla85pdq/image/upload/v1580183212/QuandaryCG/user-groups-06.jpg)\n\n3. Click the **‘+New Group’** button in the top-right corner. Then enter a group name (follow naming conventions outlined above);\n\n![](https://res.cloudinary.com/dnla85pdq/image/upload/v1580183212/QuandaryCG/user-groups-07.jpg)\n\n### Adding/Deleting Member\n\n1. Repeat steps 1 through 4 of **‘Creating a Group’** or steps 1 through 3 of *‘Creating a Group (Alternative if user is Billing Account Administrator)**;\n\n2. Click the hyperlink in the row of the group you want to add additional users to;\n\n![](https://res.cloudinary.com/dnla85pdq/image/upload/v1580183212/QuandaryCG/user-groups-08.jpg)\n\n3. In the new pop-up window, click **‘Add members or managers’** in the top-left;\n\n![](https://res.cloudinary.com/dnla85pdq/image/upload/v1580183212/QuandaryCG/user-groups-09.jpg)\n\n4. Enter the email addresses of the users you want to add to the group and click **‘Save’**. \n\n5. To delete a member, select the **‘remove’** checkbox next to their name and click **‘Save’**.\n\n### Group Records\n\nOnce you have created a group and added the appropriate users, one of the most useful features is limiting user’s access to records in an application based on their group.  This tool will help filter pertinent information for your users as your app grows because it automatically filters records seen by a user to only those records created by someone in their group.  For example, you can group employees by region, department, etc. so they only see that region’s or that department’s records.\n\n1. Go to your App Settings;\n\n2. Click **‘Roles’**;\n\n3. Choose the role you want to restrict and then in the **‘Permissions’** tab, change the **‘View’** and **‘Modify’** columns to **‘Group’s Records’** to restrict the records a particular role can view and modify.\n\n![](https://res.cloudinary.com/dnla85pdq/image/upload/v1580183212/QuandaryCG/user-groups-10.jpg)\n\nIf you want to learn more about user roles in Quick Base, check out the article: [Adding a New User Role](/knowledge-base/roles-and-permissions/adding-a-new-user-role-beginner/).","slug":{"current":"user-groups-beginner"},"categories":[{"id":"-3711bc9d-2dc7-582c-b894-03c210cdb205","title":"Roles & Permissions","slug":{"current":"roles-and-permissions"}}]}},{"node":{"id":"-61d13020-e19f-5af0-ae24-bd52533ecc46","title":"Using Report Formulas as a Filter in a Report in Quickbase","metaDescription":"You can add calculated columns (Report Formulas) to any Quickbase report. The report formula is similar to a formula field. Learn how to set it up in Quickbase.","body":"A calculated column (recently renamed ‘Report Formulas’) can be added to any Quick Base report. The report formula is similar to a formula field, but is added as a column to your report and can only be used within the confines of the report where it was created. If you not familiar with Report Formulas, click here for a brief background.\n\nIf you’re familiar with Report Formulas you already know they can be used to; Calculate total costs, display images, return a boolean depending on if a criteria is met and more.  But did you know that Report Formulas can also be added to your report filters?\n\nSo what are some good examples where we might use Report Formulas in a report filter?  The applications are fairly wide-ranging. Here are just a few examples:\n\n✓ Extract months from dates to allow users to filter by a particular month\n\n✓ Categorize companies into ‘High’, ‘Med’ and ‘Low’ based on sales for report filtering\n\n✓ Determine if an invoice is at risk for non-payment given multiple factors\n\nLet’s look more closely at our first example: _Extract months from dates to allow users to filter by a particular month.  In this scenario we’ll use a formula to determine the month of each of our project start-dates.  Then we will use the results of the formula to filter for Projects starting in the month of February.\n\nCurrently our report looks like this:\n\n![](https://res.cloudinary.com/dnla85pdq/image/upload/v1580452290/QuandaryCG/using-report-01.png)\n\nIf we wanted to see all the projects starting in February 2019 we could easily set a filter within the report that looked like this:\n\n![](https://res.cloudinary.com/dnla85pdq/image/upload/v1580452290/QuandaryCG/using-report-02.png)\n\nHowever, if I expand this filter to look as far back as 2010, I’ll have to add similar filters an additional 8 times (one for each year).  Creating a Report Formula and using it as a filter presents a better option.\n\nTo setup our Report Formula and Report Filter, take the following steps:\n\n1. Click ‘Customize this report’\n\n2. Now we’ll scroll to the middle of our report settings ‘Report Formulas’ and click ‘Add a report formula’\n\n3. In the resulting formula box enter the following formula:\n\n![](https://res.cloudinary.com/dnla85pdq/image/upload/v1580452290/QuandaryCG/using-report-03.png)\n\nMake sure to name your formula (in this case we’ve named it ‘Month’).  Then set your formula type to ‘Formula – Numeric.\n\n4. Once you’ve finished constructing your formula, scroll down to the ‘Filters’ portion of your report settings.  Select the formula you just created in the fields dropdown and set it equal to ‘2’. Your filter should look like this:\n\n![](https://res.cloudinary.com/dnla85pdq/image/upload/v1580452290/QuandaryCG/using-report-04.png)\n\nOur report will now only show projects with a start date in February.\nClick ‘Save’\n\n5. Returning to your report, it should look something like this:\n\n![](https://res.cloudinary.com/dnla85pdq/image/upload/v1580452290/QuandaryCG/using-report-06.png)\n\nNotice that with our one formula added as a filter, we were able to see all projects starting in February, regardless of year, with just one filter.\n\nFor our introduction to ‘Calculated Columns/Report Formulas’ click [here](/knowledge-base/reporting-and-dashboards/how-and-when-to-use-calculated-columns-in-reports-beginner/).  For all our articles on Fields and formulas click [here](/knowledge-base/quick-base-fields-and-formulas/).","slug":{"current":"using-report-formulas-calculated-columns-as-a-filter-in-a-report-intermediate"},"categories":[{"id":"-27382539-ae20-5f0a-ace9-391d7b9a149f","title":"Reporting & Dashboards","slug":{"current":"reporting-and-dashboards"}}]}},{"node":{"id":"-d9f435ea-b4fe-59c6-88d4-e145892fb57a","title":"Create Audit/Change Logs with Automations | INTERMEDIATE","metaDescription":"Learn to create your own customizable audit/change log. Track changes in your records using Quickbase Automations in this step-by-step guide.","body":"Quickbase has limited out-of-box options for tracking changes to your records. This article will demonstrate how to create your own customizable audit/change log using Quickbase Automations.\n\nIf you’re not already familiar with Automations check out <a href=\"https://www.quickbase.com/blog/quick-base-automations\" target=\"_blank\">this short blog post</a>  from Quickbase demonstrating the basics.\n\nWhy would you want to track changes in Quickbase?  Here are a few examples:\n\n✓ Log important changes to your project such as change of Status or Project Manager\n\n✓ Log a record of changes to employee compensation such as salary and bonus\n\n✓ Identify when a user makes changes to or deletes an invoice, for greater accountability\n\nIn this article we’ll use the first example, “Log important changes to your project such as change of Status or Project Manager,” to demonstrate how to set up a change log.\n\n1. Start by creating a ‘Projects’ table and add the following fields:\n\n| Field Name | Field Type | Field Values |\n| ----------- | ----------- | ----------- |\n| Project Name | Text | N/A |\n| Project Manager | Multiple Choice | \"Jane Doe\", \"John Doe\" |\n| Project Status | Multiple Choice | \"Open\", \"Closed\", \"Lost\" |\n\nWe’ll keep it simple and just add these three fields for now. On a real project you’d typically have many more fields.\n\n2. Next, create a “Project Logs” table and add the following fields.\n\n| Field Name | Field Type |\n| ----------- | ----------- |\n| Project Name | Text |\n| Project Manager | Text |\n| Project Status | Text |\n\n3. Create a relationship between the two tables where “Each Project has many Project logs”\n\n![](https://res.cloudinary.com/dnla85pdq/image/upload/v1580696807/QuandaryCG/create-audit-01.png)\n\n4. Go to the ‘Automations” section under of you applications “Settings”.  Click “New” under the Automations section. Two options will appear. Select the option “When data changes”:\n\n![](https://res.cloudinary.com/dnla85pdq/image/upload/v1580696807/QuandaryCG/create-audit-02.png)\n\nAutomations are made of two components; a trigger and an action. The trigger starts the automation (On a schedule or based on a change in QB). The action can add, modify or delete records. \n\n5. Start by defining your “Trigger”:\n\n\n1. Under “When a user…”, select “Adds a record” and “Modifies a record”\n\n2. Under “In this table”, select “Projects”\n\n3. Click the carrot symbol next to “Additional Criteria” and select “Any of the following fields change”.  Add “Project Manager” and “Project Status”.\n\n4. When complete your trigger should look like this:\n\n![](https://res.cloudinary.com/dnla85pdq/image/upload/v1580696807/QuandaryCG/create-audit-03.png)\n\n5. Now we’ll define our “Action”:\n\n\n1. Click “Add an action” in the upper right of the screen or by click “Add Action” on the left panel under actions to add your first action.\n\n2. Chose the option “Modify record(s)”.\n\n3. In the resulting screen choose “Project Logs”.\n\n4. Now “Select fields and specify values for the record” as shown below: \n\n![](https://res.cloudinary.com/dnla85pdq/image/upload/v1580696808/QuandaryCG/create-audit-04.png)\n\n7. When finished, save your automation.\n\n#### The results:\n\n1. Now each time a ‘Project’ record is saved or modified, a log of changes to the “Project Name’,  ‘Project Manager’ and ‘Project Status’ will be recorded.  The User field will capture whomever made the modification by using the ‘Last Modified By’ fields in the ‘Projects’ table.\n\n2. Go ahead and test with a record in your project table by adding a record.  A new record will appear in the ‘Project Logs’ table. You can also view a history of project logs on the embedded report on your project record:\n\n![](https://res.cloudinary.com/dnla85pdq/image/upload/v1580696807/QuandaryCG/create-audit-05.png)\n\nNow whenever you view your Project record you can see a history of any changes made to the fields we’ve selected to track.\n\n> NOTE: Quick Base has designed the Audit Logs feature with security and compliance use cases in mind. Audit logs track user activity, including data changes, in a non-editable format. You can set up those logs to be retained for up to 7 years. Because Quick Base records can be edited, you should never use data change logs created by automations as part of any security or compliance initiative. If you’re interested in adding audit logs to your account, please contact [sales@quandarycg.com](mailto:sales@quandarycg.com).\n\nFor a simpler, but less robust method to capture change history, see our [article on snapshot fields](/knowledge-base/quick-base-fields-and-formulas/how-and-when-to-use-snapshot-fields-beginner/).","slug":{"current":"create-audit-change-logs-with-automations-intermediate"},"categories":[{"id":"-27382539-ae20-5f0a-ace9-391d7b9a149f","title":"Reporting & Dashboards","slug":{"current":"reporting-and-dashboards"}}]}},{"node":{"id":"-3c4eaf54-706e-5817-9381-c0fb35401773","title":"Using Application Variables (Global Params) | ADVANCED","metaDescription":"Application Variables are availible anywhere in your application. Share this data across records at any time using this easy guide. ","body":"#### What are Application Variables?\n\nApplication Variables are simply a piece of information that is available anywhere in your application. Application variables can be used in two places: Quick Base formulas and when using XML to make API calls.\n\n#### Why should I use Application Variables?\n\nA great use case for Application Variables would be sharing a deadline date across your application that may need to be referenced by any record at any time. By using an Application Variable, you can enter this date in once place and allow for it to be used anywhere in your app. If the date needs to be changed, you can update from one place and your changes will propagate across the app.\n\n#### How do I create an Application Variable?\n\n1. From your app’s homepage, navigate to **Settings > Variables** and click **New Variable**. A popup will appear prompting you to enter your new variable’s **Name** and **Value**.\n\n![](https://res.cloudinary.com/dnla85pdq/image/upload/v1580784799/QuandaryCG/app-var-01.png)\n\n2. The **Name** value will be what you use to reference the variable elsewhere in your application. The syntax would be **Product Deadline]** and its value would be **“12-31-2018”**. Be default, an Application Variable’s value is treated as Text within a formula unless you convert it to another data type using functions.\n\n3. Once you are happy with your variable’s **Name** and **Value*, click **OK** to save your new Application Variable. Upon doing so, you will be directed back to your Variables home page where you will see your new variable along with any others that had been created previously.\n\n![](https://res.cloudinary.com/dnla85pdq/image/upload/v1580784799/QuandaryCG/app-var-02.png)\n\n\n> EDITORS NOTE:\nWhen you copy an application, all of its variables will be copied.\n\n#### Deleting an Application Variable\nThere are two ways to delete an Application Variable:\n\n✓ Click on the red **“X”** to the very right of its table row.\n\n✓ Select the checkbox to the very left of the table row and click **Delete**. This is also the method for deleting multiple variables at once.\n\n#### Referencing an Application Variable\n\n1. To reference an Application Variable in a formula, use the same bracket notation you would any standard Quick Base field.\n\n~~~~\n[Product Deadline]\n~~~~\n\n2. Application Variables are always text. You must convert them within your formula if you wish to change their data type.\n\n~~~~\nToDate([Product Deadline])\n~~~~\n\n* * *\nTo get a better understanding of **Formulas** and how to use them, **[Using the CASE function](/knowledge-base/quick-base-fields-and-formulas/using-the-case-functions-intermediate/)** is a great place to get started creating conditions using your new Application Variable!\n* * *","slug":{"current":"using-application-variables-global-params-advanced"},"categories":[{"id":"-51554930-c85d-504e-b1fc-9e93b25a4991","title":"Fields & Formulas","slug":{"current":"quick-base-fields-and-formulas"}}]}},{"node":{"id":"-25646539-bbef-5bd4-b233-04cee4b1ef6b","title":"Setting Up Reverse Relationship in Quickbase | Intermediate","metaDescription":"Need to see the specific child data reflected in the parent and not a summary? Follow this guide to setting up reverse relationships in Quickbase.","body":"Occasionally, you might want to see specific child data reflected in the parent (not a summary). \n\nFor example, in a system where “Work Orders” is the child of both “Vendors” and “Locations”, you might want to show details from the most recent “Work Order” in the Location. \n\nIn this situation, you may want to add the following: \n- Which “Vendor” serviced this particular Location last?\n- What are the notes from the last “Work Order”?\n\n![](https://cdn.sanity.io/images/55lcecww/production/a7584f6b39ccba936e3673fe8aecc7126f14eb33-287x374.png)\n\n“Summary Combined Text” fields aren’t a big help in this case.  We can’t tell which “Vendor” was on the last “Work Order” or which “Note” is most recent.  \n\nA reverse relationship is the answer.\n\nHere’s how to do it: \n\n### How to Set Up Reverse Relationships in Quickbase (3 Steps)\n1. Create a summary field in “Locations” that gives the maximum related “Work Order”. This will be named “Maximum WO Record ID#” by default.\n\n![](https://cdn.sanity.io/images/55lcecww/production/82440c2f2d1e7b869459fdca697326fec9812e30-468x254.png)\n\n2. Create a reverse relationship where Work Order is the parent of Locations\n\n![](https://cdn.sanity.io/images/55lcecww/production/7d43aef7edd9c0ee3c007e71426352498de51e72-468x219.png)\n\n3. Make sure to use the “Maximum WO Record ID#” we just created.\n\n![](https://cdn.sanity.io/images/55lcecww/production/97446b6e36eca36ecd6f60692ef78f119de3ed82-427x251.png)\n\n### Summary\n\nIn this walkthrough, we used the original relationship, ”Location” with many “Work Orders”, to get a summary. In this case, it was a maximum of the related “Work Orders”.  \n\nEach “Location” will have a different value for this. the maximum Record ID# for that “Location”.  \n\nAfterward, we created another relationship where the “Work Order” is the “Parent of Locations”. \n\nNow, you can pull data from the most recent “Work Order” into the Location as Lookup fields:\n\n![](https://cdn.sanity.io/images/55lcecww/production/3b3ee2927e379ad4fc54b436c546b37504f45dbe-468x197.png)\n\nPlus, you can easily see from a list of “Locations” which “Vendor” serviced the “Location” last and what the “Notes” were.\n\n![](https://cdn.sanity.io/images/55lcecww/production/945847eb679185666d757ea562a7f586e76c48d6-468x113.png)\n\nYou _may_ wish to filter out certain Work Orders from the [Maximum WO Record ID#] field\n\n![](https://cdn.sanity.io/images/55lcecww/production/075c4b3fadc0fc0f02aa910fc490ec9f93e0d3c4-1058x447.png)\n\nA canceled, recently scheduled, or currently in progress “Work Order” may not be relevant at this time.\n\nFor more support on how to use Quickbase, view the rest of [our knowledge base](https://quandarycg.com/knowledge-base/quickbase-knowledge-center/).","slug":{"current":"setting-up-reverse-relationship-in-quickbase"},"categories":[{"id":"-5bed183e-fc97-5f28-8c58-da9094825c0d","title":"Tables","slug":{"current":"quick-base-tables"}}]}},{"node":{"id":"-9495d546-fc91-5093-968f-a5e6b9b46976","title":"Creating User-Friendly Forms in Quickbase | BEGINNER","metaDescription":"End-users interact most often with an app’s forms. It's important to build user-friendly forms to app success. Here's how to build user-friendly forms in QB.","body":"Forms are used to add, edit, and view records. End-users interact most often with an app’s forms. That's why it's important to build user-friendly forms to help ensure an app's success.  \n\nTo build a valuable, user-friendly form, the form must be easy for the user to navigate while capturing all the necessary data points.  \n\nYou can create an easily navigatable form for users with tabs, sections, and [Dynamic Form Rules](/knowledge-base/quick-base-forms/creating-form-rules-beginner/). \n\nTo capture the necessary data points, the correct Fields must be created.\n\n## NAVIGATION\n\nTo customize a form from your app’s homepage, click on the table in the [Table Bar](/knowledge-base/admin-application-setup-security/organizing-the-table-bar-beginner/) (A),\n\n![](https://res.cloudinary.com/dnla85pdq/image/upload/v1580712176/QuandaryCG/creating-user-01.png)\n\nClick Settings (B),\n\n![](https://res.cloudinary.com/dnla85pdq/image/upload/v1580712176/QuandaryCG/creating-user-02.png)\n\nClick Forms (C),\n\n![](https://res.cloudinary.com/dnla85pdq/image/upload/v1580712176/QuandaryCG/creating-user-03.png)\n\nFinally, select the Form you would like to edit.\n\n## USER-FRIENDLY FORMS\n\nTo create user-friendly forms, use the tools in the tabs of the Customize Form. We'll focus on the tools available in the Elements tab of the customize form page.\n\nForm elements can be tabs (D), section headings (E), text (F), field (G), and child table reports (report link fields).\n\n![](https://res.cloudinary.com/dnla85pdq/image/upload/v1580712176/QuandaryCG/creating-user-04.png)\n\n✓ _Tabs:_ a powerful tool to break up long forms and to hide fields from different roles.  \n\n**For instance:** a customer record may have multiple locations, contacts, invoices, etc. All this information can be stored in one tab. However, to make it easy to find the information, it would be better to create a tab for locations, contacts, invoices, etc. Additionally, you may want to prevent some roles from being in one or more tabs. This can be configured in the Dynamic Form Rules tab.\n\n![](https://res.cloudinary.com/dnla85pdq/image/upload/v1580712176/QuandaryCG/creating-user-05.png)\n\n✓ _Section Headings:_ like tabs, section headings can be used to break up forms and make them more user-friendly. They also can be shown/hidden based on different dynamic form rules. \n\nAs a best practice, field labels should appear above fields. Click the radio button in the Section Heading Properties to apply (H).\n\n![](https://res.cloudinary.com/dnla85pdq/image/upload/v1580712177/QuandaryCG/creating-user-06.png)\n\n✓ _Text:_ should be added to give additional instructions to users if necessary.\n\n✓ _Fields:_ capture all the necessary data. \n\nIn the form, fields will display their name as the default. Occasionally, it makes sense to shorten it to make the form easier to navigate (i.e. ‘Project Name’ could be shortened to ‘Name’ if the field is below a ‘Project’ Section heading).  \n\nTo change the field name that is displayed on the form, click the ‘Use Alternate Label Text’ and enter the desired text to display on the form (I). By default, there is only one field per line. \n\nHowever, it makes sense to put some fields on the same line to save space and make the form more user-friendly when building longer forms. Simply click the \"Same Row\" checkbox next to the form element that needs to be placed on the same row as the previous form element(J).\n\n![](https://res.cloudinary.com/dnla85pdq/image/upload/v1580712177/QuandaryCG/creating-user-07.png)\n\nFurthermore, fields can be made read-only (K) or required (L) by clicking the radio buttons: \n- Read-only will not allow a user to edit the field\n- Required will make the user input data into the field before saving the record  \n\nAs a default, fields are shown when a record is being edited, added, or viewed. However, you can customize that functionality to any combination by clicking the drop-down (M).\n\n![](https://res.cloudinary.com/dnla85pdq/image/upload/v1580712177/QuandaryCG/creating-user-08.png)\n\n✓ _Information Icon:_ provide additional instructions for any given field.  \n\nOccasionally, it may not be self-intuitive what should be entered in a field. Instead of using the alternative label text and having a long field name, you can create an information icon that can include more direction for the user on what should be entered in a field.  \n\nTo create the information icon, select the field you want the icon to display next to in the form. Next, click ‘Properties’ (N) and scroll to the bottom of the pop-up window.  \n\nAt the bottom, there is a field called “Field help text”; enter the message you would like to display to a user when they hover their mouse over the icon (O).\n\n![](https://res.cloudinary.com/dnla85pdq/image/upload/v1580712177/QuandaryCG/creating-user-09.png)\n\n✓ _Child Table Reports (report link fields):_ can provide valuable information to the user when looking at a parent record.  \n\nIt allows the user to see all pertinent information in one form. As a best practice, the child report should be under its own section heading or on its own tab.\n\nDynamic form rules are a great place to start when building user-friendly forms. If you want to learn more about dynamic form rules, check out the article, [Creating Form Rules](/knowledge-base/quick-base-forms/creating-form-rules-beginner/).","slug":{"current":"creating-user-friendly-forms-beginner"},"categories":[{"id":"-540552b6-6aca-5fc6-ab8e-c34778837055","title":"Forms","slug":{"current":"quick-base-forms"}}]}},{"node":{"id":"-7f6cf0ac-0817-5533-82e8-b956fe7ae44c","title":"Using Combined Text Summary Field in Quickbase | INTERMEDIATE","metaDescription":"Table-to-Table connections in Quickbase allow you to link two tables together. Discover how to get the most out of this fuction.","body":"Table-to-Table connections in Quickbase allow you to link two tables together. One advantage inherent in this process is the ability to create a lookup field that will link records of the child to the parent.  \n\n_If you need a refresher regarding table-to-table connection please read our article [here](/knowledge-base/admin-application-setup-security/setting-up-a-new-relationship-beginner/)._\n\n**Great news**: Quickbase has just released a new feature called ‘**List Text Summary Fields**’ that displays lists of values from child records.  \n\nWhy would you want to use such a field?  \n\nWell, in the past, our only option to show these records within a report was to add a report link, which displayed like this:\n\n![](https://res.cloudinary.com/dnla85pdq/image/upload/v1580716139/QuandaryCG/using-combined-01.png)\n\nNow, with the ‘List Text Summary’ field, we can actually display the actual text from the child ‘materials’:\n\n![](https://res.cloudinary.com/dnla85pdq/image/upload/v1580716139/QuandaryCG/using-combined-02.png)\n\nThis is a huge improvement. Now you can use this field to:\n\n✓ Display employees in a business unit\n\n✓ Display contacts on a job\n\n✓ Display materials on a project\n\nIn this article, we’ll look at **how to display materials on a project** using the combined text field, but the process is essentially the same in each example.\n\n## How to Display Materials on a Project in Quickbase\n\n1. Create a table-to-table relationship between the Project and Materials tables with materials as children to the parent Project.  \n2. Open your new relationship and add a new ‘Lookup Field’:\n\n![](https://res.cloudinary.com/dnla85pdq/image/upload/v1580716139/QuandaryCG/using-combined-03.png)\n\n3. Set the new summary field to ‘a summary of a specific field.’ Then select ‘Material Name’ from your field list. Note that you can also set matching criteria to filter which items are listed based on criteria:\n\n![](https://res.cloudinary.com/dnla85pdq/image/upload/v1580716140/QuandaryCG/using-combined-04.png)\n\n4. Save the field and click ‘Done’ to save your changes to the table-to-table relationship\n5. Return to your table and add your new field as a column to your home report:\n\n![](https://res.cloudinary.com/dnla85pdq/image/upload/v1580716139/QuandaryCG/using-combined-05.png)\n\nFor more ideas to create and leverage relationships click [here](/knowledge-base/admin-application-setup-security/)","slug":{"current":"using-combined-text-summary-field-intermediate"},"categories":[{"id":"-51554930-c85d-504e-b1fc-9e93b25a4991","title":"Fields & Formulas","slug":{"current":"quick-base-fields-and-formulas"}}]}},{"node":{"id":"-3289a4e9-e3c3-54ca-9330-f96b943a8601","title":"How to Turn Quickbase Webhooks into Pipelines | ADVANCED","metaDescription":"With Quickbase deprecating Webhooks, it’s important to understand pipelines, what makes them different, and how to set them up. Learn more.","body":"Quickbase Webhooks was meant to automate processes almost instantaneously. [As webhooks gradually become uncertain](https://community.quickbase.com/blog/the-qrew-blog-/qb-actions-and-webhooks-will-become-read-only-on-june-30-2025/86329), the best option is to transition them into Pipelines to retain your automations. \n\nWith Quickbase Pipelines, the use case for webhooks is no longer valid. Instead, pipelines allow the user to run with a more low-code approach. This allows for more integrations, connections, and versatility. Pipelines also provide insight into issues, possible inefficiencies, and immediate error resolution. \n\nAdditionally, they allow the user to schedule and trigger more items (where webhooks could not). With that being said, systems can bog pipelines down during high peak times and when multiple processes run at the same time. There may also be delays with Pipelines at the beginning as they may not fire immediately, unlike a webhook. \n\nPipelines can work in tandem with Webhooks through the **Webhooks Channel** using the **Make Request** Action. \n\n_**Note:**_ _the biggest challenge is converting webhooks syntax to pipeline syntax._ \n\n## Explaining Quickbase Webhook Syntax\n----------------------------------------\n\nThere are differences between Quickbase Webhook and Pipeline syntax you should know. \n\nWebhook Syntax is built around the fields and forms inside the Quickbase Tables, while Pipeline Syntax is built inside the Pipeline. Knowing this difference helps you conceptualize how to formulate the pipeline to accommodate the webhook, starting with the trigger. \n\nWhen converting from a webhook syntax to pipeline syntax, the webhook syntax is similar to what you may see in a formula field for example **\\[Record ID#\\]** or **\\[Title\\]**. These are defined by the straight brackets **\\[\\]**. \n\nThe value changes with pipelines. Instead, you will utilize where the value is pulled from in each step of the pipeline process. For example, **step A, {{a.id}}** or **{{a.title}}**. There’s a slight difference as it is defined by curly brackets **{{}}**. \n\nValues inside a webhook, like a field ID number, are defined as numbers. However, you need to surround this number with apostrophes for this to work inside a pipeline. For example, when you use the **mergefieldid** in the webhook payload, you need to surround it with apostrophes. \n\nYou will see examples of this below.\n\n## The Current Webhook Layout\n------------------------------\n\nThe current webhook layout consists of **trigger fields, conditionals,** and **webhook payload.** \n\n### A: Trigger Fields\n\n[![Screenshot of a Quickbase Webhook example that includes trigger fields and conditionals.](https://cdn.sanity.io/images/55lcecww/production/fe97ff15005276ffa74e3a4d730a9651b96ec6b7-829x352.png)](https://cdn.sanity.io/images/55lcecww/production/fe97ff15005276ffa74e3a4d730a9651b96ec6b7-829x352.png)\n\n### B: Conditionals:\n\n[![Screenshot of a Quickbase Webhook example that includes trigger fields and conditionals.](https://cdn.sanity.io/images/55lcecww/production/9102a1fedce34a6cf2b673287ceefac8ac7b22f8-1509x278.png)](https://cdn.sanity.io/images/55lcecww/production/9102a1fedce34a6cf2b673287ceefac8ac7b22f8-1509x278.png)\n\n### C: Payload\n\n[![Screenshot of Quickbase Webhook providing an example of Payload with Then Perform an action in Quickbase or another system\" showing with \"End Point URL\", \"HTTP Method\", \"Message format\", \"Message Header\", and \"Message Body\" showing.](https://cdn.sanity.io/images/55lcecww/production/83d0e80ea7d72eefd0813a7cefe20a2330176fd3-1112x460.png)](https://cdn.sanity.io/images/55lcecww/production/83d0e80ea7d72eefd0813a7cefe20a2330176fd3-1112x460.png)\n\n## How to Convert Webhooks to Pipelines\n----------------------------------------\n\n### 1\\. Set the Pipeline Trigger\n\nYou will need a new event to convert a webhook into a pipeline. This is where the developer needs to identify how the field is triggered:\n\n- ◦ **On Modified**\n    \n- ◦ **On Delete**\n    \n- ◦ **On Add**\n    \n\nOnce you identify and choose the correct trigger, the best approach is to maintain the field ids from the webhook. This will expedite the process of setting up the pipeline. \n\nIt’s best to utilize the, **less than – slash – greater than**, **.** \n\nYou can find this in the upper right corner of the field selector. \n\n_**Note:**_ _Some fields that could be triggered in a webhook, may not be triggered in a pipeline. This is something you may need to test out, like a formula field that won’t trigger a pipeline. This could be a reason why your converted webhook pipeline is not working._ \n\n[![Screenshot of Quickbase Pipeline new event trigger stating, \"Triggers on New Event\". The step can trigger on different or combination of record's events - add, modify, delete.\" \"Connection\" and \"Details\" with Table \"GFS Management: Contracts\", Fields for Subsequent steps 175, 174.](https://cdn.sanity.io/images/55lcecww/production/1d36e36263579dc6e9ad3cb957c9e83a1abd4d5a-705x543.png)](https://cdn.sanity.io/images/55lcecww/production/1d36e36263579dc6e9ad3cb957c9e83a1abd4d5a-705x543.png)\n\n### 2\\. Set Pipeline Conditionals\n\n[![Screenshot of Quickbase Pipeline Filters \"simple filter\" toggled on with \"Trigger pipeline if\" displayed.](https://cdn.sanity.io/images/55lcecww/production/f65bf74e88708a0df4570a5315fb64e9e805ef10-692x277.png)](https://cdn.sanity.io/images/55lcecww/production/f65bf74e88708a0df4570a5315fb64e9e805ef10-692x277.png)\n\nThe filter at the bottom of the trigger is the conditional. You need to align the conditionals with the conditionals in the pipelines. \n\n### 3\\. Making a HTTP Request in a Pipeline\n\nWe will use the **Make Request** channel inside of pipelines to perform the action of the webhook.\n\nWe can choose HTTP Basic for Authentication and leave the other fields blank. (This won’t be necessary unless working outside of Quickbase.)\n\n[![Screenshot of Quickbase Pipeline Make Request, \"Makes an HTTP request. You can use RequestBin to see what this pipe is sending or to inspect and debug webhook requests.\" and \"Authentication: Http basic\" displayed](https://cdn.sanity.io/images/55lcecww/production/45c0400c635fc358602fa58a83d7f81f6d5760b9-700x332.png)](https://cdn.sanity.io/images/55lcecww/production/45c0400c635fc358602fa58a83d7f81f6d5760b9-700x332.png)\n\nThe URL where the data action is **GET**, **POST**, **PUT**, **DELETE**, **HEAD**, **OPTIONS**, or **PATCH** will be identified in the webhook, which flows into our next **Method** field. Additionally, you should define the content type (For example, whether the Payload will be XML, JSON, or URL\\_Encoded). You should note all of this inside the webhook payload, as shown above in C: Payload.\n\n[![Screenshot of Quickbase Pipeline Make Request, \"Makes an HTTP request. You can use RequestBin to see what this pipe is sending or to inspect and debug webhook requests.\" and \"Authentication: Http basic\" displayed](https://cdn.sanity.io/images/55lcecww/production/579608c5a030cd28850b06acb309cf440222ea2e-702x391.png)](https://cdn.sanity.io/images/55lcecww/production/579608c5a030cd28850b06acb309cf440222ea2e-702x391.png)\n\n### 4\\. Set Up Payload _(Optional)_\n\n_**Note:**_ _This is optional. However, you will likely use this as part of the Webhook setup as it is where you will use the API tools._  \n\n[![Screenshot of Quickbase Pipeline headers (list) with \"Name\" and \"Value\" displayed](https://cdn.sanity.io/images/55lcecww/production/e235b51c38c8f2af3bbb7b107080bfb16125ad44-636x435.png)](https://cdn.sanity.io/images/55lcecww/production/e235b51c38c8f2af3bbb7b107080bfb16125ad44-636x435.png)\n\n**The Body** contains the Webhook Payload. \n\nThis will be a copy and paste. However, you will need adjustments to translate it into Pipeline Syntax. You need to convert the identified **record id** and **field ids** now.\n\nThis is the original webhook payload vs. the new updated payload. You can see clearly the changes:\n\n#### Webhook Payload:\n\n[![Screenshot of Quickbase Pipeline headers (list) with \"Name\" and \"Value\" displayed](https://cdn.sanity.io/images/55lcecww/production/836c07f88d6c1ef4db0f65f5ff43dd1bb888fc38-777x152.png)](https://cdn.sanity.io/images/55lcecww/production/836c07f88d6c1ef4db0f65f5ff43dd1bb888fc38-777x152.png)\n\n#### Pipeline Payload:\n\n[![Screenshot of Quickbase Pipeline payload with body displayed](https://cdn.sanity.io/images/55lcecww/production/8ccf665b1df395761318504379027863298f18b5-663x286.png)](https://cdn.sanity.io/images/55lcecww/production/8ccf665b1df395761318504379027863298f18b5-663x286.png)\n\n## Most Common Use Cases for Pipelines\n---------------------------------------\n\n### API\\_EditRecord / API\\_AddRecord / API\\_PurgeRecords\n\nTrying to convert an edit/modify webhook is more trouble than it’s worth. The best option is to convert it entirely into a pipeline. This function is more difficult to implement. Instead, it's best to use normal pipeline functionality (for example, **Search** and **Update Records**).\n\nYou should only utilize the webhook as an absolute if you can’t change the existing API or if the pipeline can’t create the new record.\n\nWebhook triggered on **Event** and **Add/Modify/Delete a Record**:\n\n- ◦ **Option 1:** Turn webhook into a pipeline using a Quickbase Action: **Create Record, Update Record, Delete Record**\n    \n- ◦ **Option 2:** Keep webhook and utilize the **Make Request** action\n    \n\n### ImportfromCSV –\n\nIn this instance, keep the webhook and Utilize the **Make Request** action.\n\n**Common issues:** \n\n- <ol style=\"list-style-type: circle;\">\n<li>Not pulling necessary fields for subsequent steps in the webhook</li>\n<li>Not having a user token</li>\n\n    <li>Trying to Use <strong>API_AddRecord</strong> when creating a record does the same. \n        <ul>\n            <li>Creating records in the same table (and other tables) Complicates the process when using API_\n            </li>                \n        </ul>\n    </li>             \n    <li>Incorrect Syntax for Body Webhook:\n        <ul>\n            <li><strong>mergefieldID</strong> is an integer field that must be separated by apostrophes ‘26’\n            </li>         \n        </ul>\n    </li>             \n<li>The payload can be based on the 12.231.3. format syntax in the webhook, which separates the values where no further actions are needed (for example, buckets or prepare bulk upsert).\n</li>\n<li>Not removing or turning off  <strong>%repeaton%</strong> and <strong>%repeatoff%</strong> internal functions that one would see in a webhook. This may lead to duplicate dummy records\n</ol>\n\n\n    \n\n### Example of  ImportfromCSV\n\nThis commonly used webhook is easily adaptable in the pipeline. You can keep the **field ids** the same, separated by a period. You only need to change the MergefieldID with quotes.\n\n[![Screenshot of Quickbase pipeline  Example: \"ImportfromCSV\"](https://cdn.sanity.io/images/55lcecww/production/99a9e0d058f7b03a216f23c0bbce49b563ad3dd8-685x367.png)](https://cdn.sanity.io/images/55lcecww/production/99a9e0d058f7b03a216f23c0bbce49b563ad3dd8-685x367.png)\n\n","slug":{"current":"turning-webhooks-into-pipelines"},"categories":[{"id":"-95a5c11c-fb39-526f-a713-ac5e88ca2f1d","title":"Pipelines","slug":{"current":"pipelines"}}]}},{"node":{"id":"-9725a381-5c1b-5ed5-9d48-a185fa566423","title":"Utilizing the Dashboard Side Bar | BEGINNER","metaDescription":"As your dashboards become more complex – they can become cluttered with reports, buttons, and links that take up precious real estate on your screen. Because the Home Page is the first thing people see when they log in, its important to make sure its not confusing or hard on the eyes.  The Side Bar …","body":"As your dashboards become more complex – they can become cluttered with reports, buttons, and links that take up precious real estate on your screen. Because the Home Page is the first thing people see when they log in, its important to make sure its not confusing or hard on the eyes. \n\nThe Side Bar is a space reserved on the left hand side of the screen that it ‘invisible’ until used, but offers a great way to put searches and buttons in one place where it doesn’t take up prime real estate that is reserved for branding and reports. \n\nSome common things you might put in the Side Bar:\n\n✓ Adding quick searches\n\n✓ Buttons for items not used often\n\n✓ Instructions or text to provide detail that isn’t needed on the main part of the page\n\nHow to set up your Side Bar:\n\n1. From the Home Page – select ‘Customize this Page’\n2. Drag and drop a dashboard widget all the way to the left hand edge of the screen.\n3. Move your cursor around until you see a green checkmark saying ‘Add this to the sidebar’ and release\n4.  Once there, you can manage the widgets in the side bar like normal\n\n> EDITORS NOTE:\nReports cannot be used in the sidebar.\n\nSee the below video to view a brief walkthrough of how to get your sidebar set up\n\n<iframe src=\"https://res.cloudinary.com/dnla85pdq/video/upload/v1580707504/QuandaryCG/linking-vid.mov\" style=\"border:0px #ffffff none;\" name=\"myiFrame\" scrolling=\"no\" frameborder=\"1\" marginheight=\"0px\" marginwidth=\"0px\" height=\"400px\" width=\"600px\" allowfullscreen></iframe>\n\nFor more – check out using the [Linking Dashboards together](/knowledge-base/reporting-and-dashboards/linking-dashboards-together-beginner/)","slug":{"current":"utilizing-the-dashboard-side-bar-beginner"},"categories":[{"id":"-27382539-ae20-5f0a-ace9-391d7b9a149f","title":"Reporting & Dashboards","slug":{"current":"reporting-and-dashboards"}}]}},{"node":{"id":"-d53be182-d001-59cd-996b-f4bdf9a6348c","title":"Linking Dashboards Together | BEGINNER","metaDescription":"Ensure your Dashboards demonstrate your goals and objectives. Set up multiple dashboards to keep your team focused and productive. Learn how.","body":"As a best practice with Dashboards – you want them to have a clear and specific focus. They should each tell a story or message about what you are trying to accomplish when on that page. To help keep that focus, a great approach is to set up multiple dashboards, each with a different focus, and then link them all together to tell your users story. \n\nImagine a scenario when working with a Sales Team in Quick Base, where Sales Reps are responsible for seeing new leads as they come in, scheduling follow ups, working the leads, closing deals etc. Their dashboard likely contains several reports or queues so they can see and log their activity for that day. The focus and purpose of it is to highlight their daily to do’s and where to focus their time. \n\nWhat if they want to see their metrics for the entire year? Where they are against their current goals? You would set up a different dashboard to highlight that information that they could check in on from time to time. This way – their summary information doesn’t take away from their daily checklist.\n\nSome common reasons to set up multiple dashboards might be:\n\n✓ Having daily / task oriented dashboards with the daily To Do’s and activities, with another dashboard being a Summary dashboard with reports on year to date, goals etc.\n\n✓ Setting up different Manager dashboards to let you focus on different teams and different reports\n\n✓ Back link to other roles dashboards so you can see what they see\n\nTo link one or more dashboards together:\n\n1. From the dashboard you want to modify – click ‘Customize This Page’\n\n2. From the list of widgets, drag a ‘Button Bar’ widget onto your page.\n\n3. Hover your mouse over the newly created button, click the arrow to expand the options – and click the magnifying glass looking icon to open the configuration options\n\n4. Click to the ‘Page’ tab\n\n5. Under the ‘Page’ dropdown – select the Dashboard you want to link this button to and click off to save that setup\n\n![](https://res.cloudinary.com/dnla85pdq/image/upload/v1580707456/QuandaryCG/linking-01.png)\n\nSee the below video to view a brief walk through of linking via the above steps\n\n<iframe src=\"https://res.cloudinary.com/dnla85pdq/video/upload/v1580707504/QuandaryCG/linking-vid.mov\" style=\"border:0px #ffffff none;\" name=\"myiFrame\" scrolling=\"no\" frameborder=\"1\" marginheight=\"0px\" marginwidth=\"0px\" height=\"400px\" width=\"600px\" allowfullscreen></iframe>\n\nAs highlighted in the beginning – dashboards are an excellent way to display items that need someone's attention right when they log in. Another option though is to send that information via email utilizing [Notifications](/knowledge-base/notifications-subscriptions-reminders/setting-up-a-notification-beginner/) and [Subscriptions](/knowledge-base/notifications-subscriptions-reminders/setting-up-a-subscription-beginner/), to get real-time feedback whether they’re in Quick Base or not.","slug":{"current":"linking-dashboards-together-beginner"},"categories":[{"id":"-27382539-ae20-5f0a-ace9-391d7b9a149f","title":"Reporting & Dashboards","slug":{"current":"reporting-and-dashboards"}}]}},{"node":{"id":"-bb86f98d-e9cf-515e-ae26-6934c42b54e2","title":"Workato for Logging Quickbase Emails","metaDescription":"WORKATO FOR LOGGING EMAILS Quick Base allows users to easily set up notifications, subscriptions, and reminders.  These tools are great for designing workflows, improving communication with internal and external users, and keeping abreast of changes in an app.  The shortfall of notifications, subscriptions, and reminders is there is no way to log the emails that have been sent …","body":"### WORKATO FOR LOGGING EMAILS\n\nQuick Base allows users to easily set up [notifications](/knowledge-base/notifications-subscriptions-reminders/setting-up-a-notification-beginner/), [subscriptions](/knowledge-base/notifications-subscriptions-reminders/setting-up-a-subscription-beginner/), and [reminders](/knowledge-base/notifications-subscriptions-reminders/setting-up-reminders-beginner/). These tools are great for designing workflows, improving communication with internal and external users, and keeping abreast of changes in an app.  The shortfall of notifications, subscriptions, and reminders is there is no way to log the emails that have been sent to users – there is no audit trail.  Furthermore, if an invalid email address is entered in an email field in Quick Base and that field is the field the email is addressed to, the notification, subscription, or reminder will not be sent.  The same logic holds if you input specific emails into a notification, subscription, or reminder; if the email address is invalid, it will not be sent.  Unfortunately, there is no native functionality in Quick Base to inform you of an invalid email address.\n\nWorkato can be used to overcome the invalid email address and email logging shortcomings from Quick Base.    Recipes can be built to send emails to internal and external users that mimic Quick Base notifications, subscriptions, and reminders.  With Workato, sent emails can be logged in two different ways.\n\n1. First, Workato allows a user to cc an email address or a shared inbox so that all communication is sent to the intended recipient and a central location.  This solution is effective, but it can be cumbersome to search an inbox for a specific message.\n\n2. The second solution is more dynamic and allows the user to quickly find a sent notification, subscription, or reminder.  In Quick Base, build an Emails table and create fields for information you want to log such as: To, From, Subject, Message, Attachments, etc. (note date/time sent is automatically logged by the Date Created field).  In the Workato recipe, add a step to create a record in the new Emails table.  Now, when a notification, subscription, or reminder is sent, a new record will be created in the Emails table simultaneously.  Add dynamic filters or create reports in the Emails table to be able to quickly search for past communications. \n\nBoth solutions above solve Quick Base’s limitation of catching an invalid email address.  If Workato is unable to complete a recipe, it sends an error email to the Workato administrator.  From the Workato error email, it is easy to find the invalid email address in Quick Base and correct the data entry error.\n\nWorkato also enhances Quick Base’s native ability to send reports.  In both solutions, Workato can send reports from Quick Base, Dropbox, etc. can be added as attachments in the email.\n\n> EDITORS NOTE:\nThe above-outlined logging sent emails. The process can be reversed to log received emails as well. In Workato, a new email to an inbox will trigger a recipe to create a new record in the email table in Quick Base. Building this process can bring everything a user needs into Quick Base and make their job more efficient.\n\nIf you are interested in learning more about non-native Quick Base functionality, check out the article, [Google Maps for Data Visualization](/knowledge-base/quick-base-outside-of-the-box/google-maps-for-data-visualization/).","slug":{"current":"workato-for-logging-quick-base-emails"},"categories":[{"id":"-dc095853-fb86-5354-8647-e35dd8636ed2","title":"Quickbase Outside Of The Box","slug":{"current":"quick-base-outside-of-the-box"}}]}},{"node":{"id":"-298cd1a9-80ff-5f0c-93a4-dfe943702af6","title":"Color-Coding Rows in Reports | BEGINNER","metaDescription":"Color-code your report rows to ensure important information stands out to others. Learn how to use Quckbase to draw attention to critical details in this guide.","body":"Color-coding your report rows allows the important information to stand out to your audience. Drawing attention to critical details will save time and create action.\n\nSome common scenarios that you might encounter where color coding rows in your report would be beneficial are:\n\n✓ Highlight data that is “on track”\n\n✓ Show attention to a problem\n\n✓Ease of identifying action items\n\nYou can switch between three color-coding methods available in the report builder:\n\n✓ Selecting colors\n\n✓ Writing a formula\n\n✓ Default color-coding\n\n* * *\n\n#### Color-Coding by Selecting Colors:\n\n> EDITORS NOTE:\n**Color-coding by selecting colors is available for the following field types:**\n- Text – Including Multiple Choice and Multi-Select\n- Email\n- Components of an Address Field, like street or state\n- Formula Text and Email\n- Checkbox and Formula – Checkbox\n\n1. Open up a report you would like to start customizing and select the **Customize this Report** key icon from the upper right corner.\n\n![](https://res.cloudinary.com/dnla85pdq/image/upload/v1580701422/QuandaryCG/color-coding-01.png)\n\n2. Navigate towards the bottom of the report builder and locate section heading, **Color-Coding**.\n\n![](https://res.cloudinary.com/dnla85pdq/image/upload/v1580701425/QuandaryCG/color-coding-02.png)\n\n3. In the **Color-Coding** Section of the report builder, select the radio button **Assign to choices**.\n\n![](https://res.cloudinary.com/dnla85pdq/image/upload/v1580701423/QuandaryCG/color-coding-03.png)\n\n✓ Select the field you want to color-code. Quick base creates up to 10 unique color options.\n\n✓ You can assign colors for any field values without a color – up to a maximum of 10 options.\n\n#### You can customize color assignments by:\n\n✓ Selecting a different color from the color palette.\n\n✓ Selecting a different field value from the drop down.\n\n✓ Removing the color by selecting the **Remove** icon.\n\n✓ Adding a color by selecting a field value, then selecting a color.\n\n![](https://res.cloudinary.com/dnla85pdq/image/upload/v1580701423/QuandaryCG/color-coding-04.png)\n\n> EDITORS NOTE:\nPlease follow this link for more information on using advanced color-coding options using Hex Codes: <a href=\"https://www.color-hex.com/\" target=\"_blank\">Color Hex Color Codes</a>.\n\n4. Select **Display** to preview your work or select **Save** to save your work.\n\n* * *\n\n#### Color-coding by Writing a Formula:\n\nSometimes the built-in color-coding rules in Quick Base don’t go quite far enough. Adding your own colorization formula can use conditional logic based on multiple fields to provide a power boost to help you do things the built-in rules can’t do.\n\n1. Navigate to the upper right corner and **select** the **Customize this Report** key icon.\n\n![](https://res.cloudinary.com/dnla85pdq/image/upload/v1580701422/QuandaryCG/color-coding-05.png)\n\n2. Navigate towards the bottom of the report builder and locate section heading, **Color-Coding**.\n\n![](https://res.cloudinary.com/dnla85pdq/image/upload/v1580701423/QuandaryCG/color-coding-06.png)\n\n3. In the **Color-Coding** section of the report building, select **Write a formula**.\n\n![](https://res.cloudinary.com/dnla85pdq/image/upload/v1580701423/QuandaryCG/color-coding-07.png)\n\n✓ In the formula editor, enter a formula that defines color assignments.\n\n✓ The formula input must tell Quick Base the conditions needed to assign a color. In most cases, formulas use IF or CASE statements to define the conditions.\n\n> EDITORS NOTE:\nTo view articles about CASE statements click here: [Using the CASE function | INTERMEDIATE](/knowledge-base/quick-base-fields-and-formulas/using-the-case-functions-intermediate/)\n\n✓ The formula must return the colors as text in HTML color names like “Blue,” or “Orange.”\n\nHere is an example of a simple colorization formula where any **Account Numbers** equal to **“2026000”** will be highlighted in Blue and **Account Numbers** equal to **“87100”** will be highlighted in Orange.\n\n#### Before:\n\n![](https://res.cloudinary.com/dnla85pdq/image/upload/v1580701423/QuandaryCG/color-coding-08.png)\n\n#### Result:\n\n![](https://res.cloudinary.com/dnla85pdq/image/upload/v1580701423/QuandaryCG/color-coding-09.png)\n\n4. Select **Display** to preview your work or select **Save** to save your work.\n\n* * *\n\n#### Specifying Default Color-Coding:\n\n> BEST PRACTICE:\nKeep in mind, this option will change the coloring on all reports that are set to default color-coding, but it’s not best practice unless you want all reports to be color-coded initially.\n\n1. Navigate to the upper right corner and **select** the **Customize this Report** key icon.\n\n![](https://res.cloudinary.com/dnla85pdq/image/upload/v1580701423/QuandaryCG/color-coding-10.png)\n\n2. Navigate towards the bottom of the report builder and locate section heading, **Color-Coding** and select **Default**.\n\n![](https://res.cloudinary.com/dnla85pdq/image/upload/v1580701423/QuandaryCG/color-coding-11.png)\n\n3. Select the hyperlink **Change** in parentheses. This will redirect you to the **Default Report Settings**.\n4. Scroll down to the bottom of the page and under the **Color-Coding** section select **Assign to choice in**.\n\n![](https://res.cloudinary.com/dnla85pdq/image/upload/v1580701424/QuandaryCG/color-coding-12.png)\n\n#### You can customize color assignments by:\n\n✓ Selecting a different color from the color palette.\n\n✓ Selecting a different field value from the drop-down.\n\n✓ Removing the color by selecting the **Remove** icon.\n\n✓ Adding color by selecting a field value, then selecting a color.\n\n5. Select **Save**.\n\n* * *\n\n#### Removing Color-Coding:\n\n1. Navigate to the upper right corner and **select** the **Customize this Report** key icon.\n\n![](https://res.cloudinary.com/dnla85pdq/image/upload/v1580701424/QuandaryCG/color-coding-13.png)\n\n2. In the **Color-Coding** section of the report builder, select **None**.\n\n![](https://res.cloudinary.com/dnla85pdq/image/upload/v1580701425/QuandaryCG/color-coding-14.png)\n\n3. Select **Save**.\n\n* * *\n\nTo learn more ways to customize your reports in Quick Base, check out more articles here: [Reporting & Dashboards](/knowledge-base/reporting-and-dashboards/).\n\n* * *","slug":{"current":"color-coding-rows-in-reports-beginner"},"categories":[{"id":"-27382539-ae20-5f0a-ace9-391d7b9a149f","title":"Reporting & Dashboards","slug":{"current":"reporting-and-dashboards"}}]}},{"node":{"id":"-4dde28cf-e50a-51e2-ac9c-f282e01f9280","title":"Adding Conditional Actions to Your Workato Recipe | INTERMEDIATE","metaDescription":"The \"if-else\" statement allows us to specify what action must occur \"if\" a certain condition is met. Learn how to extend your Workato recipe. ","body":"Welcome to step 3 in our introductory series on how to use Workato.  We’ve already learned how to [make a connection](/knowledge-base/workato-knowledge-center/creating-a-new-app-connection-in-workato-beginner/) and construct our first [Workato recipe](/knowledge-base/workato-knowledge-center/creating-your-first-workato-recipe-intermediate/).  If you’re new to Workato and haven’t read our first to articles, linked above, I recommend you read them before starting this step.\n\nIf you recall from our [previous article](/knowledge-base/workato-knowledge-center/creating-your-first-workato-recipe-intermediate/), we built a recipe that added a record to Quickbase whenever a new row was added in Google Sheets. Now we’ll extend our recipe so that, when a row in our Google sheet is updated the corresponding record in Quickbase is also updated.  \n\nOur new recipe will add to that logic: If a row is updated in Google Sheets, update its corresponding record in Quickbase.  If a new row is added add a record to Quickbase and write that new records ID back to the newly added Google Sheet row.\n\nConditional logic allows you to enter something similar to a standard “if-statement’, where actions are only taken ‘if’ a certain condition is met (ex. a row is updated).  In our case we will be using a “if-else” statement.  This allows us to specify what to do “if” a certain condition is met (ex. a row is updated) and the ‘else’ will specify another action to take in the case the ‘if’ condition is not met (ex. a row is added).  If this doesn’t immediately make sense, reading through the proceeding steps should help.\n\nLet’s look at how to set this up:\n\nWe’ll start by creating this recipe just like we did with our [last Workato recipe](/knowledge-base/workato-knowledge-center/creating-your-first-workato-recipe-intermediate/).\n\n1. In your Google account, create a new Google Sheets and add three columns; ‘Customer Name’, ‘Sign-up Date’ and ‘Quickbase ID’.  Name your new sheet ‘Customers (Example)’\n\n![](https://res.cloudinary.com/dnla85pdq/image/upload/v1580277568/QuandaryCG/adding-conditional-01.png)\n\n2. Sign in to your Workato account\n3. Make sure you are on the ‘Recipes’ tab. Click the green button labeled ‘Create a new recipe’.\n4. Select your application (Google Sheets) and your trigger (new/update row in sheet).  The result should look like this:\n\n![](https://res.cloudinary.com/dnla85pdq/image/upload/v1580277569/QuandaryCG/adding-conditional-02.png)\n\nClick ‘Next’\n\n5. Now, choose a Google Sheets connection.  If you need help creating a new connection click here for a guide to creating connection in Workato.\n\n![](https://res.cloudinary.com/dnla85pdq/image/upload/v1580277569/QuandaryCG/adding-conditional-03.png)\n\n6. Once you select your ‘Connection,’ you’ll be prompted to select a spreadsheet from your Google Sheets account as well as the sheet/tab in your spreadsheet you wish to use.\n\n![](https://res.cloudinary.com/dnla85pdq/image/upload/v1580277569/QuandaryCG/adding-conditional-04.png)\n\nClick ‘Next’\n\n7. Now we’ll set up our Action. We’re going to have two actions; ‘Update Record’ and ‘Create Record’. We’ll create our ‘Update Record’ action first\n\n![](https://res.cloudinary.com/dnla85pdq/image/upload/v1580277568/QuandaryCG/adding-conditional-05.png)\n\n8. Select your connection for Quickbase.  If you do not have an existing connection with your Quickbase database will have to create a new one. For instruction click [here](/knowledge-base/workato-knowledge-center/creating-a-new-app-connection-in-workato-beginner/).\n\nEnter your Quickbase subdomain (ex. https://yourdomain.quickbase.com). Then enter the requested credentials but with your application’s information substituted (as pictured below).\n\n![](https://res.cloudinary.com/dnla85pdq/image/upload/v1580277569/QuandaryCG/adding-conditional-06.png)\n\nOnce completed click ‘Next’\n\n9. Now select the QB application you’d like to send your data to\n\n![](https://res.cloudinary.com/dnla85pdq/image/upload/v1580277569/QuandaryCG/adding-conditional-07.png)\n\nNow designate a source for the Quickbase Record ID.  This is how Workato will identify which record is updated in Quickbase when a change/update is made to that row in Google Sheets:\n\n![](https://res.cloudinary.com/dnla85pdq/image/upload/v1580277569/QuandaryCG/adding-conditional-08.png)\n\nThen, select the fields to be updated in the ‘Table field list’ and select the corresponding fields in Google Sheets for each field.  Your recipe action should now look like this:\n\n![](https://res.cloudinary.com/dnla85pdq/image/upload/v1580277569/QuandaryCG/adding-conditional-09.png)\n\nOnce completed, click ‘Finish’.  We’re not actually finished though.  We’re going to edit our recipe and add an action to add a record as well as some logic to determine whether a record should be updated or added.\n\n10. At the moment our recipe should look like this.\n\n![](https://res.cloudinary.com/dnla85pdq/image/upload/v1580277569/QuandaryCG/adding-conditional-10.png)\n\nOur next step will be to add a conditional action.  To do so, click the plus sign (+) below the ‘Update Customers in Quickbase’ action and select ‘Conditional with Else’:\n\n![](https://res.cloudinary.com/dnla85pdq/image/upload/v1580277569/QuandaryCG/adding-conditional-11.png)\n\nNow, drag our ‘Update Customers (KB Example) in Quickbase to the location of the black arrow below:\n\n![](https://res.cloudinary.com/dnla85pdq/image/upload/v1580277569/QuandaryCG/adding-conditional-12.png)\n\n11. By dragging your action into the conditional action area you’ve now got two actions. Delete the extra action:\n\n![](https://res.cloudinary.com/dnla85pdq/image/upload/v1580277570/QuandaryCG/adding-conditional-13.png)\n\nNow we’ll set up our condition\n\n12. Click into Step 1 of your action, ‘Setup your condition’, just below our trigger.  Here we’ll add two conditions;  First, ‘Updated’ to indicate the row has been updated. Second, that data ‘is present’ in the ‘Quickbase ID’ column of our Google Sheet.\n\n![](https://res.cloudinary.com/dnla85pdq/image/upload/v1580277570/QuandaryCG/adding-conditional-14.png)\n\n13. At the moment our new conditional action say that if a Google Sheet row is updated, update the corresponding record in Quickbase, if not (else) do something.  Now we need to define what that something is. To do so, click into the field labeled ‘Select app and action….’ highlighted below:\n\n![](https://res.cloudinary.com/dnla85pdq/image/upload/v1580277570/QuandaryCG/adding-conditional-15.png)\n\n14. Now we’ll set up a ‘Create Record’ action which is virtually identical to our previous ‘update record’ action.  When completed, your setup should look just like this. (Update the application and table name with your own):\n\n![](https://res.cloudinary.com/dnla85pdq/image/upload/v1580277570/QuandaryCG/adding-conditional-16.png)\n\n15. Now for the last step in the recipe.  Remember when we created our ‘update record’ action and we added the record ID from Google Sheets?  Now we need to create an action which, when a new record is added to Quickbase, writes the record ID of the created Quickbase record back to the Google sheet row.  Let’s start by cloning our ‘Create Customers….’ action:\n\n![](https://res.cloudinary.com/dnla85pdq/image/upload/v1580277570/QuandaryCG/adding-conditional-17.png)\n\n16. Now we’ll change the action we just cloned to the following:\n\n![](https://res.cloudinary.com/dnla85pdq/image/upload/v1580277570/QuandaryCG/adding-conditional-18.png)\n\n17. Let’s take a moment to look at our recipe and recall what we’ve just done:\n1. We created our trigger for when a row is ‘New/Updated’\n2. We added a condition to determine if the row is ‘updated’ and a ‘Quickbase ID is present’\n3. If ‘Yes’, ‘Update Customer Table Record’\n4. If ‘No’ create a new Quickbase record in our table, then update our spreadsheet row with the record ID of the newly created Quickbase record.\n\n![](https://res.cloudinary.com/dnla85pdq/image/upload/v1580277570/QuandaryCG/adding-conditional-19.png)\n\n18. All that’s left now is to save and test our recipe. Make sure to check what happens when you add a new row as well as when you edit an existing row.\n\nTo view a full collection of articles on Workato recipes and other ideas click [here](/knowledge-base/workato-knowledge-center/)","slug":{"current":"adding-conditional-actions-to-your-workato-recipe-intermediate"},"categories":[{"id":"-19639513-515e-5bd2-b0ac-4fddcab7d3be","title":"Workato Knowledge Center","slug":{"current":"workato-knowledge-center"}}]}},{"node":{"id":"-c58bb305-926e-5def-a87d-8d4de197405b","title":"Setting up Reminders | BEGINNER","metaDescription":"Reminders allow you to send an email a specific number of days before or after a record date. Keep your projects on track in Quickbase. Learn how.  ","body":"**Reminders** allow you to send an email a specific number of days before or after a record date.  Let’s consider a few examples:\n\n✓ Email an employee’s manager a week before the employee’s birthday\n\n✓ Email a reminder to the equipment manager when a tool has passed its calibration date\n\n✓ Send a technician an email the day before scheduled travel\n\nLet’s take a look at how we might set up our last example:\n\n_Send a technician an email the day before scheduled travel_\n\n> EDITORS NOTE:\nSetting up reminders is a feature only available to application Administrators\n\n1. Go to the table containing your task records. Then, click the ‘Settings’ link in the upper-left corner of the page.\n2. Once there, find the option for Notifications, Subscriptions, and Reminders. Click ‘New’ and a pop-up box will appear.  Select ‘Reminder’ and click the button labeled ‘Create’. You will now be presented with a few simple options to configure your Reminder.\n3. Start by giving your Reminder a name:\n\n![](https://res.cloudinary.com/dnla85pdq/image/upload/v1580793990/QuandaryCG/reminders-begin-01.png)\n\n4. Next, tell Quick Base who should receive the reminder by specifying the number of days before/after a date field in your table\n\n![](https://res.cloudinary.com/dnla85pdq/image/upload/v1580793990/QuandaryCG/reminders-begin-02.png)\n\nIn this case we are telling Quick Base to send a reminder 1 day prior to the [Start Date]\n\n5. If you choose, you can also set additional conditions to only send your reminder under more specific scenarios.  In this case we will only send the reminder if the employees travel has been ‘fully booked’\n\n![](https://res.cloudinary.com/dnla85pdq/image/upload/v1580793991/QuandaryCG/reminders-begin-03.png)\n\n6. Lastly, add any text you would like to include in your email reminder:\n\n![](https://res.cloudinary.com/dnla85pdq/image/upload/v1580793991/QuandaryCG/reminders-begin-04.png)\n\nOnce you’ve completed this step navigate to the the top of the setting page and click ‘Preview’ to view an example of what your reminder will look like when sent\n\n![](https://res.cloudinary.com/dnla85pdq/image/upload/v1580793992/QuandaryCG/reminders-begin-05.png)\n\n7. Once you’re satisfied with your Reminder settings click ‘Save’ \n\nFor more information regarding triggered emails in Quickbase, checkout our articles on [Subscriptions](/knowledge-base/notifications-subscriptions-reminders/setting-up-a-subscription-beginner/) and [Notifications](/knowledge-base/notifications-subscriptions-reminders/setting-up-a-notification-beginner/).","slug":{"current":"setting-up-reminders-beginner"},"categories":[{"id":"-00366782-bad9-5d54-90e3-d3f86c145de0","title":"Notifications/Subscriptions/Reminders","slug":{"current":"notifications-subscriptions-reminders"}}]}},{"node":{"id":"-57d312cb-6486-52ca-98f5-49e7a58855a2","title":"API EditRecord | ADVANCED","metaDescription":"API_EditRecord is another basic API component that allows the user to make an edit to a single record in Quick Base Common use cases for using the API_EditRecord might include: ✓ Creating a custom button in Quick Base that will edit several fields at once ✓ Implement in Quick Base Webhooks to edit a record …","body":"API_EditRecord is another basic API component that allows the user to make an edit to a single record in Quick Base\n\nCommon use cases for using the API_EditRecord might include:\n\n✓ Creating a custom button in Quick Base that will edit several fields at once\n\n✓ Implement in Quick Base Webhooks to edit a record once certain changes occur\n\n✓ Custom Scripting (either client or server-side)\n\n \n\nImagine a scenario where you want to approve a record in Quick Base. You want to mark the record as approved, log the date it was approved and log the current user as the approver. To do so, you could create a button that uses API_EditRecord to create a seamless workflow.\n\n> EDITORS NOTE:\nThis document will cover the URL Alternative for utilizing API_EditRecord. The URL alternative is applicable for use in native Quick Base buttons, Webhooks, as well as GET requests in custom scripting. This article does not cover POST Requests, although the details are transferrable.\n\n_Please reference the Quick Base <a href=\"https://help.quickbase.com/api-guide/index.html\" target=\"_blank\">API documentation</a> for [API_EditRecord](/knowledge-base/quick-base-api/api-editrecord-advanced/) for any additional information that is not included below_\n\nThe Quick Base example from their documentation is as follows:\n\n<a href=\"https://target_domain/db/target_dbid?a=API_EditRecord&rid=154&_fnm_second_year=1776&_fid_8=changed&update_id=992017018414&ticket=auth_ticket&apptoken=app_token\" target=\"_blank\">https://target_domain/db/target_dbid?a=API_EditRecord&rid=154&_fnm_second_year=1776&_fid_8=changed&update_id=992017018414&ticket=auth_ticket&apptoken=app_token</a>\n\nPart 1 – the _**Target**_\n\nThe target is the Quick Base table you want to add a record in. The colored text below represents the target.\n\n<a href=\"https://target_domain/db/target_dbid?a=API_EditRecord&rid=154&_fnm_second_year=1776&_fid_8=changed&update_id=992017018414&ticket=auth_ticket&apptoken=app_token\" target=\"_blank\">https://target_domain/db/target_dbid?a=API_EditRecord&rid=154&_fnm_second_year=1776&_fid_8=changed&update_id=992017018414&ticket=auth_ticket&apptoken=app_token</a>\n\nThe **target_domain** is your Quick Base realm. In my case, my Quick Base realm is quandarycg.quickbase.com. So, the first part of my URL would look like –\n\n`https://quandarycg.com/db/`\n\nThe **target_dbid** is the table you want to edit a record in. Every table in Quick Base is uniquely identified by a table id. To find your unique table id, navigate your browser to the table where you are trying to edit a record. Once there, take a look at your browsers URL – the text you are looking for is the string of characters that immediately follow after the “/db/”, and stops before the “?a”. In the case of the <a href=\"https://quandarycg.quickbase.com/db/bnz6hr7j9\" target=\"_blank\">Quandary CG Knowledge Base</a>, we have a table for ‘External Records’ to hold test data from Knowledge Base users. That table is found via the following link for us:\n\n<a href=\"https://quandarycg.quickbase.com/db/bnz6hr7j9\" target=\"_blank\">https://quandarycg.quickbase.com/db/bnz6hr7j9</a>\n \n\nPart 2 – the _**API Call**_\n\nThe API call is how you tell Quick Base what you are trying to do. It is the core piece that determines how Quick Base interprets everything else and what it needs from you. Everything in the API call should start with “?a=API_”. Since this document is about editing records, your full API call should read as “?a=API_EditRecord”. **Make sure you do not forget the “API_” piece**.The updated URL will be as follows:\n\n<a href=\"https://quandarycg.quickbase.com/db/bn6wwekqv?a=API_EditRecord\" target=\"_blank\">https://quandarycg.quickbase.com/db/bn6wwekqv?a=API_EditRecord</a>\n \n\nPart 3 – **Using App Tokens**\n\nDepending on your app – Application Tokens may or may not be required. For more info on how to use app tokens, please reference the Application Tokens article. If they are required, then your URL needs to call out that essential piece. Doing so requires that you add “&apptoken=” as the next part of your URL.The updated URL will be as follows:\n\n<a href=\"https://quandarycg.quickbase.com/db/bn6wwekqv?a=API_EditRecord&apptoken=itgoeshere\" target=\"_blank\">https://quandarycg.quickbase.com/db/bn6wwekqv?a=API_EditRecord&apptoken=itgoeshere</a>\n \n\nPart 4 – **Authentication/Ticket**\n\nA requirement of an API call is that the user or process making the call be logged in or authenticated in some form. For simplicity – I recommend using User Tokens. For an explanation of user tokens, please reference the User Tokens article. Incorporating a user token is similar to using apptokens, whereby you add an additional URL param to your API call for Quick Base to read. That string is “&usertoken=”. The updated URL will be as follows:\n\n<a href=\"https://quandarycg.quickbase.com/db/bn6wwekqv?a=API_EditRecord&apptoken=itgoeshere&usertoken=usertokengoeshere\" target=\"_blank\">https://quandarycg.quickbase.com/db/bn6wwekqv?a=API_EditRecord&apptoken=itgoeshere&usertoken=usertokengoeshere</a>\n \n\nPart 5 – Establishing the RID\n\nSince we are editing an existing record in Quick Base, part of your API_EditRecord needs to call out which record you want to edit. Doing so requires that identify somewhere in the URL string, the **rid** or the **key** of the record you want to change.\n\nIf you have set up your table to use a different Key field other than Record ID#, you can use the ‘key’ parameter. Otherwise, the more common usage and what will be detailed below is using the standard Quick Base Record ID# and the rid param.\n\nTo set your rid value – we will continue with the existing URL, and append a new param for ‘rid’, similar to below.\n\n<a href=\"https://quandarycg.quickbase.com/db/bn6wwekqv?a=API_EditRecord&apptoken=itgoeshere&usertoken=usertokengoeshere&rid=12345\" target=\"_blank\">https://quandarycg.quickbase.com/db/bn6wwekqv?a=API_EditRecord&apptoken=itgoeshere&usertoken=usertokengoeshere&rid=12345</a>\n\n_**Where 12345 is the Record ID of the record you want edited**_\n\nPart 6 – **Setting Field Values**\n\nThe last part of this process is determining what fields you want changed, and what values to change them to.\n\n> BEST PRACTICE:\nIt is strongly recommended to use field ID’s instead of field names given that field names can be changed over time, while field ID’s are immutable. Doing so prevents you from having to update this part of your call\n\nSetting different field values is just a matter of rinse and repeat using &_fid_#=. Make sure the field ID of the various inputs you want to set in the **target table**. Before you set up your API call, you should identify the various inputs you want to set and their associated Field IDs. With those identified, you will append &_fid_#=value to your URL string for each field you want a value set for. For example,\n\n_fid_6=Approved&_fid_7=12.19.2018&_fid_8=Chayce\n\nWhere:\n\nField ID 6 = the Approval Status\n\nField ID 7 = the Approval Date\n\nField ID 8 = the approver\n\nYour complete URL thus far would be –\n\n<a href=\"https://quandarycg.quickbase.com/db/bn6wwekqv?a=API_EditRecord&apptoken=itgoeshere&usertoken=usertokengoeshere&rid=12345&_fid_6=Approved&_fid_7=11.18.2018&_fid_8=Chayce\" target=\"_blank\">https://quandarycg.quickbase.com/db/bn6wwekqv?a=API_EditRecord&apptoken=itgoeshere&usertoken=usertokengoeshere&rid=12345&_fid_6=Approved&_fid_7=11.18.2018&_fid_8=Chayce</a>\n\nPart 7 – **Test it**\n\nTo see it in action – head over to the <a href=\"https://quandarycg.quickbase.com/db/bn22wn4cx?a=dr&r=h\" target=\"_blank\">Knowledge Base</a> and try it out\n\nIn opposition to editing records – check out [API_PurgeRecords](/knowledge-base/quick-base-api/api_purgerecords-advanced/) for more info on how to remove records.\n\n> EDITORS NOTE:\nIn March 2019, Quick Base released a clist Parameter that can now be included in all AddRecord and EditRecord calls. By including this in your API call – you can define a list of field ids such as “&clist=1.2.3.4.5” such that the XML response returns the value of these fields in the record","slug":{"current":"api-editrecord-advanced"},"categories":[{"id":"-46109a16-4c3d-593f-a8f1-11046af26ef6","title":"Quickbase API","slug":{"current":"quick-base-api"}}]}},{"node":{"id":"-517481c2-ea0f-53e3-bd54-8a6ec1f39d57","title":"Implementing Custom Imports","metaDescription":"Use data outside of Quickbase with ease. Combine Quickbase DB Pages with custom code to increase workflow efficiency. Learn why custom imports are so effective.","body":"### Implementing Custom Imports\n\nIf you are like a lot of companies, you likely have a situation where not all of your data originates in Quick Base, or it comes from outside your company. Take an example where you work with a vendor that sends you orders each week via an excel file. They send you a list of new orders via email, and you’ve set up a Quick Base application to store all of those orders and then you’ve set up your application to handle them once imported.\n\nGiven Quick Base’s import abilities, you can import a flat file into Quick Base with ease. But what if that file has data points the represent different tables in Quick Base? What if its not just as easy as importing ‘Orders?’ Imagine that a single row in that file has information about the customer, where to bill, where work is performed, each service / product requested in that order, dates, financials etc. In Quick Base, that may point to tables such as Clients, Purchase Orders, Purchase Order Lines, Services, Employees, Addresses etc etc.\n\nExcel files/tabs are flat – your Quick Base applications are not. \n\nIf you’re like a lot of people I’ve seen, you are likely manually taking that file, splitting it out and creating several different imports in excel and then importing to each table one by one with the right information in pieces. This might look like importing new Customers, then importing new Orders for those Customers that were just created, then finally importing the Services needed on those Orders just created. 3 steps to import one file.\n\nAn alternative that we’ve used to great success for our clients is to combine Quick Base DB Pages with a little custom code to create a custom import to accomplish this with ease. Doing so means that you let the code do all the work. You define the process and a developer writes the process to absorb that data in the file and manipulate it to meet your business need. Setting this up means your users just copy and paste their file into a screen similar to below – then hit submit, and let a custom process eliminate your manual one. No more manipulation in excel.\n\n![](https://res.cloudinary.com/dnla85pdq/image/upload/v1580197002/QuandaryCG/implementing-01.png)\n\nWhy use methods like custom imports?\n\n✓ Reduce manual intervention to a matter of seconds by only having to copy and paste\n\n✓ Build in error checking in order to see if the file has any missing information or issues\n\n✓ Add additional logic or conditions to make your import ‘smarter’ – such as assigning orders automatically, replacing bad data, removing duplicates etc.\n\nRemoving human intervention by adding things like custom imports not only reduces time, it also ensures accuracy and consistency from person to person. Training becomes a matter of minutes to show someone how to do your imports. For more information about Custom Imports, send us an email to get more information about next steps or how we can get you moving in the right direction.","slug":{"current":"implementing-custom-imports"},"categories":[{"id":"-dc095853-fb86-5354-8647-e35dd8636ed2","title":"Quickbase Outside Of The Box","slug":{"current":"quick-base-outside-of-the-box"}}]}},{"node":{"id":"-b82a3f26-b3ef-5c99-b7ae-e7c8d8b841de","title":"Workato and Sending HTTP Requests | ADVANCED","metaDescription":"Workato has a HTTP connector feature that allows for added functionality for an API system that accepts HTTP requests. Learn how to integrate your API. ","body":"If you’ve dug around into the built-in Workato actions like Loggers and Variables, you might have seen the action for HTTP Requests. While Workato comes pre-loaded with hundreds of out-of-the-box actions and triggers, you might find yourself using a system that Workato doesn’t have a well defined connector for.\n\nLets take a simple example with Quick Base. Workato handles most major functions that a Quick Base / Workato developer might need. It handles most CRUD actions in any table, file handling capabilities – and has extremely powerful query abilities. But the Quick Base API is much broader than that. There are also User Management and Schema level capabilities at your disposal depending on what you’re doing. While these are not built in features to Workato – that doesn’t mean Workato doesn’t have a solution.\n\nEnter the <a href=\"https://docs.workato.com/developing-connectors/http-v2.html\" target=\"_blank\">HTTP Connector</a>. With this method – you can enter any API call to any system that accepts HTTP Requests. You can do any GET, POST, PUT, DELETE, HEAD, PATCH, sent as XML, JSON, Text, Binary. This means that if you can find the API documentation for your cloud system – you’re almost guaranteed to be able to integrate it with Workato and HTTP. In order to use the HTTP connector – you only have to select ‘HTTP’ from your ‘Actions’ dropdown. From there – you can select your method, and start configuring your request as needed. For more detail about what has to actually go into your HTTP request – you’ll need to review and understand the API documents for your intended system/endpoints\n\n![](https://res.cloudinary.com/dnla85pdq/image/upload/v1580267993/QuandaryCG/workato-and-sending-01.png)\n\nSo when would you use this method?\n\n1. Workato doesn’t have an action you for one of its existing connectors\n2. Workato doesn’t currently support the system your are using, but that system does accept HTTP requests\n3. Workato has a built in action for your system, but you need to pass in unique/special parameters in your request that aren’t currently supported\n\nNow – keep in mind that when doing it this way – you lose a little bit of functionality that Workato normals builds in for you.\n\nIn keeping with the Quick Base Example – lets say you want to use Workato to automatically invite users. Out of the box – Workato doesn’t have a built in action for provisioning Quick Base users – API_ProvisionUser. Quick Base will happily accept a GET request for that particular action though – so we turn to using the HTTP action. One requirement of all Quick Base API calls though, is authentication. Normally – when you set up your Workato connector – you take care of that – and these connectors help handle the authentication for you when you use one of their built-in actions. This is what happens when you set up a new App Connection. Workato is getting you all set up so that you don’t have to worry about dealing with your user name and password every time. But with HTTP – since you’re not actually using one of your Authenticated connectors – you have to find a workaround. So for this example – you would need to make another HTTP request, this time to do an API_Authenticate to get a temporary ticket, then make your ProvisionUser call.\n\nSo while HTTP makes your integration capabilities infinitely more powerful – they also take a bit more thought into all the different implications that go into using this type of connector.\n\nWhile we’ve only focused in this article on Sending HTTP requests – Workato can also receive requests. Check back soon for an article related to Workato and Receiving HTTP Requests.\n\nIf you’re interested in learning about the more advanced developer-centric capabilities Workato offers similar to HTTP – check out this article on [Custom Connectors using the Workato SDK](/knowledge-base/workato-knowledge-center/workato-and-custom-connectors-advanced/).","slug":{"current":"workato-and-sending-http-requests-or-advanced"},"categories":[{"id":"-19639513-515e-5bd2-b0ac-4fddcab7d3be","title":"Workato Knowledge Center","slug":{"current":"workato-knowledge-center"}}]}},{"node":{"id":"-19df9259-a56c-5821-9ff5-3d223719569e","title":"Organizing & Assigning Groups To Reports | BEGINNER","metaDescription":"If you have many reports spread across different tables, organize reports across different tables of your app to create a more intuitive workflow in Quickbase. ","body":"If you have many reports spread across different tables of your app, you’ll probably want to organize them in ways that make the most sense to users of your app, rather than in one long list.\n\nFor example, you might want to move your most frequently visited reports to the beginning of the list, so your users don’t have to search for them in a list of reports. You also might want to consider grouping reports so that all similar reports, such as financial reports, are together.\n\n> EDITORS NOTE:\nPlease keep in mind that you must be an **App Administrator** to organize reports. Meaning, your role must have an access level of **Full Administration** and must also have the **Edit Field Properties** column for each table in which you want to organize reports. These options appear on the **Permissions Table** when you edit the role.\n\n* * *\n\n#### To Organize reports:\n\n1. In the table bar, select the table featuring the report.\n\n![](https://res.cloudinary.com/dnla85pdq/image/upload/v1580694765/QuandaryCG/organizing-01.png)\n\n2. Select **Reports & Charts** to open the reports panel.\n\n![](https://res.cloudinary.com/dnla85pdq/image/upload/v1580694765/QuandaryCG/organizing-02.png)\n\n3. Select **Organize** at the top of the panel.\n\n> EDITORS NOTE:\nYou cannot organize reports listed under **Recent**,  or personal reports listed under **Mine**.\n\n![](https://res.cloudinary.com/dnla85pdq/image/upload/v1580694765/QuandaryCG/organizing-03.png)\n\n4. Select a report’s name or icon and drag it to a different location in the panel. You can move the report to a different location within the same group, or into a separate group. A yellow line will be displayed to show you the drop location.\n\n![](https://res.cloudinary.com/dnla85pdq/image/upload/v1580694765/QuandaryCG/organizing-04.png)\n\n> EDITORS NOTE:\nIf you have several reports, you may want to drag to a location not visible on the screen. Simply move your cursor to the arrow at either end of the panel to scroll forward or backward.\n\n5. Drop the report to finish moving it.\n6. Select **Done Organizing** to return to viewing the reports panel.\n\n![](https://res.cloudinary.com/dnla85pdq/image/upload/v1580694765/QuandaryCG/organizing-05.png)\n* * *\n#### To Rearrange Groups:\n\nGroups can be rearranged just like reports can, except that only one group at a time can be dragged.\n\n#### To Assign Reports to groups in report settings:\n\n1. In the settings for a new or existing report, use the **Reports & Charts Panel Section**, then select **Show options**.\n\n![](https://res.cloudinary.com/dnla85pdq/image/upload/v1580694765/QuandaryCG/organizing-06.png)\n\n2. Use the **Group for this report** setting to select an existing group.\n\n![](https://res.cloudinary.com/dnla85pdq/image/upload/v1580694766/QuandaryCG/organizing-07.png)\n\n* * *\n\n#### Working with Groups:\n\n#### To Create a Group:\n\n1. Select the **Organize** button on the reports panel.\n\n![](https://res.cloudinary.com/dnla85pdq/image/upload/v1580694766/QuandaryCG/organizing-08.png)\n\n2. Select one or more reports and drag them onto the **“Drag here to create a group”** area on the right-hand side of the reports panel.\n\n> EDITORS NOTE:\nTo select/highlight multiple reports at one time, use command + left click (MacOS) or use ctrl + left click (Windows).\n\n3. Enter a group name, and click the green check mark or press **Enter** to save the new name. To cancel, click the (X) icon.\n\n![](https://res.cloudinary.com/dnla85pdq/image/upload/v1580694766/QuandaryCG/organizing-09.png)\n\n4. Select **Done Organizing** to return to viewing the reports panel.\n\n#### Group Name Restrictions:\n\n✓ Group names have a maximum of 32 characters.\n\n✓ Group names cannot be blank or empty.\n\n✓ Groups may not be names, **Mine**, **Common**, or **Recent**.\n\n#### To Delete a Group:\n\n> EDITORS NOTE:\nThere are two ways to delete a group – using the delete icon and removing all the reports individually from the group. Follow the steps below to delete a group by the delete icon.\n\n1. Select the **Organize** button on the reports panel.\n\n![](https://res.cloudinary.com/dnla85pdq/image/upload/v1580694766/QuandaryCG/organizing-10.png)\n\n2. Hover over a report’s name, and click the delete icon (X) that appears.\n\n![](https://res.cloudinary.com/dnla85pdq/image/upload/v1580694766/QuandaryCG/organizing-11.png)\n\n3. Confirm the action by clicking **Delete Group** on the dialog that displays. The reports in the group will be placed back into the **Common** group after you confirm deletion.\n\n![](https://res.cloudinary.com/dnla85pdq/image/upload/v1580694766/QuandaryCG/organizing-12.png)\n\nThe Dialog box also provides you the option to permanently delete all of the reports in the groups if you so choose.\n\n4. Select **Done Organizing** to return to viewing the reports panel.\n\n* * *\n\nTo learn more about Reporting & Dashboards, check out more articles here: [Reporting & Dashboards](/knowledge-base/reporting-and-dashboards/)\n\n* * *","slug":{"current":"organizing-assigning-groups-to-reports-beginner"},"categories":[{"id":"-27382539-ae20-5f0a-ace9-391d7b9a149f","title":"Reporting & Dashboards","slug":{"current":"reporting-and-dashboards"}}]}},{"node":{"id":"-8de45284-572b-5b75-9f39-e8ea949fb00f","title":"Setting up a Notification in Quickbase | BEGINNER","metaDescription":"A notification is an email triggered when one of the records in your table is modified, added or deleted. Learn types and how to set these up in Quickbase.","body":"A **notification** is an email that is triggered when one of the records in your table is modified, added, or deleted.  \n\nExamples of notifications might include:\n✓ Email the project manager when a team member closes a task\n✓ Email an employee when their time-off is approved\n✓ Email a customer when their package has shipped\n\nLet’s look at our first example: _Emailing the project manager when a team member closes a task_.\n\nTo set this up:\n\n1. Go to the table where your task records are contained. Then, click ‘Settings’ in the upper-left corner of the page.\n2. Next, find the option for ‘Notifications, Subscriptions, and Reminders’.\n3. Click ‘New’ and a pop-up box will appear. Select ‘Notification’ and click ‘Create’. You will now configure your notification.\n4. Select notification type as ‘Recipient’ or ‘Open’. The ‘Recipient’ option requires that notifications only be sent to Quickbase users in your app. ‘Open’ is a less restrictive option which allows you to send a notification to any email address.\n\n![](https://res.cloudinary.com/dnla85pdq/image/upload/v1580793540/QuandaryCG/setting-up-a-01.png)\n\n5. Provide a name for your Notification\n\n![](https://res.cloudinary.com/dnla85pdq/image/upload/v1580793539/QuandaryCG/setting-up-a-02.png)\n\n6. Enter the recipient(s) of the notification. The notification can be sent to any user field contained in your record. In this case we select “The user listed in the field: Project Manager’ as shown in the picture below.\n\n![](https://res.cloudinary.com/dnla85pdq/image/upload/v1580793539/QuandaryCG/setting-up-a-03.png)\n\n> EDITORS NOTE:\nNote that also have the option enter a specific email address(es) as your recipient(s). Be aware that any addresses listed must be from an existing Quickbase user if you have selected the “Recipient” option listed in step 4\n\n7. Next define when the notification will be sent. A notification can be sent anytime one of the following actions takes place on a record:\n\n![](https://res.cloudinary.com/dnla85pdq/image/upload/v1580793540/QuandaryCG/setting-up-a-04.png)\n\nIn this case, we select the option ‘a task is modified’. This only sends an alert when a task is modified. Then, we select additional criteria. \n\nNext, we select when a specific field changes, and that field is ‘Task Status’.  \n\nThis means that for the notification to fire an email. The field ‘Task Status’ must change from one value to another. In this case, we select only ‘Task Status.' However, in many cases you will select multiple fields:\n\n![](https://res.cloudinary.com/dnla85pdq/image/upload/v1580793540/QuandaryCG/setting-up-a-05.png)\n\nFinally, we can add a notification filter, which tells our notification to send only if the ‘Task Status’ is equal to the value ‘Complete’:\n\n![](https://res.cloudinary.com/dnla85pdq/image/upload/v1580793540/QuandaryCG/setting-up-a-06.png)\n\n8. Email Customization: By default, an email will be sent to the Project Manager listed on the record whenever a Task changes to the status incomplete. The email will contain an embedded, read-only copy of the record, highlighting all the fields that had changed.\n\nYou also have the option to create a custom (HTML) email. \n\nBelow is an image of the customization view. Notice in the picture below that there is a dropdown box on the far right with the text “Choose Fields and Markers”.  \n\nYou may add fields and markers to the text of your email. When sent the email will then include the record value of whatever field or marker you include. Markers include such items as a copy of the record, a link to the record, the table ID, etc.\n\n![](https://res.cloudinary.com/dnla85pdq/image/upload/v1580793541/QuandaryCG/setting-up-a-07.png)\n\n8. When you’ve completed configuring your notification click ‘Save’.   \n\nFor more information regarding triggered emails in Quickbase, checkout our articles on [Subscriptions](/knowledge-base/notifications-subscriptions-reminders/setting-up-a-subscription-beginner/) and [Reminders](/knowledge-base/notifications-subscriptions-reminders/setting-up-reminders-beginner/).","slug":{"current":"setting-up-a-notification-beginner"},"categories":[{"id":"-00366782-bad9-5d54-90e3-d3f86c145de0","title":"Notifications/Subscriptions/Reminders","slug":{"current":"notifications-subscriptions-reminders"}}]}},{"node":{"id":"-e35f6a67-8915-5394-b730-ae5c98464f74","title":"Kanban Reports | BEGINNER","metaDescription":"Manage large teams or work across multiple workflows using Kanban Reports. Instantly view, share, and update tasks to keep your teams productive. Find out how.","body":"### Why Kanban?\n\nWhen it comes to managing large teams or work across multiple stages and resources, standard reports can be cumbersome. Interpreting large amounts of data and updating progress can be inefficient which often times can lead to confusion or delays.\n\nThat is where Kanban Reports, with drag-and-drop card views, come into play. The ability to instantly view, share, and update tasks makes it easier than ever to keep your teams focused and productive. You can display work items as cards organized in columns, and instantly update progress by dragging cards. Calculated fields, color codes and filtering dynamically update in real time as well.\n\n![](https://res.cloudinary.com/dnla85pdq/image/upload/v1580460673/QuandaryCG/kanban-01.png)\n\n#### Benefits of Kanban Reports in Quickbase:\n\n✓ Visibility into Real-Time Status Information.\n\n✓ Data Collection for Process Improvement.\n\n✓ Kick off an automated workflow by dragging a card.\n\n✓ Drill-down on the card to view all the related information you need.\n\n* * *\n\n#### Create a Kanban Report:\n\n1. From the Table bar, choose a table you would like the Kanban report to live in.\n2. Select **Reports & Charts** to open the reports and charts panel, then click **+New**\n\n![](https://res.cloudinary.com/dnla85pdq/image/upload/v1580460673/QuandaryCG/kanban-02.png)\n\n3. Select **Kanban** from the list and click **Create**.\n\n![](https://res.cloudinary.com/dnla85pdq/image/upload/v1580460673/QuandaryCG/kanban-03.png)\n\n4. Add a name and description.\n\n![](https://res.cloudinary.com/dnla85pdq/image/upload/v1580460672/QuandaryCG/kanban-04.png)\n\n5. In the **Reports & Charts** panel section, determine who can see this report.\n\nWhen you save this type of report, you will have several choices to choose from. Each option will have a brief description next to them to help you select the best option.\n\n![](https://res.cloudinary.com/dnla85pdq/image/upload/v1580460673/QuandaryCG/kanban-05.png)\n\n> EDITORS NOTE:\nAn app manager can also specify which reports a particular role can see at any time. To learn how, see: [Displaying Information for Certain Roles | BEGINNER](/knowledge-base/roles-and-permissions/displaying-information-for-certain-roles-beginner/).\n\n6. In the **Card Groups** section, select the multiple-choice field or user field you want to use to group your cards into columns.\n\n> EDITORS NOTE:\nEach group will display the first 50 records as cards on your report.\n\n![](https://res.cloudinary.com/dnla85pdq/image/upload/v1580460672/QuandaryCG/kanban-06.png)\n\n7. In the **Card Details** section, you can customize the three fields you want to display on your cards. Otherwise, the cards will display the first three fields from the default settings.\n\n![](https://res.cloudinary.com/dnla85pdq/image/upload/v1580460673/QuandaryCG/kanban-07.png)\n\n> EDITORS NOTE:\nQuickbase currently only allows three fields to be added to the kanban report cards. There might be times where you may want to add additional fields. This can be done by implementing formula-text fields. To learn how, see: <a href=\"https://www.quickbasejunkie.com/blog/how-to-kanban-hacks#hack02\" target=\"_blank\">Add more than 3 fields</a>.\n\n8. In the **Filters** section, you can customize the data that displays. You have the option to set initial filters to only include pertinent information and also define dynamic filters that enable users to change the display to quickly view information that is relevant to them.\n\n![](https://res.cloudinary.com/dnla85pdq/image/upload/v1580460673/QuandaryCG/kanban-08.png)\n\n9. In the **Sorting** section, select the fields to determine the order you want the kanban cards to appear within your columns.\n\n![](https://res.cloudinary.com/dnla85pdq/image/upload/v1580460674/QuandaryCG/kanban-09.png)\n\n10. To color-code your cards, select **Color-code cards using a formula**. To learn how, see: [Color-Coding Rows in Reports | BEGINNER](/knowledge-base/reporting-and-dashboards/color-coding-rows-in-reports-beginner/)\n\n![](https://res.cloudinary.com/dnla85pdq/image/upload/v1580460674/QuandaryCG/kanban-10.png)\n\n* * *\nTo learn more about another type of report, check out more articles here: [Reporting & Dashboards](/knowledge-base/reporting-and-dashboards/).\n* * *","slug":{"current":"kanban-reports-beginner"},"categories":[{"id":"-27382539-ae20-5f0a-ace9-391d7b9a149f","title":"Reporting & Dashboards","slug":{"current":"reporting-and-dashboards"}}]}},{"node":{"id":"-4efcdb76-d9ee-52c2-8b09-a2a40881562c","title":"Putting Custom HTML as a Form Element Quickbase | INTERMEDIATE","metaDescription":"Need to customize a form that goes beyond the native options presented in Quickbase? Here's how to use custom HTML as a form element.","body":"In some instances, you may need to customize a form that goes beyond the native options presented in Quickbase by implementing simple HTML text formatting to alert, inform, or organize information on your forms.\n\nFor example, you may need to provide directions for your user to highlight key information by adding text to your form, create column headers to better organize the flow of your form, or add color to show emphasis on certain information to your users.\n\n> EDITORS NOTE:\nFor those who are new to HTML, click here: <a href=\"https://www.w3schools.com/html/html_intro.asp\" target=\"_blank\">Introduction to HTML</a> to learn more about HTML and best practices. \n\nUnderstanding the HTML elements and tags will be helpful when using HTML as a form element to style your text in Quickbase.\n\n##Things you can do in Quickbase using HTML as a form element:\n✓ Change the font size\n✓ Add color to the font\n✓ Highlight important text\n✓ Underline a key point\n✓ lace a box around the form instructions\n✓ Format headers for columns of information\n✓ Change the font used for field labels\n\n* * *\n\n## Steps to Adding HTML text formatting to your forms:\n\n1. To customize a form from your app’s homepage, click on the table in the [Table Bar](/knowledge-base/admin-application-setup-security/organizing-the-table-bar-beginner/).\n2. Click **Settings**.\n3. Click **Forms** and select the form you would like to edit.\n4. Look in the form settings, you will see three tabs: Elements, Properties, and Dynamic Form Rules. \n5. Make sure the **Elements tab** is selected.\n\n![](https://res.cloudinary.com/dnla85pdq/image/upload/v1580710898/QuandaryCG/custom-html-01.png)\n\n6. In one of the form elements titled, **Make a Selection**, select the **text** option. This will display a **Text Item Properties** area for you to input your HTML code.\n\n![](https://res.cloudinary.com/dnla85pdq/image/upload/v1580710898/QuandaryCG/custom-html-02.png)\n\n7. Check the HTML (Limited) checkbox. This allows any text in the box above to be interpreted as HTML with the following tags allowed: <a href=\"https://help.quickbase.com/user-assistance/setting_form_elements.html\" target=\"_blank\">Adding Instructional text</a>.\n\n![](https://res.cloudinary.com/dnla85pdq/image/upload/v1580710897/QuandaryCG/custom-html-03.png)\n\n* * *\n\n## Basic Structure of the HTML\n\nIt begins with a left angle bracket, followed by the word span, and then the most important part is that style comes next. You set the style equal to the name and value of the styles you want to include. \n\nThose are included in quotations with a colon between the name and value. If you have multiple names and values that you want to include in your style you separate those with a semicolon. \n\nYou close out that initial span with a right angle bracket and then include the text that you want to have formatted. \n\nFinally, you’ll close out the span with a left angle bracket, a forward slash, the word span, and then your final right angle bracket.\n\n## Increase Font Size\n\nOne of the most common formatting changes is the size. To increase the size of the font we add font size to our style and give it a value in pixels like 14,18, or 24.\n\nExample:\n\n![](https://res.cloudinary.com/dnla85pdq/image/upload/v1580710897/QuandaryCG/custom-html-04.png)\n\n#### Change The Color Text\n\nYou can use color followed by either the name of a color or it’s hex value: <a href=\"https://www.december.com/html/spec/color1.html\" target=\"_blank\">Warm Hex Color Codes: [Hexadecimal codes](https://htmlcolorcodes.com/) for named colors used in HTML page features</a>.\n\nExample:\n\n![](https://res.cloudinary.com/dnla85pdq/image/upload/v1580710897/QuandaryCG/custom-html-05.png)\n\n## Decoration\n\nText Decoration allows you to have either underline, line-through, or overline your text in Quickbase.\n\nExample:\n\n![](https://res.cloudinary.com/dnla85pdq/image/upload/v1580710897/QuandaryCG/custom-html-06.png)\n\n## Background\n\nThe background can help you highlight important text. Its name is the background color and can also have a color value using a color name or a hex code.\n\nExample:\n\n![](https://res.cloudinary.com/dnla85pdq/image/upload/v1580710898/QuandaryCG/custom-html-07.png)\n\n## Border\n\nBorders can add emphasis. The values here are a little different because you need to define three parts; the thickness of the border and pixels, followed by the style of the border either solid, dashed, or dotted, and then the color.\n\nExample:\n\n![](https://res.cloudinary.com/dnla85pdq/image/upload/v1580710898/QuandaryCG/custom-html-08.png)\n\n## Display Block\n\nInstead of formatting a single line of text, in Quickbase, you can format a block of text. \n\nIn this case, you’ll want to include the display with a value of block along with your other formatting.\n\nExample:\n\n![](https://res.cloudinary.com/dnla85pdq/image/upload/v1580710899/QuandaryCG/custom-html-09.png)\n\n## Combination\n\nOnce you understand how individual HTML tags work, you can start combining them together to get some unique, creative elements on your forms to make them stand out.\n\nExample:\n\n![](https://res.cloudinary.com/dnla85pdq/image/upload/v1580710899/QuandaryCG/custom-html-10.png)\n\n* * *\nTo see other tips and tricks all Quick Base related, click here: [Knowledge Base](/knowledge-base/quickbase-knowledge-center/)\n* * *","slug":{"current":"putting-custom-html-as-a-form-element-intermediate"},"categories":[{"id":"-540552b6-6aca-5fc6-ab8e-c34778837055","title":"Forms","slug":{"current":"quick-base-forms"}}]}},{"node":{"id":"-35d04a6b-f106-52ed-ac7d-b2de131a5bb7","title":"Denying User Access | BEGINNER","metaDescription":"A key role of an Admin includes denying users access when they are no longer needed. Follow this 4 step guide to keep your team current in Quickbase.","body":"One of the key responsibilities of a Quick Base Admin is managing your users licenses and access for your current team. A key feature of that includes Denying users access to your realm when they are no longer needed in Quick Base or in your organization. Denying a user means they are completely shut out from your Quick Base realm, and cannot log in to any QB application, even if they are still listed as a user. Common reasons you want to deny users:\n\n✓ They have left your organization and need to remove their license\n\n✓ Remove their access to any applications they own, that you do not have access to\n\n_Note – if they were the app owner and you deny them, the application will not be impacted. But it is advised that from the realm settings you re-assign the owner to someone else._\n\n✓ Ensure that someone cannot re-invite them by mistake\n\n> EDITORS NOTE:\nDenying users is specific to Account Admins. Account Admins are those with Full Management of the realm. Differentiate that with an Application Admin, which is someone who has admin rights to update and maintain specific applications.\n\nAs a use case – lets say a Senior Manager is leaving your company. Over time, they have built several of their own apps, and have access into several of yours as well. As part of the off-boarding process, you will want to Deny their access to ensure that they are completely removed from Quick Base.\n\nTo do so:\n\n1. Navigate to the ‘My Apps’ Quick Base Home Page. From there – under the ‘Account Admin’ section, select ‘Manage my billing Account’.\n\n![](https://res.cloudinary.com/dnla85pdq/image/upload/v1580451492/QuandaryCG/denying-01.png)\n\n_If you do not see this section – it means you are not currently listed with full management of the realm and will need to be added before you can continue._\n\n2. Select ‘Users’\n3. Search for the user(s) you want to Deny. Toggle the checkbox next to their name\n4. Click the ‘Deny’ button that appears at the top of the list to remove their access\n\n![](https://res.cloudinary.com/dnla85pdq/image/upload/v1580451492/QuandaryCG/denying-02.png)\n\n> EDITORS NOTE:\nYou can follow the same process to ‘Undeny’ users, just change step (4) to select ‘Undeny’ a denied user.\n\nAnother important aspect of user management is [setting up new roles](/knowledge-base/roles-and-permissions/adding-a-new-user-role-beginner/). Click here to read more about setting up a new role in Quick Base.","slug":{"current":"denying-user-access-beginner"},"categories":[{"id":"-3711bc9d-2dc7-582c-b894-03c210cdb205","title":"Roles & Permissions","slug":{"current":"roles-and-permissions"}}]}},{"node":{"id":"-358b020e-d6c5-5702-b726-ca29daee5edd","title":"Logger by Workato | BEGINNER","metaDescription":"The Logger by Workato action allows users to record the output of other actions in a recipe. Highlight inefficiencies and optimize your recipes. Learn how.","body":"### Logger by Workato\n\nThe Logger by Workato action allows users to record the output of other actions in a recipe.  This tool is useful to help visualize the data being passed through different steps in a recipe.  It is especially useful in helping to debug recipes if you are receiving unexpected results.\n\nFor example, a recipe could be built to read a pdf using the Docparser app. The recipe extracts Employee Names, Employee IDs, and other data points from pdfs and adds the data points to a Workato list.  The recipe then converts the list to a CSV file and then creates or updates new Employee records in Quickbase.\n\nWhen testing the recipe, if it does not work as intended, it is difficult to pinpoint where the problem(s) exist; the breaking point could be Docparser, the Workato list, the CSV, the Quickbase upload, or another issue.  This situation is perfect for Logger by Workato.  A Logger by Workato step can be added after any step in the process.  Simply click the ‘Add Step’ icon and choose Logger by Workato.  In the Message section, insert the data pills you want to log.\n\n![](https://res.cloudinary.com/dnla85pdq/image/upload/v1580283521/QuandaryCG/logger-01.jpg)\n\n![](https://res.cloudinary.com/dnla85pdq/image/upload/v1580283521/QuandaryCG/logger-02.jpg)\n\nNow, when you test the recipe, you will be able to troubleshoot any errors, make corrections and fix your recipe.  Below is a screenshot of the Logger by Workato: the prior step output in the example was two columns (Row Number and True/False).  In the example, all 8 rows are True.  By using the Logger, at this point, you could troubleshoot your recipe if you were expecting some False answers or more or less rows.  If 8, True entries were your expectation but the final output of the recipe is still not meeting your expectations, you can move onto troubleshooting the next step.\n\n![](https://res.cloudinary.com/dnla85pdq/image/upload/v1580283522/QuandaryCG/logger-03.jpg)\n\nIf you want to learn more about recipes, check out the article: [Creating Your First Workato Recipe](/knowledge-base/workato-knowledge-center/creating-your-first-workato-recipe-intermediate/).","slug":{"current":"logger-by-workato-beginner"},"categories":[{"id":"-19639513-515e-5bd2-b0ac-4fddcab7d3be","title":"Workato Knowledge Center","slug":{"current":"workato-knowledge-center"}}]}},{"node":{"id":"-2b16bb50-c18b-508b-9abf-3d53dc848412","title":"Embedding an I-Frame (Webpage Widget) in a Dashboard | BEGINNER","metaDescription":"Embedding an iFrame in a Quickbase Dashboard allows you to view and navigate the contents of an external webpage within your Quickbase Application. Learn more.","body":"Embedding an iFrame in a Quickbase Dashboard allows you to view and navigate the contents of an outside webpage within your Quickbase Application.  An iFrame is an HTML document embedded inside another website. Think of the iFrame as a window into another webpage.\n\nWhy might you embed an iFrame into your Quickbase Dashboard?  Here are just a few reasons:\n\n✓ Show new leads from SurveyMonkey within an outreach app to track performance\n\n✓ Show reports from weather.com for technicians to view conditions before deploying to a site\n\n✓ Show a Quickbase report on a dashboard that has already embedded the maximum number of reports allowed by Quickbase\n\nIn this article we will walk through how to embed weather reports from weather.com as well as how to embed a Quickbase Report as an iFrame.\n\nTo add a weather.com page (or any iFrame) to your dashboard you will need to add a Webpage Widget.  To start: \n\n1. Visit the dashboard to which you would like to add your iFrame and click ‘Edit’\n2. You will see the following options which you may add to your dashboard:\n\n![](https://res.cloudinary.com/dnla85pdq/image/upload/v1580699079/QuandaryCG/embedding-an-01.png)\n\nClick and hold on the option titled ‘Web Page’ and pull the icon onto to the body of your dashboard\n\n3. You will now see a large grey area on your dashboard representing an unassigned ‘Web Page’ widget.\n\n![](https://res.cloudinary.com/dnla85pdq/image/upload/v1580699080/QuandaryCG/embedding-an-02.png)\n\nIn picture above you can see a highlighted text box.  This is where you can enter the URL of the webpage you would like to display.  In this case I have chosen to add the weather.com URL for weather in Chicago, IL: <a href=\"https://weather.com/weather/today/l/USIL0225:1:US\" target=\"_blank\">https://weather.com/weather/today/l/USIL0225:1:US</a> Click away from the URL box and your webpage will appear in place of the grey area.\n\n4. Often times, including this example, the widget area is too short to display the website as intended:\n\n![](https://res.cloudinary.com/dnla85pdq/image/upload/v1580699235/QuandaryCG/embedding-an-03.png)\n\nTo increase the widget height simply edit your dashboard and hover over the bottom of the widget area. Once you see an arrow, drag downward to increase the height of the widget. \n\n> EDITORS NOTE:\nSome webpages will not work within a webpage widget.  In some cases, webpages will either block iFraming of their URL or elements of the webpage do not function properly within an iFrame.  This is a case by case basis.\n\nOur second example concerns how to **Add a Quickbase Report to a dashboard as a Webpage Widget**.  Currently, Quickbase imposes a limit of nine reports per dashboard. Even after reaching your report limit, you can still use a webpage widget to add additional reports as an iFrame. Here is how: \n\n1. Start by locating your report and copying the report URL\n2. Add a new webpage widget and paste the URL you just copied into the URL pop-up:\n\n![](https://res.cloudinary.com/dnla85pdq/image/upload/v1580699079/QuandaryCG/embedding-an-04.png)\n\n3. After entering your URL, click away from the URL box and view the resulting report.  You’ll notice right away that this report doesn’t look like your other embedded reports.  Rather than showing just the contents of the report, you’re viewing the report within the full Quickbase website:\n\n![](https://res.cloudinary.com/dnla85pdq/image/upload/v1580699080/QuandaryCG/embedding-an-05.png)\n\nNotice how I can see more than just the report.  I am viewing the report as if I was navigating within my browser.  In order to get this report to look similar to your other dashboard reports you will need to take two additional steps\n\n4. In order to show only the report, add the following text to the end of the URL entered for your report: &ifv=1\n\n![](https://res.cloudinary.com/dnla85pdq/image/upload/v1580699079/QuandaryCG/embedding-an-06.png)\n\nNow view your report.  You will now notice that only the report is visible and looks much better. However if you look at the pic below you will notice we still have our filters on the left of the report:\n\n![](https://res.cloudinary.com/dnla85pdq/image/upload/v1580699081/QuandaryCG/embedding-an-07.png)\n\n5. To remove the filters, simply go to the original report.  Click “Customize this report’ and remove the filters from the report by selecting ‘None’ for Dynamic Filters:\n\n![](https://res.cloudinary.com/dnla85pdq/image/upload/v1580699081/QuandaryCG/embedding-an-08.png)\n\nNow your Webpage Widget will look almost identical to a report added via the Report Widget:\n\n![](https://res.cloudinary.com/dnla85pdq/image/upload/v1580699080/QuandaryCG/embedding-an-09.png)\n\nThese are just two examples of powerful dashboard features within Quickbase. For more tips, tricks and how-to articles related to dashboards and reports click [here](/knowledge-base/reporting-and-dashboards/)\n\nFor a technical write up by Quickbase on Webpage Widgets, click <a href=\"https://help.quickbase.com/user-assistance/about_web_page_widgets_app_home_page.html\" target=\"_blank\">here</a>.","slug":{"current":"embedding-an-i-frame-webpage-widget-in-a-dashboard-beginne"},"categories":[{"id":"-27382539-ae20-5f0a-ace9-391d7b9a149f","title":"Reporting & Dashboards","slug":{"current":"reporting-and-dashboards"}}]}},{"node":{"id":"-bdfb8078-1165-56d7-81a3-2adf4199c426","title":"Creating Cross-App Relationships in Quickbase | INTERMEDIATE","metaDescription":"Need to share data from one of your applications with another? Follow these steps to create cross-app relationships in Quickbase.","body":"Often, you may need to share data from one of your applications with another in Quickbase. This is common when you have a set of core tables, such as Employees or Contacts, that you want to maintain in a single location. \n\nUsing a Cross-App Relationship you can create a child-to-parent relationship to share record data between applications.\n\n> EDITORS NOTE:\nThis feature is **not* available on the Essential Plan.\n\n* * *\n\n## How to create a Cross-App Relationship:\n\n1. The relationship must be created from the application where the child table lives. However, you must allow access to that app from the parent table’s application. To do this, visit **Settings > App properties** in the parent application and scroll down to **Cross-application relationships**.\n\n2. Click **Select an app**, find the app you wish to connect to, and click **Save** at the top of the page. The **Role** you select filters what information is available to you in the child application.\n\n![](https://res.cloudinary.com/dnla85pdq/image/upload/v1580355607/QuandaryCG/creating-cross-01.png)\n\n3. From the child table’s application, visit the table you would like to relate then navigate to **Settings > Table-to-table relationships** and click the **+ New Relationship** button. From the dropdown, pick **Select a table in another app**.\n\n![](https://res.cloudinary.com/dnla85pdq/image/upload/v1580355607/QuandaryCG/creating-cross- 02.png)\n\n> EDITORS NOTE:\nIf you see the message **“Your app needs to allow cross-application relationships”*, be sure that you are allowed access to the parent application. \n\nFollow the instruction prompts to complete this step.\n\n4. Select the table you wish to become the parent, select your reference field, select your lookup fields and click **Create Relationship**.\n\n![](https://res.cloudinary.com/dnla85pdq/image/upload/v1580355608/QuandaryCG/creating-cross-03.png)\n\n5. Once you’ve created the new relationship, you will see it appear on the child table only. You can edit the relationship, change field properties and add fields from the **Table-to-table relationships** page of the child table.\n\n* * *\n\nIf you’re looking to brush up on creating table-to-table relationships check out Alex’s article on **[Setting up a New Relationship](/knowledge-base/admin-application-setup-security/setting-up-a-new-relationship-beginner/)**. \n\nTo learn more about relationship type fields, take a look at how to create **[Summary and Lookup Fields](/knowledge-base/quick-base-fields-and-formulas/summary-and-lookup-fields-beginner/)**.\n\n* * *","slug":{"current":"creating-cross-app-relationships-intermediate"},"categories":[{"id":"-14942e20-302e-57b3-a12c-de473ea4cc86","title":"Admin / Application Set Up / Security","slug":{"current":"admin-application-setup-security"}}]}},{"node":{"id":"-73d4340b-48c1-5a28-804d-5cfc837f3493","title":"Radio Buttons (Hiding the None of the Above) | INTERMEDIATE","metaDescription":"Radio buttons and drop-down menus are important controls in quality forms, surveys, and checklists. Learn how to alter radio button properties in Quickbase. ","body":"### Introduction\n\nThis article focuses on a step-by-step process on how to take the default Quickbase radio buttons and alter their properties using a JavaScript rich-text formula field to remove one – the none of the above option and two – the layout and positioning. In addition, you will learn about some helpful rules on when to use either radio buttons versus drop-down menus when creating surveys, checklists, or forms.\n\n* * *\n\n### Radio Buttons vs. Drop-Down Menus\n\nTwo important controls are radio buttons and drop-down menus when building out forms, surveys and checklists. Both of them can be used interchangeably when an input is required from a user and should be used in certain scenarios to make it easier for a user to select a given input.\n\nHere are some rules to think about when to use radio buttons:\n\n✓ **When you have less than 5 options.**\n\n✓ **Use radio buttons when you want to emphasize options.**\n\n✓ **When visibility and quick response is a priority.**\n\nHere are some rules to think about when to use drop down menus:\n\n✓ **When default option is the recommended option.**\n\n✓ **When a large number of familiar options are available.**\n\n✓ **When you have more than 7 options.**\n\nSince forms can be very long with large number of options, it becomes tedious for users if he/she has to make extra clicks to fill-in information. The given set of rules above will help you to decide between two controls, radio buttons and drop-down menus, while designing your forms in Quick Base.\n\n* * *\n\nSurveys, checklists, and forms in general can all benefit from radio buttons. Using radio buttons decreases clicks, and speeds up completion. And if you are using them on a mobile device, it can help provide a better user experience.\n\nHowever, there are times that radio buttons can make your forms not as functional or visually pleasing as it could be as shown below.\n\n![](https://res.cloudinary.com/dnla85pdq/image/upload/v1580190785/QuandaryCG/radio-buttons-01.png)\n\nThe upcoming steps will cover how to setup a rich-text formula field to alter the appearance and default properties of radio buttons. Here is a preview of what to expect:\n\n✓ Remove the **None of the Above** as an option.\n\n✓ Realign the radio buttons to be horizontal instead of vertical\n\n* * *\n\n### How to Alter the Default Properties on Radio Buttons\n\n> EDITORS NOTE:\nPlease note, the below steps uses an image onload technique using JavaScript to accomplish realigning and removing the None of the Above option for the radio button. If you are unfamiliar with implementing java script in a formula rich-text field, please see: [Adding JavaScript to a ‘Formula Rich-Text’ Field | ADVANCED](/knowledge-base/quick-base-fields-and-formulas/adding-javascript-to-a-formula-rich-text-field-advanced/). For more information about what is an image onload event, please <a href=\"https://www.w3schools.com/jsref/event_onload.asp\" target=\"_blank\">click here</a>.\n\n1. Create a **formula rich-text field**. By using JavaScript and the image onload technique, you will be able to get the look and positioning of the radio buttons.\n\n![](https://res.cloudinary.com/dnla85pdq/image/upload/v1580190785/QuandaryCG/radio-buttons-02.png)\n\n2. On the form, create a new tab and name it ‘Admin’. This tab will be used to store the formula rich text field created in the previous step (If you like, you can set up dynamic form rules to hide this tab on your form).\n\n![](https://res.cloudinary.com/dnla85pdq/image/upload/v1580190785/QuandaryCG/radio-buttons-03.png)\n\n3. Since we are using the image onload technique, the first line is an image source of what our radio button(s) will look like on the form.\n\n![](https://res.cloudinary.com/dnla85pdq/image/upload/v1580190784/QuandaryCG/radio-buttons-04.png)\n\n4. Next, we want to define our ‘onload event’. The onload event is most often used within  the body element to execute a script once a web page has completely loaded all content (including images). In this case, our form page in Quick Base.\n\n![](https://res.cloudinary.com/dnla85pdq/image/upload/v1580190785/QuandaryCG/radio-buttons-05.png)\n\n5. In lines three and four of our script, we are making a declaration to one – create break between each one of our radio buttons (changing the position of our radio buttons to be horizontal oppose to vertical) and second – remove the ‘None of the Above’ as an option for users to select.\n\n![](https://res.cloudinary.com/dnla85pdq/image/upload/v1580190785/QuandaryCG/radio-buttons-06.png)\n\n6. The last line of our script uses css to help with formatting and spacing between our radio button choices. If you were to comment this out, the radio buttons would look like they are on top of each other as shown below.\n\n![](https://res.cloudinary.com/dnla85pdq/image/upload/v1580190785/QuandaryCG/radio-buttons-07.png)\n![](https://res.cloudinary.com/dnla85pdq/image/upload/v1580190785/QuandaryCG/radio-buttons-08.png)\n\nAfter implementing the rich-text field with the JavaScript outlined above, you should have a similar result shown below:\n\n![](https://res.cloudinary.com/dnla85pdq/image/upload/v1580190785/QuandaryCG/radio-buttons-09.png)\n\n* * *\n\nTo see how to put custom HTML into a form element, see our article: [Putting Custom HTML as a Form Element | INTERMEDIATE](/knowledge-base/quick-base-forms/putting-custom-html-as-a-form-element-intermediate/).","slug":{"current":"radio-buttons-hiding-the-none-of-the-above-intermediate"},"categories":[{"id":"-540552b6-6aca-5fc6-ab8e-c34778837055","title":"Forms","slug":{"current":"quick-base-forms"}}]}},{"node":{"id":"-e146d07b-82b9-5924-9c2a-c0e327233f6d","title":"Managing and Deleting Reports in an App in Quickbase","metaDescription":"Follow this guide for steps on how to manage and delete reports in your Quickbase apps effortlessly. Learn more.","body":"> EDITORS NOTE:\nIf you have **admin permissions** for an app, you can view and manage **ALL** reports and charts for all tables in the app.\n\n* * *\n\n## How to Display a List of Reports in Quickbase Apps\n\n1. From the app Home Page (Top left), click **Settings**, under the app name.\n\n![](https://res.cloudinary.com/dnla85pdq/image/upload/v1580351735/QuandaryCG/managing-01.png)\n\n2. Click on **App management**, under **Advanced Features**.\n\n![](https://res.cloudinary.com/dnla85pdq/image/upload/v1580351736/QuandaryCG/managing-02.png)\n\n3. Slightly scroll down and under **Manage App Contents**, click **Manage reports**.\n\n![](https://res.cloudinary.com/dnla85pdq/image/upload/v1580351736/QuandaryCG/managing-03.png)\n\nFrom this page, you can manage all reports for all tables in your app. This includes both common and personal reports.\n\n* * *\n\n## How to Limit the Number of Reports Shown in the List\n\nIf you have many reports, use the **Search reports** box at the top left of the list to enter a search term.\n\n![](https://res.cloudinary.com/dnla85pdq/image/upload/v1580351734/QuandaryCG/managing-04.png)\n\nThe search term limits the reports shown to ones whose report name, table name, or owner contain that term. \n\n### Example:\n\nIf you search for a chart named, “Target Sales,” in the search reports box, you can see how it filters directly by the name specified in the report box.\n\n![](https://res.cloudinary.com/dnla85pdq/image/upload/v1580351736/QuandaryCG/managing-05.png)\n\nYou can also use the **Show** dropdown to display reports, common reports, or all reports (the default setting).\n\n### Example:\n\nIn the example above, I selected **All Personal Reports** which shows all the related personal reports. In this case, we only have one report that matches this criterion.\n\n![](https://res.cloudinary.com/dnla85pdq/image/upload/v1580351735/QuandaryCG/managing-06.png)\n\n## Managing Individual Reports\n\n✓ Use the icons at the right of each item in the list of reports to **view**, **copy** or **delete** that report.\n✓ Click the **report name** to customize the report.\n✓ Click **New report or chart** at the top right of the Page Bar to create a new report.\n\n* * *\n\n## Deleting Multiple Reports\n\n1. Display the list of reports in the app.\n\n![](https://res.cloudinary.com/dnla85pdq/image/upload/v1580351737/QuandaryCG/managing-07.png)\n\n2. Select the checkbox next to the name of each report you want to affect.\n\n![](https://res.cloudinary.com/dnla85pdq/image/upload/v1580351737/QuandaryCG/managing-08.png)\n\n3. Click **Delete** on the dialog to confirm the deletion.\n\n![](https://res.cloudinary.com/dnla85pdq/image/upload/v1580351736/QuandaryCG/managing-09.png)\n\n> EDITORS NOTE:\nIf you are only deleting a single report, you can click the Red X to the far right of the report instead of the delete at the top of the table.\n\n* * *\nTo learn more about Admin / Application Set Up / Security, please follow this link: [Admin / Application Set Up / Settings](/knowledge-base/admin-application-setup-security/).\n* * *\n","slug":{"current":"managing-and-deleting-reports-in-an-app-beginner"},"categories":[{"id":"-14942e20-302e-57b3-a12c-de473ea4cc86","title":"Admin / Application Set Up / Security","slug":{"current":"admin-application-setup-security"}}]}},{"node":{"id":"-eef60999-f306-585b-a361-bcd8e75bcc99","title":"How to Create a Code Page in Quickbase | ADVANCED","metaDescription":"Code Pages are robust Quickbase tools. While advanced, knowing how to set up one can help you get more out of the app. Learn more.","body":"One of the most useful tools for creating a robust Quickbase application is a **Code Page**. This Page Type allows you to create markup documents using HTML, JavaScript, CSS, or XML. \n\nThis functionality is definitely more pro-code than low-code. However, it’s a great place to begin expanding your Quickbase creativity. Plus, there are plenty of tutorials out there to get you started, including this one.\n\n* * *\n\n## Sample Use Cases:\n\nCode pages can be used to accomplish just about anything you can imagine (and write!). Here are some ideas to get you started:\n\n✓ Dynamically generated invoices or other documents.\n✓ **[Data import interfaces](/knowledge-base/quick-base-outside-of-the-box/implementing-custom-imports/)** with customized user experience and error checking.\n✓ Automated processes beyond the limits of Actions and Automations.\n✓ Enhanced mapping functionality with Google Maps. **[See more here!](/knowledge-base/quick-base-outside-of-the-box/google-maps-for-data-visualization/)**\n\n* * *\n\n## The Quickbase side of creating a Code Page:\n\nThis example will demonstrate how to create a new Code Page and allow users to access it via a button on their Home Page. \n\nThe rest of the code is up to you!\n\n1. From your Home Page, navigate to **Settings > Pages** and click **+ New Page**.\n\n2. Select **Code Page** and click **Create**.\n\n![](https://res.cloudinary.com/dnla85pdq/image/upload/v1580350990/QuandaryCG/code-pages-01.png)\n\n3. Enter a **PAGE NAME**, paste your code in the text area below, and click **Save**. You can also write your code directly in the input. However, I’m going to assume you’re using a text editor (_please be using a text editor, if not **<a href=\"https://code.visualstudio.com/\" target=\"_blank\">VSCode</a>** is highly recommend and free!_).\n\n![](https://res.cloudinary.com/dnla85pdq/image/upload/v1580350988/QuandaryCG/code-pages-02.png)\n\n4. Buttons are the most common way to access a Code Page. Add a new button on your Home Page by selecting **Customize this Page** and selecting your **PAGE NAME** from the **Page** tab property.\n\n![](https://res.cloudinary.com/dnla85pdq/image/upload/v1580350989/QuandaryCG/code-pages-03.png)\n\n5. After saving your page, test the button by clicking it. Congratulations, you’ve successfully created your first Code Page!\n\n![](https://res.cloudinary.com/dnla85pdq/image/upload/v1580350989/QuandaryCG/code-pages-04.png)\n\n> EDITORS NOTE:\nYou are not limited to Home Page buttons when linking to a Code Page. You can use any table URL buttons and also pass in record-specific parameters!\n\n* * *\n\nCheck out our articles on **[Implementing Custom Imports](/knowledge-base/quick-base-outside-of-the-box/implementing-custom-imports/)** and **[Google Maps for Data Visualization](/knowledge-base/quick-base-outside-of-the-box/google-maps-for-data-visualization/)** to get an idea of how Code Pages can be used to create a more powerful user experience. \n\nTo get started with HTML/CSS check out this free introduction at **<a href=\"https://www.khanacademy.org/computing/computer-programming/html-css\" target=\"_blank\">Khan Academy</a>**, and download **<a href=\"https://code.visualstudio.com/\" target=\"_blank\">VSCode</a>** to begin writing code.\n\n* * *","slug":{"current":"code-pages-advanced"},"categories":[{"id":"-14942e20-302e-57b3-a12c-de473ea4cc86","title":"Admin / Application Set Up / Security","slug":{"current":"admin-application-setup-security"}}]}},{"node":{"id":"-0214807a-8993-576e-b934-b13335a68174","title":"File Download Button in Quickbase | INTERMEDIATE","metaDescription":"Have you ever thought about using Quickbase buttons to download a file attachment? Follow this guide to set up Quickbase file download buttons. Learn more.","body":"Quickbase buttons are great to manipulate your own data. But have you ever thought to use buttons to download a file attachment!?\n\nLike me, you might have thought to yourself, \"Why go through the process of creating a button when [Quickbase makes it easy](/quick-base-solutions/) for me to just use the file attachment link?\"\n\n## The Benefits of Creating a File Download Button in Quickbase\n- It can be more visually appealing and orderly on forms and reports.\n- When creating a notification, a download button can make it easy for the user to simply click rather than having to copy and paste a link.\n- Have you ever wondered why some of your attachments download, others save, and yet others open in a new window? A download button can help solve this quandary.\n\n_**Remember:** These are just some of the examples where a file download button is a better substitute for the file attachment field. In the end, it comes down to personal preference and end-user goals._\n\n* * *\n\n## How to Create a Button to Download a File\n\n> EDITORS NOTE:\nIn the steps that follow, we will be using a Rich-Text Formula field, not a URL field. You can use the default URL field to accomplish the same goal though. Also, the steps below will assume you are familiar with html tags and does not go into detail about HTML. For further information on HTML, click\n<a target=\"_blank\" href=\"https://www.w3schools.com/html/\">Here</a>\n\n**Step 1.** Select the table where you want to create the download file button (Preferably the same table where you have the file attachment field(s) located).\n\n**Step 2.** Go to settings, and create a new field.\n\n![](https://res.cloudinary.com/dnla85pdq/image/upload/v1580191890/QuandaryCG/file-download-01.png)\n\n**Step 3.** Select the **Rich-Text Formula** field type and name it Download File.\n\n![](https://res.cloudinary.com/dnla85pdq/image/upload/v1580190785/QuandaryCG/radio-buttons-02.png)\n\n**Step 4.** Open your Rich-Text Formula field.\n\n**Step 5.** In the first line below, we are creating the url link. The **“31” is the field ID** for the File Attachment field, yours will likely be different. The **“v0”** at the end refers to the **latest version** of the file attachment.\n\n![](https://res.cloudinary.com/dnla85pdq/image/upload/v1580191890/QuandaryCG/file-download-03.png)\n\n**Step 6.** In the second line below, we are creating the visuals of the button and referencing the URL link in line one. \n\nYou will want to make sure to include **“$url”** in your formula. That way, when the button is clicked on, it can reference your file attachment link and initiate the download.\n\n![](https://res.cloudinary.com/dnla85pdq/image/upload/v1580191890/QuandaryCG/file-download-04.png)\n\n**Step 7.** Lastly, insert your declaration at the end of your formula.\n\n![](https://res.cloudinary.com/dnla85pdq/image/upload/v1580191890/QuandaryCG/file-download-05.png)\n\n* * *\n\n## Visual Examples:\n### Form View:\n\n![](https://res.cloudinary.com/dnla85pdq/image/upload/v1580191892/QuandaryCG/file-download-06.png)\n\n### Edit Mode:\n\n![](https://res.cloudinary.com/dnla85pdq/image/upload/v1580191891/QuandaryCG/file-download-07.png)\n\n### Report View:\n\n![](https://res.cloudinary.com/dnla85pdq/image/upload/v1580191891/QuandaryCG/file-download-08.png)\n\n### Notification View:\n\n![](https://res.cloudinary.com/dnla85pdq/image/upload/v1580191891/QuandaryCG/file-download-09.png)\n\n### Email View:\n\n![](https://res.cloudinary.com/dnla85pdq/image/upload/v1580191890/QuandaryCG/file-download-10.png)\n\n* * *\n\nTo see how to put custom HTML into a form element, see our article: [Putting Custom HTML as a Form Element | INTERMEDIATE](/knowledge-base/quick-base-forms/putting-custom-html-as-a-form-element-intermediate/).\n\n* * *","slug":{"current":"file-download-button-intermediate"},"categories":[{"id":"-51554930-c85d-504e-b1fc-9e93b25a4991","title":"Fields & Formulas","slug":{"current":"quick-base-fields-and-formulas"}}]}},{"node":{"id":"-f1d2727a-7d19-5c91-bfe3-95079e2c2d9f","title":"Creating a New App Connection in Workato | BEGINNER","metaDescription":"Connect Workato to other applications to allow data to flow across databases with ease and efficiency. Set up a new connection using this simple guide. ","body":"At its core Workato is a tool for connecting applications.  In this article we’ll show you how to create and manage these connections.  There are many different applications that you may wish to create a connection for in your Workato account.  Some examples include:\n\n✓ Microsoft Outlook to create or store emails based on a trigger\n\n✓ SurveyMonkey to capture survey information\n\n✓ Quick Base to push data from or pull data into your database\n\nIn this article we’ll focus on the steps needed to create a connection with Quick Base.  Follow these steps for setting up your Quick Base connection in Workato:\n\n> EDITORS NOTE:\nEach connection setup will be different and is based upon the configuration and credential requirements\n\n1. On the black ribbon on the top of the page select ‘App Connections’.  In the ‘App Connections’ page you can view your existing connections and some basic information about each connection such as ‘Status’ and ‘Time connected’.\n\n![](https://res.cloudinary.com/dnla85pdq/image/upload/v1580282982/QuandaryCG/creating-a-new-app-01.png)\n\n2. To create a new connection, click the green button titled ‘Create a new connection’\n\n3. In the next screen, click the dropdown field labeled ‘Application’.  A list of applications will display with a suggestion of relevant apps at the top of the list. Type in the name of your application and select the app from the list.  In this case we’ve typed in “Quick Base”:\n\n![](https://res.cloudinary.com/dnla85pdq/image/upload/v1580282982/QuandaryCG/creating-a-new-app-02.png)\n\nOnce selected the page will update with configuration options.\n\n4. Give your connection a useful name you can easily remember\n\n5. Provide the Quick Base sub-domain.  This will be the URL shown when you are on the homepage of your Quick Base application. It should look something like this:\nhttps://yourdomain\n\n6. In the next field select the answer ‘yes’ if your application requires an application token.\n   - If you answered ‘yes’ a new field will appear. Enter your app token in the new field.  For more information about app tokens click here.\n   - If you answered ‘No’, fill in the username and password.\n\n7. Next click the green button labeled ‘Link Your Account’:\n\n![](https://res.cloudinary.com/dnla85pdq/image/upload/v1580282981/QuandaryCG/creating-a-new-app-03.png)\n\nIf any issues are encountered, the app connection will not be established and an error message will appear to the left of the ‘Link Your Account’ button:\n\n![](https://res.cloudinary.com/dnla85pdq/image/upload/v1580282981/QuandaryCG/creating-a-new-app-04.png)\n\nOnce the app is successfully connected a green message will appear to the right of the button and the button label will change to ‘Disconnect’:\n\n![](https://res.cloudinary.com/dnla85pdq/image/upload/v1580282982/QuandaryCG/creating-a-new-app-05.png)\n\nClicking this button will now disconnect the app\n\n8. Now that you’ve completed your app connection, return to the ‘App Connections’ tab where you can view all of your connections, including the one you have just added.\n\nFor more articles on getting started with Workato (and advance articles) click [here](/knowledge-base/workato-knowledge-center/)","slug":{"current":"creating-a-new-app-connection-in-workato-beginner"},"categories":[{"id":"-19639513-515e-5bd2-b0ac-4fddcab7d3be","title":"Workato Knowledge Center","slug":{"current":"workato-knowledge-center"}}]}},{"node":{"id":"-a609b92a-e5e3-5ed6-80ac-8c96260a2d0c","title":"API_PurgeRecords | ADVANCED","metaDescription":"API_PurgeRecords gives users the ability to batch delete records from Quickbase. This guide teaches how to purge records in mass and alternatives to deletion.","body":"API_PurgeRecords is as it sounds – the ability to purge or delete records in mass from Quick Base. This means deleting a collection of child records, a defined report, or an entire table if necessary. If you intend or want to research how to delete a single record – take a look at <a href=\"https://help.quickbase.com/api-guide/delete_record.html\" target=\"\"_blank>API_DeleteRecord</a>.\n\n> BEST PRACTICE:\nOnly in rare cases would I recommend deleting data through the API. There are several alternatives such as changing statuses / archiving records that are possible when you want to remove data from users view. Consider alternatives before moving to deletions.\n\n> EDITORS NOTE:\nThis document will cover the URL Alternative for utilizing API_PurgeRecords for simplicity. The URL alternative is applicable for use in native Quick Base buttons, Webhooks, as well as GET requests in custom scripting. This article does not cover POST Requests, although the details are transferrable.\n\nWhat are some common reasons you might want to delete data in mass from Quick Base?\n\n✓ Removing child records when its parent record is cancelled or is being deleted also\n\n✓ Deleting test data\n\n✓ Removing data on a monthly or weekly basis that does not need to be saved\n\nFor this article – we will just focus on the API call part of the URL string. For more information about setting up the target / domain / table components, as well as how to use [apptokens](/knowledge-base/admin-application-setup-security/application-tokens-intermediate/) or [usertokens](/knowledge-base/admin-application-setup-security/user-tokens-intermediate/), please review our other Knowledge Base articles such as [API_AddRecord](/knowledge-base/quick-base-api/api-addrecord-advanced/) or [API_EditRecord](/knowledge-base/quick-base-api/api-editrecord-advanced/)\n\nThe example <a href=\"https://help.quickbase.com/api-guide/purgerecords.html\" target=\"_blank\">API Documentation</a> from Quick Base provides the following example:\n\n~~~~\nhttps://target_domain/db/target_dbid?a=API_PurgeRecords&qid=10\n&ticket=auth_ticket&apptoken=app_token\n~~~~\n\nJust like with all API calls – your API call that follows ?a= will be “API_PurgeRecords”.\n\nThe part that follows, “qid=10” is a pivotal piece of the purge record call. API_PurgeRecords can be equated closely with API_DoQuery, in that you’re searching for a collection of records based on pre-defined criteria. Be aware that what you return in that query is going to be deleted forever, so your query needs to be tested thoroughly before pushing into production. \n\nThere are 3 methods of query you can pass into API_PurgeRecords: \n\n- qname=\n- qid=  \n- query={}\n\nI strongly recommend you don’t use qname, in that query names can change over time and you don’t want name changes to affect your purge. \n\nUtilizing the “qid” parameter – will target an existing report from the chosen table. So from our example, let’s say you set up a report that strictly holds ‘Test’ data. You have defined the filters to only have your testing and bad data show up here. For example purposes, say this report is configured and can be found as qid=45. To purge it, you could put a button somewhere as an admin feature to review this data, then click to purge. Your URL would look like this: \n\n~~~~\nhttps://quandarycg.com/db/tasks_table?a=API_PurgeRecords&qid=45\n~~~~\n\nOnce pressed, all of the records that filtered to show in your test report (qid 45) would now be deleted permanently.\n\nThe alternative to using “qid” is to write you own “query”. The more common use case for this is when you want to delete all children records from a parent. Say you had a project that was cancelled, and you wanted to purge all of its child tasks. In this case – you would want to query for all tasks related to that project to purge. For more information about building a Quick Base query and its various components, view their <a href=\"https://help.quickbase.com/api-guide/componentsquery.html\" target=\"_blank\">Components of a Query</a> article. \n\nFrom our example – we want to delete all ‘Tasks’ associated with my current project, which has a Record ID# of 150. Projects and Tasks are directly related (Projects have many tasks) via the field ‘Related Project’ – which has the field id 99 in the tasks table. Given the above information – we would have a query that looks like below:\n\n~~~~\nquery={'99'.EX.'150'} (Querying the Tasks Table in Quick Base)\n~~~~\n\nSince we are querying tasks, we are looking to find all Tasks where ‘Related Project’ (fid 99) is equal to (EX from above) the Record ID# of my project (150).\n\nPut it all together, and you get:\n\n~~~~\nhttps://quandarycg.com/db/tasks_table?a=API_PurgeRecords&query={'99'.EX.'150'}\n~~~~\n\nIn a Quick Base formula – you would likely have it look closer to this:\n\n~~~~\n\"https://quandarycg.com/db/tasks_table?a=API_PurgeRecords&query={'99'.EX.'\" & [Record ID#] & \"'}\"\n~~~~\n\nThis way – you’re always targeting the current project with the [Record ID#] field rather than a hard coded value. When clicked – all tasks related to this project will be deleted. \n\n> CAUTION:\nAlways make sure you include a valid qid or query in your API_PurgeRecords call. By entering an invalid or empty qid or query – you will delete all records in your table and they cannot be recovered without intervention by Quick Base. \n\nTo re-state – its not recommended that you default to mass deletions. When possible – I suggest you add role restrictions, or archive your data rather than deleting it permanently. For more info, review an article about [Conditional Record Filtering for roles](/knowledge-base/roles-and-permissions/conditional-filters-for-record-permissions-using-roles-intermediate/).","slug":{"current":"api_purgerecords-advanced"},"categories":[{"id":"-46109a16-4c3d-593f-a8f1-11046af26ef6","title":"Quickbase API","slug":{"current":"quick-base-api"}}]}},{"node":{"id":"-922c4548-386e-5677-b4a0-cce217eb44ec","title":"Creating External Stakeholder Forms, Reports and Dashboards | INTERMEDIATE","metaDescription":"Quickbase applications store information that is relevant to external stakeholders. Giving your clients access can improve collaboration. Learn how.","body":"In your Quickbase applications, you may store information that is relevant to external stakeholders: client contacts, purchase orders, and invoices, etc. \n\nIf you are constantly answering questions for clients, you may want to consider granting them access to your application. This will let them find the answers to their questions faster. \n\nThe benefits can be immense.  \n\nYour time will be freed up to help clients with higher-level problems, and stakeholders will have 24/7 access to their information.  \n\nThe key to successfully integrating external stakeholders into your app is presenting them with useful information while simultaneously preventing external stakeholders from accessing sensitive information.\n\nQuickbase’s flexibility makes possible use cases almost infinite.  \n\nWith access to Quickbase, external stakeholders would be able to update their contact info, enter/view invoices, update/view project statuses, etc.  \n\nTo ensure the success of inviting third parties to view your Quickbase app, follow the directions below.\n\n## 1. Create a New Role\n\nThe first step is to create a new role for external stakeholders. If you want to learn more about creating a new role and setting their permissions, read [Adding a new User Role](/knowledge-base/roles-and-permissions/adding-a-new-user-role-beginner/).\n\n## 2. Create a New Form\n\nOnce you have created the new role and set up permissions for which tables the role can access, you will likely want to create a new form specifically for the external stakeholder role.  \n\nBy creating a new form, you can show only relevant information to the external stakeholders and prevent them from accessing sensitive information.  \n\nTo create a new form and assign it to the external stakeholder role:\n1. From the table home page, click **‘Settings’**; then click **‘New Form’**;\n2. Create a form for the external stakeholder role (see [Creating User-Friendly Forms](/knowledge-base/quick-base-forms/creating-user-friendly-forms-beginner/) for some tips);\n3. From the Form’s Settings Page, click the dropdown arrow on **‘Set how different roles use these forms’**;\n4. For the external stakeholder role, select the form you created in step 2;\n5. Repeat the steps above for the other tables that external stakeholders can access.\n\n## 3. Set Up Reports\n\nMore than likely, you will have to create new reports for the external stakeholder dashboard.  \n\nMake certain to use user-filtered reports as outlined in [Setting-up Personalized Dashboards](/knowledge-base/reporting-and-dashboards/setting-up-personalized-dashboards-using-user-filtered-reports-beginner/).\n\n## 4. Dashboard\n\nFinally, you can create a new dashboard for the external stakeholder role, add their reports, and invite the users to your app.  \n\nIf you need help creating a dashboard, try [Creating a new Dashboard](/knowledge-base/reporting-and-dashboards/creating-a-new-dashboard-beginner/).\n\nIf you want to learn more about customizing settings for certain roles, check out: [Displaying Information for Certain Roles](/knowledge-base/roles-and-permissions/displaying-information-for-certain-roles-beginner/).","slug":{"current":"creating-external-stakeholder-forms-reports-and-dashboards-intermediate"},"categories":[{"id":"-27382539-ae20-5f0a-ace9-391d7b9a149f","title":"Reporting & Dashboards","slug":{"current":"reporting-and-dashboards"}}]}},{"node":{"id":"-173c52a2-fe81-53c9-ad2a-97cf0efa0a47","title":"Using Workato to Send an Email Through Outlook | BEGINNER","metaDescription":"Sending an email via Workato is a powerful tool for workflow efficiency. Use Workato to send your next email through built-in connectors using this guide. ","body":"### Send an Email Using Workato\n\nOne of Workato’s most simple but powerful tools is its ability to send emails.  Emails can be sent on a set schedule (daily, weekly, etc.), based on a change in another system (new customer in Salesforce, change to a box folder, etc.), or part of any existing recipe.  It is great for keeping internal and external stakeholders abreast of changes in various systems.  Furthermore, it can be used to create a communication log, an audit trail of sent emails.\n\nWorkato has three built in connectors to send emails: Email by Workato, Gmail, and Outlook.  This article will use Outlook as the example, but the other two connectors work similarly.\n\nIn this article, for illustration, we will build a recipe to send a daily reminder to ourselves.\n\n1. Determine the trigger.  In our example we want to send the report daily – choose the **Scheduler by Workato** app, then choose **New scheduled event** as the trigger, then determine how often it should repeat;\n\n![](https://res.cloudinary.com/dnla85pdq/image/upload/v1580279038/QuandaryCG/workato-to-send-01.jpg)\n\n2. Add a simple action, select **Outlook** and then select **Send email**;\n\n![](https://res.cloudinary.com/dnla85pdq/image/upload/v1580279037/QuandaryCG/workato-to-send-02.jpg)\n\n3. Insert the **From** and **To** email addresses in the fields provided, then insert the **Subject** (Daily Remainder) and **Message** in their respective fields. Note: the message can be in written in plain text or html;\n\n![](https://res.cloudinary.com/dnla85pdq/image/upload/v1580279038/QuandaryCG/workato-to-send-03.jpg)\n\nAdditionally, as you build more complex recipes, you can pass data pills from other steps in the recipe into these fields;\n\n4. Click **Save** and **Start Recipe** and you are good to go.\n\nThe Gmail and Email by Workato connectors work similarly to the steps listed above.  The advantage of using Gmail and Outlook is you can log your sent emails in the sent folder of the email address entered in the **From** field.\n\nIf you want to learn more about recipes, check out the article: [Creating Your First Workato Recipe](/knowledge-base/workato-knowledge-center/creating-your-first-workato-recipe-intermediate/).","slug":{"current":"using-workato-to-send-an-email-through-outlook-beginner"},"categories":[{"id":"-19639513-515e-5bd2-b0ac-4fddcab7d3be","title":"Workato Knowledge Center","slug":{"current":"workato-knowledge-center"}}]}},{"node":{"id":"-6a5d522a-47f1-5029-94d1-0402726bae1d","title":"Creating a Summary Report in Quickbase | BEGINNER","metaDescription":"Summary Report in Quickbase helps users quickly organize large quantities of data, making it easier to analyze. Learn how to set these up in Quickbase.","body":"## Summary Report – Background\n\nQuickbase is capable of collecting enormous amounts of data. It's one of the reasons why Quickbase is so successful. Initially, a user can understand the information in a table using just a \"List All\" report.  \n\nTraditionally, as systems input more and more records, users need to build filtered reports to interpret the data. Eventually, a user can't understand the information in an app effectively.  \n\nOn the other hand, Quickbase \"Summary Reports\" allow users to manipulate large data sets. As a result, users can better understand their app’s information.  \n\nSummary Reports group and total a table’s records by fields selected by the report builder. To better understand how Summary Reports can help users, read the example section below.\n\n## Summary Report – Example\n\nImagine a simple invoicing app that tracks invoice date, customer, and invoice amount. \n\nAt first, it is easy to view all invoices and find what you need as a user. As more invoices are entered, filtering by month or customer is sufficient. Eventually, though, there are too many invoices to be able to understand trends by using table reports.  \n\nLet’s build a Summary Report to help our users.\n\n##  Summary Report – Navigation\n\n1. Navigate to the table home page\n2. Click on the ‘Reports and Charts’ dropdown arrow\n3. Click ‘New’\n4. Choose ‘Summary’ and then click ‘Create’\n\nBy default, Quickbase summarizes the **# of invoices**.\n\n![](https://res.cloudinary.com/dnla85pdq/image/upload/v1580700378/QuandaryCG/creating-a-01.png)\n\nTo view the number of invoices by Customer, change the Grouping and crosstabs to **Customer**.\n\n![](https://res.cloudinary.com/dnla85pdq/image/upload/v1580700378/QuandaryCG/creating-a-02.png)\n\nThese choices will display a report that looks like this:\n\n![](https://res.cloudinary.com/dnla85pdq/image/upload/v1580700378/QuandaryCG/creating-a-03.png)\n\nKnowing the number of invoices by customer is great. However, it would be useful to know the total amount per customer.  \n\nTo accomplish this, in the Summarize Data section, add **Invoice Amount**.\n\n![](https://res.cloudinary.com/dnla85pdq/image/upload/v1580700378/QuandaryCG/creating-a-04.png)\n\n![](https://res.cloudinary.com/dnla85pdq/image/upload/v1580700378/QuandaryCG/creating-a-05.png)\n\nNext, you might want to see how the number of invoices and total invoice amount changes month to month. Simply add **Invoice Month** to the Grouping and crosstabs section.\n\n![](https://res.cloudinary.com/dnla85pdq/image/upload/v1580700755/QuandaryCG/creating-a-06.png)\n\n![](https://res.cloudinary.com/dnla85pdq/image/upload/v1580700378/QuandaryCG/creating-a-07.png)\n\nThe above displays the necessary information. However, it is not easy to read as the months are repeated for each customer.  \n\nIn this scenario, crosstabs are useful.  \n\nWe can make **Invoice Month**  the ‘crosstabs’ to better view the information. Now, months are displayed as columns and each customer is displayed in its own row and the data is much easier to read. Months and customers can be reversed if you would prefer customers as column headings.\n\n![](https://res.cloudinary.com/dnla85pdq/image/upload/v1580700379/QuandaryCG/creating-a-08.png)\n\n![](https://res.cloudinary.com/dnla85pdq/image/upload/v1580700379/QuandaryCG/creating-a-09.png)\n\nAny numeric field a user wants to total or average, take the _minimum, maximum, or standard deviation_ can be added to the Summarize data section.  \n\nAlso, any field can be used to group the data. Like other report types, in Summary Reports, filters can be added to remove unnecessary information. You can also add Dynamic filters to parse the data so it fits your needs.\n\n> EDITORS NOTE:\nSummary reports are limited to 25 calculations in the Summarize data section.\n\n> EDITORS NOTE:\nEach row in a Summary Report can be clicked to view the Drill down report of that row’s data. Initially, the information is presented based on the default table setting. However, a user can change the drill-down report at the bottom of the Summary report’s ‘customize this report’ page.\n\nIf you want to learn more about filtering reports, check out the article, [Updating the Default Table Home Page and Default Report Columns](/knowledge-base/reporting-and-dashboards/updating-the-default-table-home-page-and-default-report-columns-beginner/).","slug":{"current":"creating-a-summary-report-beginner"},"categories":[{"id":"-27382539-ae20-5f0a-ace9-391d7b9a149f","title":"Reporting & Dashboards","slug":{"current":"reporting-and-dashboards"}}]}},{"node":{"id":"-733512c2-9bf3-527f-963e-51fdfe333b01","title":"Sync-for-CSV","metaDescription":"Sync-for-CSV allows users to automatically upload a text file (.csv) to Quickbase by placing it in a designated folder within an FTP site or external source, such as Dropbox. Each line of your .csv file will create a record, where each mapped column will represent a field value added for each record. There are a …","body":"Sync-for-CSV allows users to automatically upload a text file (.csv) to Quickbase by placing it in a designated folder within an FTP site or external source, such as Dropbox. Each line of your .csv file will create a record, where each mapped column will represent a field value added for each record.\n\nThere are a variety of other methods for uploading a .csv to Quickbase, however this method has some considerable advantages.\n\n✓ Mapping is easy.  Once complete you will not have to map fields again.\n\n✓ Log-in free.  Users can add files to a shared Dropbox folder, updating Quickbase data without accessing the database.\n\n✓ Easy Automation.  This process can be extended to fully automate the transfer of data\n\n### Mapping is Easy\n\nLet’s say your company has a system for managing work orders outside of Quickbase.  Like many systems, there are limited options for integrating your system with Quickbase through an API or native sync. \n\nLet’s say that in this case you are able to export or email a csv from within the work order system.\n\nOnce you have your .csv file in hand you can proceed with setting up your connected csv-sync table.  \n\n1. Create a new table. \n\n2. Choose the option ‘Use connected data’.  From there you will choose a cloud storage service to connect with:\n\n![](https://res.cloudinary.com/dnla85pdq/image/upload/v1580198056/QuandaryCG/sync-01.png)\n\nYou will then be guided through your sync options.  Once these options are set for your first file, all subsequent files added to your Dropbox folder will be mapped to your Quickbase table with the same settings.  For more extensive step-by-step instructions visit: <a href=\"https://help.quickbase.com/user-assistance/Connecting_to_a_folder_of_csv_files.html\" target=\"_blank\">https://help.quickbase.com/user-assistance/Connecting_to_a_folder_of_csv_files.html</a>\n\n### Login Free\n\nNow employee’s can add data to Quickbase without logging into Quickbase or even being Quickbase users.  They can log into the work order system, export a file and add it to a shared Dropbox folder, all from outside Quickbase.\n\n### Automation\n\nThis approach becomes even more powerful when adding a connector service, such as Workato or Zapier, to fully automate the transfer of data.  Here’s how it works:\n\nMost systems, even outdated ones, support emailed .csv reports as attachments.  In this example, our Work Order system can generate an email and regularly send out reports on a schedule. Instead of sending this email to one of your regular users, it will instead be sent to a Workato or Zapier address.  When the email is sent, the attachment will be added to:\n\n- Example of adding gmail file attachment to box with Workato: \n<a href=\"https://www.workato.com/recipes/485773\" target=\"_blank\">https://www.workato.com/recipes/485773</a>\n\n- Example of adding email attachment to dropbox with Zapier: \n<a href=\"https://zapier.com/apps/dropbox/integrations/email\" target=\"_blank\">https://zapier.com/apps/dropbox/integrations/email</a>\n \n\nFollow the steps in either link.  Once completed, when a file is sent to your designated email address, the attached file will be placed in Dropbox.  That file’s contents will then automatically be loaded into your connected Quickbase table according to the mapping you configured in the ‘Mapping is Easy’ section of this article.\n\nFor more information or help setting up this system please contact [dev@quandarycg.com](mailto:jrattner@quandarycg.com).\n\nFor more ‘Outside the Box’ ideas click [here](/knowledge-base/quick-base-outside-of-the-box/).","slug":{"current":"sync-for-csv"},"categories":[{"id":"-dc095853-fb86-5354-8647-e35dd8636ed2","title":"Quickbase Outside Of The Box","slug":{"current":"quick-base-outside-of-the-box"}}]}},{"node":{"id":"-b291fe3d-6622-531c-a766-c6357da26dd3","title":"Using Automations to Log Approval Time and User in Quickbase","metaDescription":"Automations are a powerful tool for workflow. Capture your project’s creation, review, and approval processes with this tool. Learn how in Quickbase.","body":"### Background\n\nQuick Base is excellent at creating workflows.  In a simple project management workflow – create, review, approve – it is important to track the users who create, review, and approve the project, as well as the times the project is created, reviewed, and approved.  When this information is captured, insights can be gleaned to help improve the workflow and cut down on the time it takes to complete projects.  Automations are a powerful tool that can be utilized to accurately capture the project’s Reviewer and Approver as well as the times the project was Reviewed and Approved.  If you are not familiar with Automations, please check out <a href=\"https://www.quickbase.com/blog/quick-base-automations\" target=\"_blank\">this short blog post</a> from Quick Base demonstrating the basics.\n\n### Logging Reviewer and Approver and Time\n\nBy default, Quick Base already captures the user who created the project (Record Owner) and the time the project was created (Date Created).  But additional fields will have to be created for the Reviewer, Approver, Reviewed Date, and Approval Date.  Furthermore, a status field with choices of ‘Reviewed’ and ‘Approved’ must exist to trigger the automation outlined below.  Once all of the necessary fields exist, the steps below can be followed to log the Reviewer, Approver, Reviewed Date, and Approved Date.\n\n1. Navigate to ‘Settings’, ‘Automations’, click ‘+ New Automation’ and select ‘When data changes’ as the trigger:\n\n![](https://res.cloudinary.com/dnla85pdq/image/upload/v1580460433/QuandaryCG/using-automations-01.png)\n\n2. To ensure the automation runs when intended, mark checked the ‘adds a record’ and ‘modifies a record’ options; then choose the table where the automation is to occur:\n\n![](https://res.cloudinary.com/dnla85pdq/image/upload/v1580460434/QuandaryCG/using-automations-02.png)\n\n3. To ensure the automation only fires when the record is marked as reviewed, click the drop-down arrow on ‘ADDITIONAL CRITERIA’ and choose the automation to start when the Status field is equal to Reviewed:\n\n![](https://res.cloudinary.com/dnla85pdq/image/upload/v1580460434/QuandaryCG/using-automations-03.png)\n\n4. Now the action can be created; click ‘Add Action’ and choose ‘Modify Records’ and choose the same table chosen in step 2:\n\n![](https://res.cloudinary.com/dnla85pdq/image/upload/v1580460433/QuandaryCG/using-automations-04.png)\n\n5. In the action, to ensure the correct record is updated, filter Record ID # to be equal to the Record ID # from the trigger (this will prevent other records from being updated unintentionally):\n\n![](https://res.cloudinary.com/dnla85pdq/image/upload/v1580460433/QuandaryCG/using-automations-05.png)\n\n6. Add two actions: one to write the Reviewed Date as today and one to write the Reviewer as the Last Modified By (ensure you choose the ‘new values’):\n\n![](https://res.cloudinary.com/dnla85pdq/image/upload/v1580460434/QuandaryCG/using-automations-06.png)\n\n7. Repeat steps 1 through 6, but change the review entries to the approved entries.\n\nSimilar to Automations, dynamic form rules can be used to automatically write in the Reviewer, Approver, and dates; however, dynamic form rules have one important limitation.  If a project is edited in Grid Edit, then the from rule will not run and the Reviewer, Approver, and dates would not be captured.  Automations will run irregardless if the project is updated in the form or in Grid Edit. \n\nNonetheless, form rules are still essential to building a good app; if you want to learn more about dynamic form rules, check out the article,[Creating Form Rules](/knowledge-base/quick-base-forms/creating-form-rules-beginner/).","slug":{"current":"using-automations-to-log-approval-time-and-user-intermediate"},"categories":[{"id":"-27382539-ae20-5f0a-ace9-391d7b9a149f","title":"Reporting & Dashboards","slug":{"current":"reporting-and-dashboards"}}]}},{"node":{"id":"-b35cb5ae-cc84-5bd9-80e5-c53061b7387f","title":"Many-to-Many Relationships in Quickbase | INTERMEDIATE","metaDescription":"A Many-to-Many Relationship is a relational structure comprised of two separate one-to-many relationships connected by a **Join Table**. Learn more.","body":"> EDITORS NOTE:\nIf you are new to creating relationships or have not read our article on One-to-Many Relationships, please visit our article: [Setting up a New Relationship](/knowledge-base/admin-application-setup-security/setting-up-a-new-relationship-beginner/) to learn more.\n\n## Topics:\n\n✓ What is a Many-to-Many Relationship?\n\n✓ How to set up a correct Many-to-Many Relationship Structure.\n\n✓ How to create a Many-to-Many Relationship with a Join Table.\n\n✓ How to use a Many-to-Many Relationship.\n\n✓ How to create multiple records from the Join Table.\n\n## What Is a Many-to-Many Relationship in Quickbase?\n\nA Many-to-Many Relationship is a relational structure comprised of two separate one-to-many relationships connected by a **Join Table** (Intermediate table) that allows two tables to act as though they are both master and details tables, allowing records from either table to be a parent to the other table’s records.\n\n> EDITORS NOTE:\nThroughout this article, we will be using the example of Students and Classes to help illustrate a Many-to-Many Relationship. If you’d like, follow along in Quickbase by creating a students and classes table.\n\nIn theory, students can have many classes, and classes can have many students. There is a correct and incorrect way of creating this relationship. The upcoming examples will illustrate both methods:\n\n## Incorrect Many-to-Many Method\nIn this example, you can see that both students and classes are related to one another and represent information passing to each other similar to how cars move on a two-lane highway. \n\nUltimately, this method is not ideal and creates duplication of work in Quickbase.\n\n![](https://res.cloudinary.com/dnla85pdq/image/upload/v1580354508/QuandaryCG/many-to-many-01.png)\n\n## Correct Many-to-Many Method\nIn this example, we have created a **Join Table**. It’s a third table that helps connect data from the two tables you are trying to connect. \n\nTo help further illustrate, our students and classes table both contain lists of information. \n\nThe join table allows us to take the information from both the students and classes tables and create every combination of classes to students or students to classes with that information.\n\n![](https://res.cloudinary.com/dnla85pdq/image/upload/v1580354508/QuandaryCG/many-to-many-02.png)\n\n> BEST PRACTICE:\nWhen creating a join table, it’s best practice to name the join table something that relates to both tables connected to it. \n\nFor example, our join table for students and classes could be called “Registrations” or “Assignments.”\n\n\n## How to Create a Many-to-Many Relationship\n\n1. Create a **new table** to serve as the join table.\n\n![](https://res.cloudinary.com/dnla85pdq/image/upload/v1580354508/QuandaryCG/many-to-many-03.png)\n\n2. You will want to add a new table to your application and provide an appropriate name.\n\n![](https://res.cloudinary.com/dnla85pdq/image/upload/v1580354509/QuandaryCG/many-to-many-04.png)\n\n3. Create a relationship between the new table and the existing tables.\n\n![](https://res.cloudinary.com/dnla85pdq/image/upload/v1580354509/QuandaryCG/many-to-many-05.png)\n\nIn our example, we created a One-to-Many Relationship between Classes and Registrations (**above**) and a One-to-Many Relationship between Students and Registrations (**below**).\n\n![](https://res.cloudinary.com/dnla85pdq/image/upload/v1580354510/QuandaryCG/many-to-many-06.png)\n\n4. Add lookup fields to the relationship.\n\n![](https://res.cloudinary.com/dnla85pdq/image/upload/v1580354510/QuandaryCG/many-to-many-07.png)\n\n> EDITORS NOTE:\nIf there are fields in the existing tables that track information that’s now in the new join table, you’ll want to remove those fields. \n\nFor example, a class field in the students table that you’ll no longer use. By removing these fields, you will avoid duplicate information.\n\n## Using the Many-to-Many Relationship\n\n1. Once you establish your join table and have both related tables connected, you can add information through the newly created join table. For example, if you want to register a new student into a class, you would add a new record to the Registration table.\n\n![](https://res.cloudinary.com/dnla85pdq/image/upload/v1580354510/QuandaryCG/many-to-many-08.png)\n\n2. Continuing with our example, within the new record, you would select the student and select the class. Finally, save & close. \n\n![](https://res.cloudinary.com/dnla85pdq/image/upload/v1580354511/QuandaryCG/many-to-many-09.png)\n\n* * *\n\n## How to Create Multiple Records in the Join Table\n\nQuickbase makes this easy by adding a **URL Formula Button** to each parent table.\n\nFrom within a student record, you can click the **Add Registration** button to assign a person a subject, teacher, and grade. \n\nYou can do the same from within a class record too. The URL button adds a new record to the Registration table that joins a student and a class.","slug":{"current":"many-to-many-relationships-intermediate"},"categories":[{"id":"-14942e20-302e-57b3-a12c-de473ea4cc86","title":"Admin / Application Set Up / Security","slug":{"current":"admin-application-setup-security"}}]}},{"node":{"id":"-66ca6ec0-5557-526b-ad06-66ad4d26e414","title":"Understanding and Using Subscription Emails in Quickbase | BEGINNER","metaDescription":"Learn how to use Quickbase Subscription emails to send reports directly to your team and client’s email automatically, keeping them up-to-date.","body":"Automatic emails (called Subscription in [Quickbase](https://quandarycg.com/quick-base-solutions/)) keep teams informed and projects on track. In short, they send a report out periodically. \n\nHere are a few situations where you would use Subscription Emails in Quickbase:\n\n*   ◦ The senior managers need to email a monthly sales report. \n    \n*   ◦ The project lead needs to know the current open tasks on their project the day before their weekly meeting. \n    \n*   ◦ The client wants daily updates on the issue tracker to determine which issues have been closed and the current stages of all remaining tasks.\n\n \n&nbsp;\n \n\n    \nThis article demonstrates the capacity of Subscription emails in Quickbase, how to use them, and how to create them.\n\n## Background: What Is a Subscription Email in Quickbase?\n------------------------------------------------------\n\n**A Subscription email** is an automatic email that you can set to periodically send a report to a specified user(s). You can use email subscriptions when someone needs a report that is automatically sent out consistently and on time.\n\n_**Warning:**_ _Do not use Subscriptions when you need to remind a user of an event or notify them of a record addition, update, or deletion. The automated Reminder or Notification email works better for these instances._\n\n### What Are the Benefits of Quickbase Subscription Emails?\n\nA regular user of an application (who doesn't have administrative rights on the application) can subscribe to reports they can access. \n\nHowever, regular users can only create subscriptions for themselves. They cannot send subscriptions to other users. \n\n_**Note:**_ _When subscribing to a report, application administrators have more options than regular users._\n\n## How to Use Subscription Emails in Quickbase\n-------------------------------------------\n\nFollow this process to create a report subscription.\n\n### Step 1:\n\nOpen a table, then click **REPORTS & CHARTS** in the Page bar. Open the report you want, then click the **More** menu on the default table reports (new style). The new subscription is available in **the More menu for all legacy-style** reports (including charts).\n\n**Alternative Approach:**\n\n[![Screenshot of \"More Actions\" in Quickbase for Subscription Emails](https://cdn.sanity.io/images/55lcecww/production/7c5d87830384e0d3082876d5554b75f2b8dd1162-179x59.png)](https://cdn.sanity.io/images/55lcecww/production/7c5d87830384e0d3082876d5554b75f2b8dd1162-179x59.png)\n\n[![Screenshot of \"New Subscription\" in Quickbase for Subscription Emails](https://cdn.sanity.io/images/55lcecww/production/64d4fdbd9f9712932ebcc5887e65db53ec08631d-240x388.png)](https://cdn.sanity.io/images/55lcecww/production/64d4fdbd9f9712932ebcc5887e65db53ec08631d-240x388.png)\n\nSelect a table from the Table bar, click **Settings**, then click **+New** next to **Notifications**, **subscriptions, & reminders**. Select **Subscription**, then click **Create**.\n\n[![Screenshot of \"Workflows and Permissions\" in Quickbase for Subscription Emails](https://cdn.sanity.io/images/55lcecww/production/8f6059171ac83cbd0717a82a49ea5a21ada53217-332x123.png)](https://cdn.sanity.io/images/55lcecww/production/8f6059171ac83cbd0717a82a49ea5a21ada53217-332x123.png)\n\n### Step 2:\n\nIn the **Subscription Name** text box, enter a name for the subscription. **The Select Report** dropdown provides the report list for which you want to set up the subscription. You can create subscriptions for both common (shared) and personal reports. After choosing a report, you can click the icon next to the report name to display the report in a new browser tab.\n\n[![Screenshot of \"Workflows and Permissions\" in Quickbase for Subscription Emails](https://cdn.sanity.io/images/55lcecww/production/a659f92081d01ff5edaf0f97a1e366dae42aaaff-420x77.png)](https://cdn.sanity.io/images/55lcecww/production/a659f92081d01ff5edaf0f97a1e366dae42aaaff-420x77.png)\n\n_**Note:**_ _If you have created the subscription using_ _**More > New subscription**_ _while viewing a report, that report name will appear here._\n\n_**Caution:**_ _If the report contains a link to a file attachment, and that field has been set to allow open access, the file is available to anyone who clicks the link._\n\n### Step 3: \n\nTo determine the frequency of the email report delivery, you can select:\n\n*   ◦ Daily\n    \n*   ◦ Weekly (you’ll choose the specific weekday)\n    \n*   ◦ Monthly (specifying which day(s) of the month)\n\n \n&nbsp;\n \n\n \n[![Screenshot of \"email delivery frequency\" in Quickbase for Subscription Emails, showing daily, weekly, and monthly. It also shows \"send an email even if there are no records found in this report.](https://cdn.sanity.io/images/55lcecww/production/327dc013a0b7ab7b6e92b2103b4db668b2748dd8-420x175.png)](https://cdn.sanity.io/images/55lcecww/production/327dc013a0b7ab7b6e92b2103b4db668b2748dd8-420x175.png)\n\n### Step 4: \n\nYour selection for **Deliver to** will determine the recipient(s) of the report:\n\n* ◦   If you are an application manager (a user with full management rights on the application), you can choose:\n\n    *   ◦ Yourself\n        \n    *   ◦ All users with access\n        \n    *   ◦ Users in one or more roles\n        \n    *   ◦ Or from a specific list of users\n\n \n&nbsp;\n \n\n        \n* ◦   If you do not have full management rights on the application, you can only select your email to receive Subscription emails.\n\n \n&nbsp;\n \n\n \n[![Screenshot of \"Deliver to\" in Quickbase for Subscription Emails. It shows how to browser users by typing in email addresses, user names, or group names](https://cdn.sanity.io/images/55lcecww/production/165e64d52db1671bbcc0a4655462a878b93ac789-420x193.png)](https://cdn.sanity.io/images/55lcecww/production/165e64d52db1671bbcc0a4655462a878b93ac789-420x193.png)\n\n### Step 5: \n\nDecide whether to send an email even when there are no records in the report by clicking the following checkbox:\n\n[![Screenshot of \"Email Options\" in Quickbase for Subscription Emails showing \"From Address\", \"Subject\", \"Custom Message\", and \"Report format\".](https://cdn.sanity.io/images/55lcecww/production/af8d4a17aff251d9bff006ecfc7be2ecb7e611d2-469x317.png)](https://cdn.sanity.io/images/55lcecww/production/af8d4a17aff251d9bff006ecfc7be2ecb7e611d2-469x317.png)\n\n### Step 6: \n\nIf you want the subscription to come from Quickbase, choose [notify@quickbase.com](mailto:notify@quickbase.com) under **From** **Address**. If you want the subscription to come from the application manager, choose **The application manager.** If you want the subscription to come from the users who are in the application, choose the third option.\n\n### Step 7:\n\nEnter the **Subject** and an optional **Custom Message**. Then, decide on the type of **Report** format (either plain text in an email or an email with a PDF or CSV file attachment).\n\n_**Note:**_ _If you don't specify anything here, Quickbase uses a generic message._\n\n## New Email Features\n\nOn 22 May 2024, [Quickbase released new features](https://helpv2.quickbase.com/hc/en-us/articles/26561496260500-Quickbase-May-2024-Release-Notes) for subscription email. These include email customization and automation in the new email builder.\n\nThe update improves notification functionality and subscriptions, offering more customization and flexibility with drag-and-drop functionality. Users can now add CC/BCC fields (must be enabled in Realm Policies).\n\n[The new email notification feature](https://community.quickbase.com/blog/the-qrew-blog-/new-email-notification-beta-has-arrived/86454?mkt_tok=NTc1LVBXRi04NjUAAAGTQA75OzvKfIubAuM1BORSFvzIQ3hCXFCCh2Hhpe30ZGKze_jcx5zqlbzwvbfPr9SRXtYEkrpxDsyrNX3K-Rf1V8yWF1hKKNIyPDbqAmER_Bbf) adds more options for setting the “From” field. Emails can now appear to come from the notification owner or the user who triggered them. \n\nUsers can now quickly share data through a new record change element and generate audit log events showing when someone creates, updates, deletes, or sends notifications. \n\nThere are more custom elements for users (new forms, reports, and charts). Users can now include multiple file attachments and @mention users in the rich text field as well.\n\n_**Note:**_ _You cannot use these features on legacy forms or legacy email notifications._\n\n## Summary: Using Quickbase Subscription Emails \n---------------------------------------------\n\nIf you need to consistently send a report to update your team or stakeholders, automate reporting with Quickbase Subscription email. \n\n**For more information, see the following:**\n\n*   ◦ [https://helpv2.quickbase.com/hc/en-us/articles/4570276923156-About-Report-Subscriptions-](https://helpv2.quickbase.com/hc/en-us/articles/4570276923156-What-are-report-subscriptions)\n    \n*   ◦ [https://helpv2.quickbase.com/hc/en-us/articles/4570283676052-Create-a-Report-Subscription-](https://helpv2.quickbase.com/hc/en-us/articles/4570283676052-Create-a-Report-Subscription)\n\n \n&nbsp;\n \n\n   \nFor more guides on Quickbase, [visit our knowledge base](https://quandarycg.com/knowledge-base/).","slug":{"current":"understanding-and-using-quickbase-subscription-emails"},"categories":[{"id":"-27382539-ae20-5f0a-ace9-391d7b9a149f","title":"Reporting & Dashboards","slug":{"current":"reporting-and-dashboards"}}]}},{"node":{"id":"-cc79ed3a-51dd-57c9-aed7-136a1e462f0e","title":"Workato and Custom Connectors | ADVANCED","metaDescription":"Workato comes pre-loaded with hundreds of pre-built connectors. Learn how to integrate Workato with hundreds of leading systems available today. ","body":"Out of the box – Workato comes pre-loaded with hundreds of pre-built connectors. That means that within a few clicks of sign in, you have the ability to integrate with hundreds of leading systems available today. You can instantly start connecting dozens of popular enterprise grade to small team tools.\n\nEach year, the number of available systems on the market grows exponentially, which are all now fighting for niche markets. Salesforce might be considered the market leading CRM, but their competitors try to target industry specific companies. Take roofing for example, there are companies that claim they have revolutionized the sales and estimating process in that sector with systems Salesforce cannot compete with.\n\nFrom an integration stand point, that makes it difficult for companies like Workato to keep up. Not everyone’s system has the bang-for-the-buck need to add an out-of-the-box connector in Workato. That doesn’t mean Workato isn’t the tool for you. If you’ve read [What is Workato](/knowledge-base/workato-knowledge-center/what-is-workato-basics/), it’s described as an ‘integration engine’. In this circumstance, even without having pre-built connectors, Workato still has all the tools you need to let you integrate even the most niche systems.\n\nEnter the <a href=\"https://github.com/workato/custom_connector_docs\" target=\"_blank\">Workato SDK</a> and building your own <a href=\"https://docs.workato.com/developing-connectors/sdk.html\" target=\"_blank\">custom connectors</a>. With these tools – you can become a Workato developer yourself and start building your own triggers, actions, and processes in order to change your business. You can use this to connect with any system that allows API access to authorized users and program any and all methods available in that system to work with Workato.\n\n![](https://res.cloudinary.com/dnla85pdq/image/upload/v1580275501/QuandaryCG/workato-and-custom-01.png)\n\nAvailable in every Workato account under the ‘Tools’ tab of your home page – you can opt for the Connector SDK and start creating your own connector. Note – this takes some real development skill and by no means meant for anyone brand new to Workato. When would you go this route?\n\n✓ Workato doesn’t currently support / have connectors for the system you need\n\n✓ At this time, the trigger or actions you need for your integration aren’t available for use\n\n✓ You have a complex process that requires extensive coding to manipulate / parse / work with\n\nLet’s take a simple example. As of this writing – HubSpot – a CRM software, has an out-of-the-box connector. But currently only has one trigger: ‘New Contact in Hubspot’. If you’re company is a big user of HubSpot – thats a good start. But what about when a contact is updated? Or when a ‘Deal’ is created or changed. Using the Workato SDK and building your own custom connector – you can do all that and more to build a personalized workflow specific to you and your exact business need.\n\nIf you’re proficient in development and the Workato SDK seems like a reasonable path – you might be asking why you would go this route rather than just use HTTP Requests via standard Workato connectors. In truth, in a lot of situations, if you were the sole Workato developer in your enterprise you might be able to. However, that approach means a couple things:\n\n✓ Anyone else who helps work / manage your Workato recipes would also need to be familiar with HTTP. Given that Workato takes a lot of the development out of Integrations – this may not always be the case.\n\n✓ HTTP will have to be re-entered every time. Each new recipe would need to have a new HTTP request generated and the same set-up to get your similar results.\n\n✓  It becomes much more difficult to use HTTP as a trigger. Many Workato connectors have defined triggers that wait for events to happen. Using the HTTP connector, your system that is being integrated with will need to send a Request to Workato in order to start your recipe rather than Workato trigger itself.\n\nIn summary, it’s likely that Workato already has exactly what you need to revolutionize your business processes. But if you have fringe systems or a strange workflow, Workato can’t account for them all. Using the Workato SDK and building your own connectors – you can program like your own to make the engine that is Workato operate exactly how you need it to in any circumstance.\n\nIn addition to this – Keep a look out for a more in depth article regarding how to actually use the HTTP connector to be help bridge the gap between your current processes.","slug":{"current":"workato-and-custom-connectors-advanced"},"categories":[{"id":"-19639513-515e-5bd2-b0ac-4fddcab7d3be","title":"Workato Knowledge Center","slug":{"current":"workato-knowledge-center"}}]}},{"node":{"id":"-151df36c-1bd8-5a72-91ed-b00f75b608d8","title":"Set Up Personalized Dashboards Using User-Filtered Reports","metaDescription":"Background dashboards allow users to view data from multiple reports and from multiple tables at the same time. Learn how to set this up in Quickbase.","body":" ## Quickbase Dashboard\n\nDashboards allow users to view data from multiple reports and multiple tables at the same time. For the most part, they are flexible and can be manipulated. This allows users can see the exact reports and data they want.  \n\nThe greatest constraint of Dashboards is they are customizable by role, but not by the user. For apps with few users, this is not an issue because each user can be given a unique role and a unique dashboard.  But as the number of users increases, it becomes unreasonable to continue to create unique dashboards for each user.\n\n### Problem\n\nFor apps with many users and lots of data, many dashboards have reports that contain too much data to be pertinent to an individual user.  For example, on a project manager dashboard a summary report that summarizes all projects by status would be an ideal report to include.  But for an individual project manager, the report would contain a lot of extra information because it would include every project manager’s projects.\n\n### Solution\n\nUsers in the same role need access to the same type of data (the same reports), but they do not want to have to sift through the data related to other users. It is not feasible to create unique reports and unique dashboards for each user within a role.  The solution is to create reports that filter records to only show data related to the current user.  For project managers, the solution would be to add a filter to each report on the dashboard to show records where the field Project Manager (or the name of the user-field that determines the user responsible for the record) is equal to the Current User.\n\n![](https://res.cloudinary.com/dnla85pdq/image/upload/v1580456146/QuandaryCG/personalized-01.jpg)\n\nThat way any project manager using the dashboard will only see their projects. They will no longer have to sift through projects they are not managing.\n\nFor more information on limiting which records users can view, modify and delete, check out: [Conditional Filters for Record Permissions Using Roles](/knowledge-base/roles-and-permissions/conditional-filters-for-record-permissions-using-roles-intermediate/).\n\nIf you want to learn more about Quickbase reporting, check out: [Report and Chart Types](/knowledge-base/reporting-and-dashboards/report-and-chart-types-basics/).","slug":{"current":"setting-up-personalized-dashboards-using-user-filtered-reports-beginner"},"categories":[{"id":"-27382539-ae20-5f0a-ace9-391d7b9a149f","title":"Reporting & Dashboards","slug":{"current":"reporting-and-dashboards"}}]}},{"node":{"id":"-dc13ff6d-baba-5f86-9a50-109b3bcdecba","title":"Displaying Information for Certain Roles | BEGINNER","metaDescription":"An admin can determine what information users can access depending on their role. Learn to modify Field-Level Permissions in Quickbase with this quick guide.","body":"### BACKGROUND\n\nBased on a user’s role, the information visible to that user in Quick Base can be manipulated by an admin using: Dynamic Form Rules, App-Level, Table-Level, or Field-Level Permissions.  In prior articles, we covered [Dynamic Form Rules](/knowledge-base/quick-base-forms/creating-form-rules-beginner/) and App and Table-Level Permissions in [Adding a New User Role](/knowledge-base/roles-and-permissions/adding-a-new-user-role-beginner/).  In this article, the focus will be on Field-Level Permissions.\n\n#### Field-Level Permissions\n\nThere are two ways to modify Field-Level Permissions: from App-Level Permissions or from individual fields.  For any field, you can set the Field-Level Permission for any Role to be View, Modify, or None.  App-Level and Field-Level Permissions accomplish the same goal, but the user experience is slightly different.  From App-Level Permissions, an admin can customize a role’s permissions for all of a table’s fields at once, but cannot compare different roles side-by-side.  From Field-Level Permissions, an admin can compare different roles side-by-side, but can only edit that one field’s permissions.\n\n> EDITORS NOTE:\nTo make changes efficiently, an admin should choose App-Level if they are changing field permissions in multiple tables based on one role.  If an admin is changing the field permissions in one table for every role, they should use Field-Level.\n\n#### Navigation: App-Level\n\n1. From the app home page, click ‘Settings’\n2. Click Roles\n3. Choose the role you want to edit (A)\n4. Click the ‘Permissions’ tab (B)\n   - Click the dropdown in the ‘Fields’ column of the table you want to edit (C)\n   - Click ‘Custom Access’\n5. For each field, determine if the role should have View, Modify, or No access (D)\n\n![](https://res.cloudinary.com/dnla85pdq/image/upload/v1580443017/QuandaryCG/displaying-information-01.png)\n\n#### Navigation: Field-Level\n\n1. From the app home page, click the table you want to edit field permissions in\n2. Click ‘Settings’\n3. Select the field you want to change\n4. Scroll to the advanced section (E)\n5. Determine if each role should have View, Modify, or No access (F)\n\n![](https://res.cloudinary.com/dnla85pdq/image/upload/v1580443018/QuandaryCG/displaying-information-02.png)\n\nIf you want to learn more about adding roles, check out the article: [Adding a new User Role](/knowledge-base/roles-and-permissions/adding-a-new-user-role-beginner/).","slug":{"current":"displaying-information-for-certain-roles-beginner"},"categories":[{"id":"-3711bc9d-2dc7-582c-b894-03c210cdb205","title":"Roles & Permissions","slug":{"current":"roles-and-permissions"}}]}},{"node":{"id":"-b4d0d983-0610-585c-81e1-9f35100950b6","title":"Table-to-Table Import | INTERMEDIATE","metaDescription":"Quickbase allows users to create Table-to-Table Imports to move data from one table to another. To set up this automation and save time, follow these steps.","body":"## Your Quickbase Table-to-Table Guide\n\n[Quickbase](/quick-base-solutions/) allows users to create Table-to-Table Imports to move data from one table to another. A Table-to-Table Import [is an automation](/everything-you-need-to-know-about-integrations/). Once you set it up, there is no action required. Instead, the automation will run based on the trigger chosen in the automation.  \n\nBelow, the three most common use cases for Table-to-Table Imports will be covered.\n\n## Quickbase Table-to-Table Imports Use Cases\n\n### 1. Aggregate Data from Multiple Applications\nUsers, especially managers, likely use multiple applications within a Quickbase realm. This architecture is great for segregating data and customizing apps for specific uses. \n\nBut, it can slow review processes because managers cannot compare records from multiple apps side-by-side. [By creating a new app](/quandary-build/) and Table-to-Table Imports, you can aggregate information from multiple apps into the new, centralized app.\n\n>  BEST PRACTICE:\nIn this use case, you will want to set up the Table-to-Table Imports as a merge import. Review the Merge vs. Copy section for more information.\n\n### 2. Limit Information Displayed\nAs your apps have grown and become more complex, you have probably had to limit the information displayed to certain user groups. Along with the form rules, app-level, and field-level permissions, you can create a Table-to-Table Import to specify exactly which fields are imported. \n\nThis ensures there is no risk of displaying sensitive information to particular user groups that have access to the destination table of the Table-to-Table Import.  \n\nThis is especially useful when displaying information to third parties like customers or suppliers.\n\n> BEST PRACTICE:\nSimilar to the aggregating data use case, in the limiting information use case, you will want to set up the Table-to-Table Imports as a merge import. Review the Merge vs. Copy section for more information.\n\n### 3. Archiving Information\nOver time, apps accumulate a lot of records, some of which can be unnecessary for day-to-day operations. For example, it is probably not necessary to maintain invoices from more than a year or two ago in your active app. At the same time, you do not want to erase this information permanently.  \n\nA Table-to-Table Import is a perfect solution to move this old data to an archiving app. This makes it possible to remove the records from your active app and improve performance.\n\n> BEST PRACTICE:\nIn this use case, you can set up the Table-to-Table Import as a copy merge. Review the Merge vs. Copy section for more information.\n\n## Merge vs. Copy with Table-to-Table Import \n\nThe most important decision to make when creating a Table-to-Table Import is the Import Type. In a Table-to-Table Import, records can be merged or copied.\n\n### What Is Copy Table-to-Table Import?\nThis is the more simple option. It will transfer records from the source table to the destination table and create new records in the source table every time the import runs.  \n\nFor example, if there are 20 records in the source table and the import is scheduled to run every day. After two days, there will be 40 records in the destination table.  \n\nThis functionality is useful if you want to see how records progress over time or archiving information. Once the information is transferred to the destination table, the records in the source table will be removed.\n\n### What Is A Merge Table-to-Table Import?\nThis is slightly more complex than Copy Table-to-Table Import. This automation will take the records from the source table and merge or create new records in the destination table.  \n\nFor example, if there are 20 records in the source table and the import is scheduled to run daily. Every day, the 20 records in the destination table will be updated to match the 20 records from the source table.  \n\nOn the 3rd day, if there are 10 additional records added to the source table, then, when the automation runs, the 20 original records will be updated. As a result, 10 new records will be added to the destination table.  \n\nThis is accomplished using the merge field (see How to Create a Table-to-Table Import below for more information).\n\n## How to Create a Table-to-Table Import (12 Steps)\n\n**Step 1.** Create the destination table and its fields in a new or existing app. \n\n_If you are creating a Merge Table-to-Table Import, you must create a Merge Field in the source table._\n\n_This field should be type formula-text. Best practice is to use the formula: “Table Name”&[Record ID#] – by including record ID in the formula. This ensures each record’s Merge Field is unique._\n\n_In the destination table, make certain to create a Source ID field. This field should be type text and must be unique.  In step 9, you will map the Merge Field from the source table to the Source ID field in the destination table._\n\n**Step 2.** On the new table homepage, click ‘More’ then ‘Import/Export’.\n\n**Step 3.** Choose the ‘Import into a table from another table’ radio button.\n\n![](https://res.cloudinary.com/dnla85pdq/image/upload/v1580286305/QuandaryCG/table-to-table-01.png)\n\n**Step 4**. Click ‘Import from Another Table’ then click ‘CREATE A NEW IMPORT’\n\n![](https://res.cloudinary.com/dnla85pdq/image/upload/v1580286305/QuandaryCG/table-to-table-02.png)\n\n**Step 5.** Name the import.\n\n**Step 6.** Choose the source table.\n\n**Step 7.** Choose the import type: copy or merge.\n\n**Step 8.** Choose if all records should be imported or if only records meeting certain criteria should be imported in the matching section.\n\n**Step 9.** Map fields from the source table to the destination table.\n\n![](https://res.cloudinary.com/dnla85pdq/image/upload/v1580286305/QuandaryCG/table-to-table-03.png)\n\n**Step 10.** Save the new import.\n\n**Step 11**. Navigate to automations (settings > automations) and create a new one.\n\n**Step 12.** Set up the trigger and then add an action (Table-to-Table Import).\n\n> BEST PRACTICE:\nOne shortfall of Table-to-Table Imports is they are unable to transfer file attachments from one app to another.\n\nIf you want to learn more about customizing a role’s access, check out the article: [Displaying Information for Certain Roles](/knowledge-base/roles-and-permissions/displaying-information-for-certain-roles-beginner/).","slug":{"current":"table-to-table-import-intermediate"},"categories":[{"id":"-5bed183e-fc97-5f28-8c58-da9094825c0d","title":"Tables","slug":{"current":"quick-base-tables"}}]}},{"node":{"id":"-10337215-cc81-5aed-aefd-5d49d123e5f8","title":"Adding Reports to Dashboards | BEGINNER","metaDescription":"A valuable element on a dashboard is a report. By creating reports, admins increase work efficiency by providing access to vital information. Learn how.","body":"When you are setting up a new dashboard or modifying an existing one, one of the best, most common, elements to put on your dashboard is a report.\n\nSome of the benefits of putting reports on a Dashboard include:\n\n✓ Efficiency and ease of use for your end users. Users don’t have to worry about losing a link or forgetting where/how to find their report\n\n✓ Users have instant access to their information right when they log in to see what they should be working on or need to attend to\n\n✓ Plain and simple, they make your dashboard look good\n\n> EDITORS NOTE:\nModifying dashboards is an admin-only setting\n\nTo start adding reports, you will have to get to the ‘edit’ screen for the particular dashboard you want to modify in one of two ways.\n\n1. If you are already on the dashboard you want to make changes to, click the ‘Customize This Page’ link in the right corner of your page (You can skip to step (5) if this is the case)\n\n![](https://res.cloudinary.com/dnla85pdq/image/upload/v1580708841/QuandaryCG/adding-reports-01.png)\n\n2. If you are not already on the dashboard you want to make changes to, click the ‘Settings’ gear icon from the Home Screen of your application and follow the steps below.\n3. Select the ‘Pages’ link under the ‘User Interface’ column of the settings page\n\n![](https://res.cloudinary.com/dnla85pdq/image/upload/v1580708841/QuandaryCG/adding-reports-02.png)\n\n4. Click the link of the particular Page you want to make changes to\n5. From the edit page of the Dashboard – hover over the ‘Report or Chart’ icon at the top of the page, click and drag the icon into the white area of the page, move it around until you find the place you want to drop it, then un-click.\n\n![](https://res.cloudinary.com/dnla85pdq/image/upload/v1580708841/QuandaryCG/adding-reports-03.png)\n\nA new empty report widget will be added (see image below) on the page where you dropped it.\n\n![](https://res.cloudinary.com/dnla85pdq/image/upload/v1580708841/QuandaryCG/adding-reports-04.png)\n\n6. On your new report widget – click the gear icon where the arrow is pointing. You will be presented with a drop-down list similar to below. Search and locate the report you want to place here, select it, and watch the report load on your dashboard.\n\n![](https://res.cloudinary.com/dnla85pdq/image/upload/v1580708841/QuandaryCG/adding-reports-05.png)\n\n7. By default, Quick Base will title this widget with the report name – see the ‘List All’ title on the report widget above. To change the title, hover your mouse next to the title, where a Pencil Icon will appear. Select the Pencil and enter in the new title you would like to label this widget as to ensure it makes sense to your users.\n8. Repeat these steps to add  additional reports that you want to appear on this dashboard. When you are done, make sure to ‘Save’ the dashboard in the upper right-hand corner.\n\n> EXCEPTIONS:\n- A ‘Grid Edit’ type report cannot be placed on a dashboard.\n- There is a limit of 9 report widgets per dashboard\n- You cannot use a Personal Report on a dashboard.\n- Incomplete Reports, meaning any of those that have an ‘ask the user’ component, cannot be used on Dashboards.\n\nFor more about report types and whats possible – read through the [full list of reports here](/knowledge-base/reporting-and-dashboards/report-and-chart-types-basics/).","slug":{"current":"adding-reports-to-dashboards-beginner"},"categories":[{"id":"-27382539-ae20-5f0a-ace9-391d7b9a149f","title":"Reporting & Dashboards","slug":{"current":"reporting-and-dashboards"}}]}},{"node":{"id":"-b88f52ac-4cb4-555b-bab5-c509a9fc30be","title":"Sharing with Everyone On The Internet | BEGINNER","metaDescription":"Opening your application to Everyone On The Internet (EOTI) allows users to access your application without signing into Quickbase. Learn how. ","body":" Opening your application to **Everyone On The Internet (EOTI)** allows users to access your application without signing into Quick Base. Users can view and add records, view reports and interact with data just like registered users. Similar to other groups, you can create a role and set permissions to limit access to your data. Some common use cases for the EOTI group may include:\n\n✓ **Allowing non-user customers to access work order histories**\n\n✓ **Sending actionable communications to non-users**\n\n✓ **Sending surveys**\n\n>EDITORS NOTE:\nThis functionality is **not** available to accounts on the Essential Plan. Your Billing Account Administrator will determine which applications allow open internet access. **It is extremely important to enforce strict role permissions to prevent against any malicious behavior from EOTI users**.\n\n* * *\n\n### How to share with Everyone On The Internet:\n\n1. Navigate to **Users** and click + **Share app with new user**.\n2. Search for **Everyone On The Internet** or select it using the **Address Book** icon. If you do not see this choice then it has not been enabled by your Billing Account Administrator.\n\n![](https://res.cloudinary.com/dnla85pdq/image/upload/v1580443297/QuandaryCG/sharing-with-01.png)\n\n3. Select the **Role** you would like to assign and click **Add**.\n4. Congratulations! Your app is now visible to the world wide web!\n\n> BEST PRACTICE:\nYou’ll want to test your access as an end user in the Everyone On The Internet role. Sign out of Quick Base or use another browser and visit your application’s URL to test functionality.\n\n* * *\nNow that you’ve opened up access to the entire internet, you are going to want to learn how to control access to your application. To learn how to customize roles for your new Everyone On The Internet group, check out my article about **[Adding a new User Role](/knowledge-base/roles-and-permissions/adding-a-new-user-role-beginner/)**.\n* * *","slug":{"current":"sharing-with-everyone-on-the-internet-beginner"},"categories":[{"id":"-3711bc9d-2dc7-582c-b894-03c210cdb205","title":"Roles & Permissions","slug":{"current":"roles-and-permissions"}}]}},{"node":{"id":"-cd9bb040-4e3b-5ee3-84cf-75d22bb64827","title":"Creating a new Dashboard | BEGINNER","metaDescription":"As you refine/expand your app, you’ll want to maintain functionality by creating and managing new Quickbase Dashboards. Learn how in this simple guide.","body":"For information about what/why to use Dashboards, please reference the article titled _**[What are Dashboards](/knowledge-base/reporting-and-dashboards/what-are-dashboards-beginner/)**_.\n\nAs you refine/expand your app, you’ll want to maintain functionality by creating and managing new Dashboards. Early on – you may only have one dashboard for everyone, but as roles and responsibilities diversify, you will need to create new ones to tailor each roles’ dashboard to meet their specific needs.\n\nSome common scenarios that you might encounter where a new Dashboard would be beneficial are:\n\n✓ You have several roles that need specific views and reports for when they log in\n\n✓ Setting up Executive / Admin only reporting views\n\n✓ Tailor more advanced workflows for specific users and roles\n\n> EDITORS NOTE:\nCreating new Dashboards is an admin-only setting, available only to those with Administrator user access.\n\nTo set up a new Dashboard,\n\n1. Navigate to the application home page, select the ‘Settings’ gear icon from the upper left corner under the ‘Home’ icon\n\n![](https://res.cloudinary.com/dnla85pdq/image/upload/v1580709368/QuandaryCG/new-dashboard-01.png)\n\n2. Select the link for ‘Pages’ in the middle column.\n\n![](https://res.cloudinary.com/dnla85pdq/image/upload/v1580709369/QuandaryCG/new-dashboard-02.png)\n\n3. SFrom ‘Pages’, select the ‘New Page’ button from the upper right corner\n\n![](https://res.cloudinary.com/dnla85pdq/image/upload/v1580709369/QuandaryCG/new-dashboard-03.png)\n\n4. You will be presented a modal window confirming what ‘type’ of page you want to create. In Quick Base – Dashboards are synonymous with ‘Home Page’, which is the default option selected when this modal pops up.\n\n![](https://res.cloudinary.com/dnla85pdq/image/upload/v1580709383/QuandaryCG/new-dashboard-04.png)\n\n5. By hitting create, a new dashboard will be created, you will be re-directed to the set-up page for your new dashboard, and you can start configuring what you want on your brand-new dashboard\n\nClick here to read about [adding reports and charts to your new dashboard](/knowledge-base/reporting-and-dashboards/adding-reports-to-dashboards-beginner/) to start making it functional","slug":{"current":"creating-a-new-dashboard-beginner"},"categories":[{"id":"-27382539-ae20-5f0a-ace9-391d7b9a149f","title":"Reporting & Dashboards","slug":{"current":"reporting-and-dashboards"}}]}},{"node":{"id":"-f2d2540e-546a-597c-a1a4-fdc7dddeec86","title":"When to Use Grid Edit | BEGINNER","metaDescription":"To maximize efficiency, learn to add, edit, or delete multiple records at once using Grid Edit in Quickbase. Manage your business's data with this brief guide.","body":"#### WHEN TO USE GRID EDIT\n\nQuick Base is great tool for entering and managing a business’s data. Creating [User-Friendly Forms](/knowledge-base/quick-base-forms/creating-user-friendly-forms-beginner/) are great to help users add, edit, or delete one record at a time.  To maximize efficiency, a user will need to add, edit, or delete multiple records at once – this can be accomplished using Grid Edit. Grid edit reports can be created from the [Table Home Page](/knowledge-base/admin-application-setup-security/organizing-the-table-bar-beginner/).  Additionally, grid edit reports can be embedded within forms to improve user experience (The ‘Editable’ checkbox must be checked in the form element). \n\n#### GRID EDIT – BACKGROUND\n\nGrid edit allows a user to add, edit, and delete multiple records at once.  A user can:\n\n✓ Edit multiple records by copying and pasting data between different records,\n\n✓ Edit multiple records by filling down the data from a field in one record to the records below,\n\n✓ Delete multiple records at once,\n\n✓ Add multiple records at once,\n\nIn grid edit, changes are not finalized until clicking save or apply changes (C).  Leaving the page before saving will revert all changes back to their original values.  To help the user review their work cells are color-coded.\n\n✓ White cells have been unedited by the user(A),\n\n✓ Yellow cells have been edited by the user(B),\n\n✓ Gray cells cannot be edited by the current user,\n\n✓ The most recent edit can be undone by pressing ctrl+z or right-clicking and selecting ‘Undo Action’,\n\n✓ Any change can be undone by right-clicking in the cell and selecting ‘Reset to Original Values’.\n\n![](https://res.cloudinary.com/dnla85pdq/image/upload/v1580711885/QuandaryCG/when-to-use-01.png)\n\n> EDITORS NOTE:\nTo prevent data entry errors, you may want to limit which users have access to grid edit; grid edit access can be removed by changing role permissions\n\nIf you want to learn more about role permissions, check out the article, [Adding a new User Role](/knowledge-base/roles-and-permissions/adding-a-new-user-role-beginner/).","slug":{"current":"when-to-use-grid-edit-beginner"},"categories":[{"id":"-540552b6-6aca-5fc6-ab8e-c34778837055","title":"Forms","slug":{"current":"quick-base-forms"}}]}},{"node":{"id":"-ad76e3c4-c4c3-52d4-b440-32c6b355ccc2","title":"Using docparser and Workato to Create Records in Quick Base | INTERMEDIATE","metaDescription":"Combine Docparser, a data capture software, and Workato to create records in Quickbase from a pdf. Learn how this systematic process can reduce your workload.","body":"### Background\n\nQuick Base is a great service for housing large amounts of data.  Forms, imports, and automations are tools that make entering information into Quick Base efficient. They are good solutions for most use cases (If you would like to learn more about these tools, check out the links at the bottom of this article).  However, each tool has some limitations: Forms are limited because you can only create one record at a time; Automations are limited by your access to other systems; Imports are limited to flat files.\n\nWhat if you receive data from a client that needs to be entered into Quick Base, but they can only send you a pdf and are not willing to let you access their system?  Without access to their system, Automations are out.  Imports are out because a flat file is not provided.  One solution is to insert the pdf information using a Form in Quick Base, but it becomes tedious very quickly if there are numerous records and it always has the risk of data entry error.  Fortunately, there are other softwares that can be used to solve the problem of creating records from pdfs.\n\nDocparser, a data capture software, and Workato, an integration software, are services that can be leveraged to efficiently create records in Quick Base from a pdf.  In the situation outlined above, docparser can be used to read the pdf and extract the necessary information (parsing rules) for data entry in Quick Base.  Then Workato can take the information from docparser and automatically create the records in Quick Base.  Therefore, by leveraging docparser and Workato, hours of data entry and numerous potential data entry errors can be eliminated.\n\n### Workato Recipe – PDF to Quick Base Records\n\nOutlined below is a workato recipe that will take the information extracted from the pdf via docparser and create the corresponding Quick Base records.  If you need a refresher on Workato recipes, check out [Creating Your First Workato Recipe](/knowledge-base/workato-knowledge-center/creating-your-first-workato-recipe-intermediate/).\n\n1. Set up a Document Parser and create the Parsing Rules in docparser;\n\n2. Create a trigger in Workato to “Fetch parsed data in docparser\n\n![](https://res.cloudinary.com/dnla85pdq/image/upload/v1580180647/QuandaryCG/docparser-1.jpg)\n\n3. Create a list to capture the data from the Document Parser;\n\n![](https://res.cloudinary.com/dnla85pdq/image/upload/v1580180751/QuandaryCG/docparser-02.jpg)\n\n4. Add items to the list that correspond to the fields in your Quick Base table;\n\n![](https://res.cloudinary.com/dnla85pdq/image/upload/v1580180843/QuandaryCG/docparser-03.jpg)\n\n5. Create a loop and pass the information from the Document Parser into the list created in step 3 above;\n\n![](https://res.cloudinary.com/dnla85pdq/image/upload/v1580180843/QuandaryCG/docparser-04.jpg)\n\n6. Compose a CSV from the list created earlier in your Workato recipe;\n\n![](https://res.cloudinary.com/dnla85pdq/image/upload/v1580180983/QuandaryCG/docparser-05.jpg)\n\n7. Create and update records in Quick Base from the CSV file created in step 6;\n\n![](https://res.cloudinary.com/dnla85pdq/image/upload/v1580180842/QuandaryCG/docparser-06.jpg)\n\nIf you want to learn other ways to enter information into Quick Base, check out the articles: [Importing Data into Quick Base](/knowledge-base/quick-base-tables/importing-data-into-quick-base/), [Table-to-Table Import](/knowledge-base/quick-base-tables/table-to-table-import-intermediate/), [Implementing Custom Imports](/knowledge-base/quick-base-outside-of-the-box/implementing-custom-imports/), and [API ImportFromCSV](/knowledge-base/quick-base-api/api-importfromcsv-advanced/).","slug":{"current":"using-docparser-and-workato-to-create-records-in-quick-base-intermediate"},"categories":[{"id":"-dc095853-fb86-5354-8647-e35dd8636ed2","title":"Quickbase Outside Of The Box","slug":{"current":"quick-base-outside-of-the-box"}}]}},{"node":{"id":"-0568121c-7672-5421-9ed9-cdc252771b2c","title":"API_DoQuery | ADVANCED","metaDescription":"API_DoQuery is the API equivalent to doing a search in a Quickbase table for a subset of data. This walkthrough shows you how to set up an API_DoQuery quickly.","body":"**API_DoQuery** is the API equivalent to doing a search in a Quickbase table for a subset of data. At its most fundamental level, DoQuery means passing Quickbase a query ID (qid) or a custom query. This returns table data that matches what you’re looking for. \n\nFrom that perspective, API_DoQuery can be treated similarly to a report with a similar setup when it comes to picking your fields, filters, and sort criteria.\n\n## Why Use API_DoQuery vs. a Regular Quickbase Report? \nUsing DoQuery is needed to get data from Quickbase without actually being in the Quickbase interface. The most common example is custom scripting or setting up server-side scripting that requires you to extract and manipulate Quickbase data from a different interface. \n\nIf you are using things such as Quickbase dbpages or have an external system that needs to extract data from Quickbase,  API_DoQuery is the method to do that.\n\n> EDITORS NOTE:\nAPI_DoQuery can be called using standard XML POST and GET requests. For this example – we’ll be covering a URL example for simplicity but the elements are transferrable\n\nThe setup for your API call is the same as most API calls and is invoked on a table-by-table basis. You cannot query your entire [Quickbase application](/quick-base-solutions/) at one time for data – you must query each table individually. \n\n**Your set up then looks similar to this:**\n\n~~~~\nhttps://yourrealm.quickbase.com/db/yourtableID?a=API_DoQuery\n~~~~\n\nThe next step is to define your query parameters. For a more in-depth review of how/what you can query, read through the Quickbase guide on the\n<a href=\"https://help.quickbase.com/api-guide/componentsquery.html\" target=\"_blank\">Components of a Query</a>.\n## Two Ways to Set Up API_DoQuery in Quickbase\n\n### 1. Using a pre-defined QID\nThis would mean using an existing table report you already have set up and using the QID of that report to run your DoQuery. Let's say you had a report of records created today that you’ve already saved (qid 18 for demo). \n\nIf that's the case, then you could invoke your DoQuery like so:\n\n~~~~\nhttps://yourrealm.quickbase.com/db/yourtableID?a=API_DoQuery&qid=18\n~~~~\n\nFrom this – your doQuery will return the same set of records that would show in report 18 if you ran it in Quickbase manually.\n\n### 2. Using a Manual/Custom Query\nThis means using query= and using the guide from \n<a target=\"_blank\" href=\"https://help.quickbase.com/api-guide/componentsquery.html\">Components of a Query<a/> to define the parameters yourself in the actual API call. \n\nUsing the same example from above, if you wanted to write out a query that looked for all records created today, your DoQuery would look like so:\n\n~~~~\nhttps://yourrealm.quickbase.com/db/yourtableID?a=API_DoQuery&query={'1'.EX.'today'}\n//The character string '1' represents querying the built-in field 'Date Created'\n~~~~\n\nIn either format – you will get the same result\n\n> BEST PRACTICE:\nWhere possible (it will serve you better in the long run) use established qid’s as opposed to always writing your own query. You can quickly change a QB report and update the filter criteria that drive the report. Updating code pages or server-side scripts require more effort for small changes.\n\nWith the above, you have defined what records you want to return from a Quickbase table. Beyond that, there are several different elements that should/can be added where appropriate to tweak and optimize what is returned. Additional parameters include:\n\n### clist in Quickbase\nThis will define what fields/columns you wanted to be returned. Your clist is comprised of the field ID numbers of the particular fields you want to be returned. If you enter a clist such as “API_DoQuery&qid=1&clist=1.2.3.4.5” – you will return the ‘List All’ Report, and include the 5 built-in Quickbase fields _Date Created, Date Modified, Record ID#, Record Owner, Last Modified By_\n   - If you do not include a clist – it will default to whatever your default table columns are and return those\n\n### list in Quickbase\nThis will define what sort-order you want your records to appear in so that the records you return are already pre-sorted how you’d like them. Your slist is comprised of the field ID numbers of the particular fields you want to sort on. \n\nFor example: “API_DoQuery&qid=1&slist=1.4” will sort your records first by _Date Created_, then sort by _Record Owner_\n   - If you do not include a slist, it will default the sort based on whatever the default table sort field is.\n\n### Options in Quickbase\nThe options parameter allows you to manipulate the response in ways that you can’t do with [standard Quickbase reporting](/quandary-build/). Using the options feature lets you combine any of the below inputs, separated by a period to manipulate the response\n   - **num-n** => Define a set number of records you want (num-100 will return only the first 100 records that meet your criteria)\n   - **skp-n** => Lets you skip over a set number of records (skp-100). This is helpful in larger data sets where you have to batch/chunk your data set and iterate over the same query multiple times and don’t want to keep starting from the beginning\n   - **onlynew** => Returns only records that are new or have been updated recently\n   - **sort-A** => Sort your records in ascending order\n   - **sort-D** => Sort your records in descending order\n\nAn example to see it might be “API_DoQuery&options=num-100.skip-250.sort-A”\n\nAs a final requirement – you’ll need an [apptoken](/knowledge-base/admin-application-setup-security/application-tokens-intermediate/)/ticket or [usertoken](/knowledge-base/admin-application-setup-security/user-tokens-intermediate/) to handle the authentication part of using the API.\n\nTo see an example of API_DoQuery, \n<a target=\"_blank\" href=\"https://quandarycg.quickbase.com/db/bnz6hr7vh?a=api_doquery&query={%273%27.XEX.%27%27}&clist=1.2.3.4.5&slist=1&options=num-5.skp-10%C2%A0\">click here</a>.\nThe link will open up a DoQuery of our Quickbase knowledge Base App and show a list of 5 records.\n\n> EDITORS NOTE:\nIf you clicked the link above – you will notice that the response is an XML formatted response. To fully utilize API_DoQuery, you will need to parse the XML response using current parsing methods to organize and configure the response in a way that can be utilized for your particular use case.\n\nOnce you’ve mastered API_DoQuery, you can start expanding your Quickbase application by incorporating DB pages and custom interfaces to enhance your workflows and processes. \n\nCheck out [Code Pages](/knowledge-base/admin-application-setup-security/code-pages-advanced/) and how to use them for all the ways you can take this new knowledge to the next level.","slug":{"current":"api_doquery-advanced"},"categories":[{"id":"-46109a16-4c3d-593f-a8f1-11046af26ef6","title":"Quickbase API","slug":{"current":"quick-base-api"}}]}},{"node":{"id":"-c0feaed2-1c42-5c63-bc6f-671f203895ab","title":"Creating Form Rules | BEGINNER","metaDescription":"Create user-friendly forms using dynamic form rules in Quickbase. Learn how to modify fields, sections, and tabs of forms given specific conditions.","body":"#### FORMS – BACKGROUND\n\nForms are used to add, edit, and view records.  End users interact most often with an app’s forms; it is important to build [User-Friendly Forms](/knowledge-base/quick-base-forms/creating-user-friendly-forms-beginner/) to help ensure the success of an app.  Dynamic Form Rules can be used to modify fields, sections, and tabs of forms given specific conditions.  Use Dynamic Form Rules to customize how users interact with your app.\n\n#### DYNAMIC FORM RULES\n\nDynamic Form Rules are tools that can be used to tailor the functionality of a form based on certain conditions and/or users.  All rules have three basic parts: When, Action, Otherwise.  The When of a rule determines when the rule is applicable; the Action of a rule determines what will happen given the When; Otherwise determines what happens if the When is not applicable.\n\n**Examples:**\n\nLet’s say a company has built a Quick Base app to manage their employee’s information.  The app tracks name, title, department, schedule, salary, etc. in the Employee table.  Based on the information collected about each employee, let’s walk through some useful dynamic form rules to add to the Employee form.\n\n1. **Hiding sensitive information:** employee salary information should not be visible to all users. To hide the information from all users but HR, create a dynamic form rule. When: the user is not in the HR role; Action: hide [Salary]\n\n2. **Time Stamp:** employees get promoted, but for it to be effective, it must be approved. To know when the approval happened is important and it can be automated with a dynamic form rule. When: [Promotion] is checked; Action: change [Approval Date] to today.\n\nTo create your own Dynamic Form Rules, follow the instructions in the Navigation section below.\n\n#### NAVIGATION\n\nDynamic Form Rules is the third tab of the Forms Settings page (the first two are Elements and Properties, respectively).  From your app’s homepage, to access the Forms Settings page, click on the table in the [Table Bar](/knowledge-base/admin-application-setup-security/organizing-the-table-bar-beginner/)(A),\n\n![](https://res.cloudinary.com/dnla85pdq/image/upload/v1580712795/QuandaryCG/creating-form-01.png)\n\nclick Settings (B),\n\n![](https://res.cloudinary.com/dnla85pdq/image/upload/v1580712796/QuandaryCG/creating-form-02.png)\n\nclick Forms (C), select the Form you would like to edit,\n\n![](https://res.cloudinary.com/dnla85pdq/image/upload/v1580712796/QuandaryCG/creating-form-03.png)\n\nthen, finally, click the Dynamic Form Rules tab (D).  To create a Dynamic Form Rule, click ‘Add New Rule’.\n\n**Action**\n\nIt is easiest to understand Dynamic Form Rules if we start with the Action.  The eight possible actions are: Show, Hide, Require, Un-require, Make Read-Only, Make Editable, Change, and Display a Message.  Multiple actions can be triggered by the When; to add an action, click the ‘Add Action’ button in the top right corner.\n\n✓ _Show:_ this action will show a field, section, and/or tab if the given condition is applicable;\n\n✓ _Hide:_ this action will hide a field, section, and/or tab if the given condition is applicable;\n\n✓ _Require:_ this action will require a field if the given condition is applicable; \n\n✓ _Un-require:_ this action will un-require a field if the given condition is applicable; \n\n✓ _Make Read-Only:_ this action will make a field uneditable; \n\n✓ _Make Editable:_ this action will make a field editable by the user; \n\n✓ _Change:_ this action will set a field to a specific value – the value can be a static value or set to the value in another field; \n\n✓ _Display a Message:_ this action will display a message to the user if the given condition is applicable\n\n#### When\n\nThe When is the trigger that determines if the Action(s) described above will occur.  The When is a condition based on a field, the record, the user, or multiple conditions.\n\n✓ _Field:_ any of the eight actions described in the Action section can be triggered based on the value in a field being equal, not equal to, greater than, less than, greater than or equal to, or less than or equal to the value in another field or a specific value inputted by you; \n\n✓ _ The Record:_ can Display a Message on being Opened, or can Change or Abort the Save   (based on a field’s value) on being Saved; \n\n✓ _The User:_ any of the eight actions described in the Action section can be triggered based   on the user being in a specific role;\n\n✓ _Multiple Conditions:_ can be set to either True or False, the conditions can be any   combination of User and Field, and any of the eight actions described in the Action section   can be triggered.\n\n#### Otherwise\n\nThe Otherwise section outlays the result of the dynamic form rule based on the condition(s) not being met.\n\nDynamic form rules are a great place to start when building user-friendly forms; if you want to learn more, check out the article, [User-Friendly Forms](/knowledge-base/quick-base-forms/creating-user-friendly-forms-beginner/).","slug":{"current":"creating-form-rules-beginner"},"categories":[{"id":"-540552b6-6aca-5fc6-ab8e-c34778837055","title":"Forms","slug":{"current":"quick-base-forms"}}]}},{"node":{"id":"-53386712-5a3c-5cf1-9f3e-3a485c4040ef","title":"Conditional Filters for Record Permissions Using Roles | INTERMEDIATE","metaDescription":"Conditional criteria grant users access to pertinent information based on their role. Optimize workflow with custom permissions. Learn how in Quickbase. ","body":"In Quickbase you can set detailed, custom permissions for any role by using conditional criteria to grant access to records based on information contained in a record.\n\nIf you’re not familiar with roles, I recommend reading <a href=\"https://help.quickbase.com/user-assistance/about_roles.html\" target=\"_blank\">this Quickbase article</a>, as well as our [introductory article on implementing role access](/knowledge-base/roles-and-permissions/displaying-information-for-certain-roles-beginner/).   \n\nFor any role, you can set view access and modify access to allow users in that role to view or modify ‘All records’, ‘Group records’, ‘None’ (no records), or you can set a ‘Custom Rule’ using conditional filters.  In this article you’ll learn how to utilize these custom rules.\n\nWhy would you want to set a custom permission for a role in one of your tables?  Here are a few examples:\n\n✓ Only allow employees to view their own timesheets\n\n✓ Only allow Project Managers to edit projects they created\n\n✓ Disallow Sales Associates from viewing Opportunities marked as ‘Archived’\n\nIn this article we’ll look at the first example: **Only allow employees to view their own timesheets**.The idea here is that you want to only allow users in the _participants_ role to view the timesheets where they are listed as the employee.  Let’s look at how we might set this up:\n\n1. Go to your timesheet table and identify the field where the username is entered.  In this example the field is called: ‘Employee’. Remember the name of your field.\n\n2. Navigate to table ‘Settings’ and select the option ‘Access’ 3. In the participant role click the dropdown field in the ‘View’ column:\n\n![](https://res.cloudinary.com/dnla85pdq/image/upload/v1580442676/QuandaryCG/conditional-filters-01.png)\n\n4. A new tab will open in your browser allowing you to select the conditions under which you would like the role to ‘view’ records.  This is very similar to how you would configure a Quickbase report:\n\n![](https://res.cloudinary.com/dnla85pdq/image/upload/v1580442676/QuandaryCG/conditional-filters-02.png)\n\nIn this case we will select the condition ‘When the employee is the current user”.  This means records will only be shown to a user if the user entered in the ‘Employee’ field is the same user they are logged in as.\n\n> EDITORS NOTE:\nIf you added this custom rule to ‘Modify’ , rather than ‘View,’ the user would be able to view all records, but only modify (edit) records where the ‘Employee’ is the current user.\n\nIn some cases your organization may want to require timesheets be completed during the current week.  We can set an additional level of custom access using the ‘Modify’ drop down.\n\nTo do so:1Start by creating a formula checkbox field named “Current Week?” and add the following formula:\n\n~~~~\nFirstDayOfWeek([Date])=FirstDayOfWeek(ToDate([Today])) and\nFirstDayOfMonth([Date])=FirstDayOfMonth(ToDate([Today])) and\nFirstDayOfYear([Date])=FirstDayOfYear(ToDate([Today]))\n~~~~\n\n1. This will cause the field to be checked if the timesheet is entered during the same year, month and week.\n\n2. In the participant role click the dropdown field in the ‘Modify’ column and select ‘Custom’\n\n3. Now set the conditions as shown in the pic below:\n\n![](https://res.cloudinary.com/dnla85pdq/image/upload/v1580442675/QuandaryCG/conditional-filters-03.png)\n\n4. Save and return to your time sheets.  Now you will notice that you can no longer edit timesheets from previous weeks.\n\nTo learn more ways to leverage roles and permissions click [here](/knowledge-base/roles-and-permissions/) to view a library of articles.","slug":{"current":"conditional-filters-for-record-permissions-using-roles-intermediate"},"categories":[{"id":"-3711bc9d-2dc7-582c-b894-03c210cdb205","title":"Roles & Permissions","slug":{"current":"roles-and-permissions"}}]}},{"node":{"id":"-4450819a-044d-54fe-86e3-0da1734b4530","title":"API_CopyMasterDetail | ADVANCED","metaDescription":"Projects and leads have multiple components to track. Use API_CopyMasterDetail to copy records while keeping its relations intact. Learn how in Quickbase.","body":"Being a relational database – Quick Base often has several layers of data working within a parent/child hierarchy. Projects will have many Tasks, Leads will have many Activities, Invoices have many Line Items, etc. etc. You might have found yourself in a position to ‘copy’ a record at some point, by clicking ‘More’ from a Quick Base form and selecting the copy link. The problem with this is that you only end up copying that record. None of the children copy with it. For example – you would wind up with a copy of your Invoice with no lines.\n\nEnter API_CopyMasterDetail. This API call is unique in that is gives you the ability to have Quick Base copy the parent record, and then copy various child tables or grand-child tables as you decide. This way – you can truly copy a record in your system and keep the relational aspects of it intact.\n\nThere are two common ways you can set up and utilize API_CopyMasterDetail.\n\n**Option 1 – Quick Base has a built in walk through to help you easily set up a button to invoke this API call on one of your tables.**\n\n**Option 2 – You can configure the API call as a good old fashioned HTTP Request and use it in custom scripting, webhooks etc.**\n\nBoth options will be discussed in detail below. \n\n#### Option 1 – Using Quick Base’s built in CopyMasterDetail setup\n\n1. From your app home page, select Settings > App Management > Copy master & detail records\n2. Select the table where the record you want copied is. This should be the ‘top’ of your hierarchy of the set up you want copied. So if you have a set up like: Projects have many Tasks, Tasks have many Activities – and you want to copy a Project and all of their related Activities, you will be copying from ‘Projects’\n3. Under the ‘Choose what to Copy’ – you have two options:\n\n_—Copy the current Project and its detailed Records_\n\nThis method is when you truly want a copy of everything and have a perfect copy. This means every field and detail record will be copied\n\n_—Always Import detail records from a specific Project _\n\nThis method allows you to create your parent and have it be a little more unique – but then copy a template set of detail/children records. This is helpful in a situation like: Projects – where you set up and save a parent Project, with all new details and set up, but then you can Copy a blank template of detail records as new children to your Project instead of just copying everything wholesale from an existing one.\n\n4. n addition to the above – you can also configure the ‘Advanced Options’. This includes the options to:\n\n_–Copy detail records from all relationships OR_\n\n_–Copy detail records from these relationships_\n\nThe difference in these are that you may not want certain children to be copied. You may want a Project to copy with all of the Tasks – but not the ‘Documents’ that are also a child table to Projects.\n\n5. In addition – you can uncheck the ‘Copy all descendants of the detail records (details of details). This checkbox determines if Quick Base will copy your children’s children – or just stop at the first relationship.\n\nSo for example if you have Projects -< Tasks -< Activities, with this box checked, it will copy records from all 3 tables. If you un-check it, only the Project and Tasks will copy, given Activity records are the detail records for Tasks (detail or details).\n\n6. Finally, give your button a field name, and click Create\n\n![](https://res.cloudinary.com/dnla85pdq/image/upload/v1580795774/QuandaryCG/api-copy-01.png)\n\nWith that, you’re done. If you end up making a mistake or change your mind later about any of the steps from above, you can simply delete your button and start again.\n\n> EDITORS NOTE:\nIt should be noted that CopyMasterDetail will not allow circular references in your application setup for anything that is involved in a copy. This means that if any of your tables related directly or indirectly to the record you are copying create a ‘loop’, where somewhere in your chain, another becomes a parent to the table you are starting the copy from, Quick Base will fail to execute this call\n\n* * *\n\n#### Option 2 – Write your own API call for a webhook or custom set up\n\nThere might be several reasons you go this route as opposed to the above.\n\n✓ You want to copy a record, and then automatically clear out or reset certain field values, by chaining an EditRecord call with it. This might look like creating an Invoice Record with all associated Invoice Lines, but then going back in to clear out the $ amounts\n\n✓ Automatically do a CopyMasterDetail when a trigger event occurs, such as through a webhook\n\n✓ Your copy function is initiated outside of Quick Base (i.e. a webhook from another system starts it as opposed to you clicking a button in Quick Base)\n\nThe set up for API_CopyMasterDetail is similar to an AddRecord or EditRecord, so for simplicity we’ll discuss it via the URL alternative that one might use in your own URL button or a GET request\n\nThe generic set up for the CopyMasterDetail url might look like below:\n\n~~~~\nhttps://target_domain/db/target_dbid?a=API_CopyMasterDetail&destRID=0&sourcerid=1\n&copyfid=6&recurse=1&relfids=7,9&ticket=auth_ticket&apptoken=app_token\n~~~~\n\nFor brevity – we won’t cover the initial set up and defining the target domain, target dbid or Authentication/apptokens here. For a more detailed breakdown of these, [API_AddRecord](/knowledge-base/quick-base-api/api-addrecord-advanced/) and [API_EditRecord](/knowledge-base/quick-base-api/api-editrecord-advanced/) go into them in more detail.\n\nBeyond that, CopyMasterDetail has some unique parameters to this particular call\n\n**destrid – REQUIRED**\n\nThe destrid is basically your way of telling Quick Base to create a new record, or copy the details of another. This will correlate above with step (3) in Option 1 – in regards to if you want to copy this exact record and its details – or copy detail records from a specific Project. There are two options with this, set destrid equal to 0, or set destrid equal to a specific record id in your table.\n\nBy setting destrid=0, you will copy that exact record and its children. So if you have this call on Project with Tasks, and destrid=0, you will get a brand new copied Project and all of its Tasks. If you set destrid=5, you will copy all detail records from another Project to Project ID=5.\n\n**sourcerid – REQUIRED**\n\nsourcerid is the specific record you want to actually copy. So if you want to copy an existing record to create a true copy, you would set this to the specific record you are on. If you are trying instead, to copy the details from a specific Project, you would set this to be the Record ID# of that particular template record. If there is a ‘template’ Project you set up, you would set your sourcerid to that particular Project, at which point it will copy the details from that template.\n\n**copyfid – REQUIRED**\n\nThis is the field ID of an existing field that Quick Base will write the words ‘copy of..’ to name your copy. For example – this might be the field id of the field ‘Project Name’ in your table. If you are copying a record name ‘Test Project’, then your new Project created would be ‘Copy of Test Project.’\n\n**recurse – OPTIONAL**\n\nUsing this param makes your Copy recursive, meaning that it will copy your details details. By default – this is true, so if in our example of Projects -< Tasks -< Activities, having recurse=1 will copy all 3 levels, so Activities will also copy. With recurse=0, only Tasks will copy, and Details of Details (Activities in this example) will not copy. By default – the copy will default to recurse being true.\n\n**relfids – OPTIONAL**\n\nRelfids tells Quick Base which of your relationships you want to copy detail records for. With this, you can determine if all children get copied, or if only certain relationships do. Following a similar example from option 1, this is where you can set that you want to copy Projects and Tasks, but omit Documents, another child to Projects from following suit. The input for Relfids is a comma delimited set of Field IDs, that correspond to the relationships you want copied.\n\nYou’ll notice that in every new relationship, Quick Base will create a new ‘Report Link’ field that helps display and link your children to your parent, used often to display embedded reports on forms. Those fields are relevant here, as they serve as the link for your API call to know which detail records to copy. You can pick and choose which relationships to copy by finding the field IDs of the specific report link fields in the relationships you want copied, and placing them in your relfids param. By omitting this value – Quick Base will default to copy any and all relationships.\n\nWith that configuration, you can have the building blocks of your CopyMasterDetail API call. If you want to try and test Option 1 before tackling Option 2, you can open up the field properties of the button that is created in Option 1 as a result, and you will be able to see the Quick Base set up they provide when you follow their steps as well.\n\nFor more information about the different types of API calls – view the full list currently in our Knowledge Base [here](/knowledge-base/quick-base-api/).","slug":{"current":"api_copymasterdetail-advanced"},"categories":[{"id":"-46109a16-4c3d-593f-a8f1-11046af26ef6","title":"Quickbase API","slug":{"current":"quick-base-api"}}]}},{"node":{"id":"-c9ff4279-cbf3-527b-b293-190bacdb95ed","title":"Integrating Power BI with Quickbase","metaDescription":"Power BI integration with Quickbase allows users to stream data at scheduled times or interact with embedded reports and visualizations. Learn how.","body":"Quick Base has powerful reporting and visualization tools. However, this isn’t the primary function of Quick Base and, at times, you may need more sophisticated reporting than what Quick Base offers natively.\n\n<a href=\"https://powerbi.microsoft.com/en-us/\" target=\"_blank\">Power BI</a> is one of the world’s most popular analytics tools because of its rich features, custom visualizations, advanced reporting  and analytics tools. Fortunately for us, it is easy to integrate PowerBi with Quick Base so you can enjoy both together. These platforms can be connected in two important ways:\n\n✓ The new <a href=\"https://help.quickbase.com/user-assistance/power_bi_with_quick_base.html\" target=\"_blank\">Power BI connector for Quick Base</a> allows you to stream data directly from your Quick Base app directly into Power BI at scheduled times throughout the day\n\n✓ The reports and visualizations you create in Power BI can be embedded within Quick Base where you can view and interact with them.\n\nWe’ll look at how to do both starting with using the Power BI Connector. To do so you’ll need to have a Quick Base account as well as a Power BI account.  If you’re not sure you’re ready to purchase Power BI you can use a 60-day free trial available from the <a href=\"https://powerbi.microsoft.com/en-us/get-started/?&OCID=AID719832_SEM_MmSKRXFn&lnkd=Google_PowerBI_Brand&gclid=EAIaIQobChMIobu4zLuH4gIVA9bACh0i4QdiEAAYASAAEgINB_D_BwE\" target=\"_blank\">Power BI Homepage</a>.\n\nTo set up the Power BI Connector:\n\n1. Log into your Power BI Desktop Account\n\n2. Navigate to the section “Get Data” and select the Quick Base Connector:\n![](https://res.cloudinary.com/dnla85pdq/image/upload/v1580182004/QuandaryCG/power-bi-01.png)\n\n3. Enter your App url and User token in the resulting screens:\n![](https://res.cloudinary.com/dnla85pdq/image/upload/v1580182003/QuandaryCG/power-bi-02.png)\n\n4. Finally, select the tables you would like to access. Data will now stream to the desktop Power BI file.  In order to schedule a refresh of the data in your online Power BI platform (Power BI Service), follow these steps:\n\n\n1. Open your Workspace\n\n2. Go to ‘My Workspace’ on the left panel and select the tab ‘Datasets’:\n![](https://res.cloudinary.com/dnla85pdq/image/upload/v1580182003/QuandaryCG/power-bi-04.png)\n\n3. Choose the dataset you’d like to refresh and click the ‘Schedule Refresh’ icon\n![](https://res.cloudinary.com/dnla85pdq/image/upload/v1580182002/QuandaryCG/power-bi-05.png)\n\n4. Now click into the scheduled refresh section and add a refresh time\n![](https://res.cloudinary.com/dnla85pdq/image/upload/v1580182003/QuandaryCG/power-bi-06.png)\n\n**Note:** You can select multiple refresh times\n\nWith your data now refreshing automatically, its time for you to start creating visualization and reports in Power BI . There are a wealth of resources in Power BI for <a href=\"https://docs.microsoft.com/en-us/power-bi/service-get-started\" target=\"_blank\">getting started</a>. You can filter your data stream, make custom reports, plot your data on a map (Power BI has a fantastic GIS engine) and even apply advanced coding and calculations.  \n\nOnce you have all your reports set up in Power BI , your users can login and view up-to-date reports any time.  But what if you’d like to see all your information in one place within Quick Base?  Power BI provides a few easy methods. Let’s see how:\n\n1. In Power BI Service (online), select a Workspace you’d like to embed\n\n2. In the file menu of that Workspace select ‘Publish to Web’ (Paid accounts will also have a secure ‘Embed’ option which requires sign-in credentials)\n![](https://res.cloudinary.com/dnla85pdq/image/upload/v1580182003/QuandaryCG/power-bi-07.png)\n\n3. From the resulting screen, copy the html url option (second box from top)\n![](https://res.cloudinary.com/dnla85pdq/image/upload/v1580182003/QuandaryCG/power-bi-08.png)\n\n4. With your url in hand, go to your Quick Base application where you would like to embed your data and go to the application dashboard where you’d like to embed your report\n\n5. Customize the dashboard page and add a ‘Webpage Widget’\n\n6. Enter your Power BI url into the Webpage Widget and press save\n\n7. Congratulations!  You now have an automatically refreshed Power BI report within your Quick Base app\n\n> BEST PRACTICE:\nKeep in mind that the ‘Publish to web’ option allows anyone on the web to view data.  If your data is sensitive it is suggested that you use the secure ‘Embed’ option for placing your reports in Quick Base.\n\nFor more ‘Out of the Box’ ideas on how to use Quick Base click [here](/knowledge-base/quick-base-outside-of-the-box/)","slug":{"current":"integrating-power-bi-with-quick-base"},"categories":[{"id":"-dc095853-fb86-5354-8647-e35dd8636ed2","title":"Quickbase Outside Of The Box","slug":{"current":"quick-base-outside-of-the-box"}}]}},{"node":{"id":"-0cd0c5da-d2c5-594a-828b-da9c99cee099","title":"Adding a new User Role | BEGINNER ","metaDescription":"Roles allow us to differentiate users performing specific jobs within an application. Use this simple guide to assign these essential roles in Quickbase.","body":"Roles allow us to differentiate users performing specific jobs within an application. They can be used to assign various levels of access to tables and fields, show and hide particular data and influence users’ workflow across the application. The successful implementation of roles will create an efficient workspace for all users.\n\n> EDITORS NOTE:\nIn order to create a new Role, you will need to have your own **App Level Permissions** set to **Admin**.\n\n* * *\n\n### Creating a new User Role\n\nOnce you have appropriate permissions, you can visit the Roles main page by navigating to the **Users table** and clicking **Manage Roles**. You can also get there from your application home page by visiting **Settings > Roles**.\n\n![](https://res.cloudinary.com/dnla85pdq/image/upload/v1580449294/QuandaryCG/adding-a-01.png)\n\n2. To add a new Role, click the + **New Role** button to the top right of the screen. After doing so, you will be prompted to provide a **Role Name** and optional **Description** for the new role you are creating. Click **OK** to save.\n\n![](https://res.cloudinary.com/dnla85pdq/image/upload/v1580449293/QuandaryCG/adding-a-02.png)\n\n3. Once the role has saved, you will be directed back to the **Roles** homepage where you will see your new role added to the list of existing ones. The **App Level Permissions** will be **Basic** and the **Home Page** will be set to the **Default Dashboard**. You can update the name and description any time from the **Properties** tab.\n\n* * *\n\n### Setting Role Permissions\n\nNow that you’ve added a new role, you will want to define what Users in this role will be allowed to do in your application. To get started, click the **Name** of your new role to enter the detailed view.\n\n![](https://res.cloudinary.com/dnla85pdq/image/upload/v1580449293/QuandaryCG/adding-a-03.png)\n\nUnder the **App Access** section, there are three checkbox options you can adjust for the new role, based on which ones you select, the role will be given one of the following permission levels:\n\n✓ **None**: Select Disable access to app for users with this role. This will prevent any users in this role from accessing your app. This is useful if you want to turn off access for certain users in one app, while allowing access to other apps in your realm.\n\n✓ **Basic**: Do not select any checkboxes. This is the default role that should be chosen for users who need access to the app, but do not need any administrative controls. Users in this role will not be able to customize the app or manage users.\n\n✓ **Basic, Sharing**: Select the Manage users and share the app. In addition to the Basic permissions above, users will be able to manage ALL users in the application. Although these users can share the application with others, Quick Base prevents them from granting or revoking Full Administration access for any user.\n\n✓ **Admin**: Select Edit app structure and permissions. This grants Full Administration access WITHOUT the ability to manage users. This role is best for application builders who do not necessarily need to share the app or monitor who is in the app.\n \n✓ **Admin, Sharing**: Select both Manage users and share the app and Edit app structure and permissions. This grants Full Administration rights to the user for app customization and sharing.\n\n>  BEST PRACTICE:\nIf you want to give “full management” control to a Role. Set their permissions to Admin, Sharing.\n\n* * *\n\n### Configuring Table Access\n\n![](https://res.cloudinary.com/dnla85pdq/image/upload/v1580449293/QuandaryCG/adding-a-04.png)\n\nUnder the **Table Access** section, you can define specific permission levels for each table for viewing, adding, modifying and deleting records. The **Add** and **Delete** checkboxes are used to specify whether the user can add/delete records in the table. **View** and **Modify** allow for significantly more customization options:\n\n✓ **None**: Grants no access to the table.\n\n✓ **All Records**: Grants view/modify rights to any record in the table.\n\n✓ **Group’s Records**: Grants view/modify rights to only records created by users in the same group.\n\n✓ **Custom Rule**: Allows you to specify parameters for view/modify access. After selecting this option, click the Edit icon to configure the criteria for access in a new popup window.\n\nSelect the **Save Common Reports** checkbox if you want to allow users to save reports visible to all other users of you app. The **Edit Fields Properties** checkbox will allow users to edit field properties within the specified table. Use the **Fields** dropdown to control access to table fields. You initially select either **Full Access**, **No Access** or **Custom Access**.  Selecting **Custom Access** will allow you to configure permissions for individual fields.\n\n* * *\n\n### User Interface\n\nThe **User Interface** tab allows you to control what users will see when they access the application by showing and hiding selected elements.\n\n![](https://res.cloudinary.com/dnla85pdq/image/upload/v1580449294/QuandaryCG/adding-a-05.png)\n\n✓ Use the **Role home page**: dropdown to select which page the user sees when they visit **Home**.\n\n✓ Click the **Set report access** link to customize which reports the user can see. By default they will have access to List All and List Changes.\n\n✓ Use the **Hiding UI for creating or customizing reports** checkbox to toggle the users ability to create or change reports. Be sure to unselect the **Save Common Reports** checkbox in the **Permissions** tab, otherwise the user will be able to create common reports but never edit them.\n\n✓ Select the **Hide personal settings link** checkbox to prevent the user from accessing settings through their dropdown at the top right of the navigation.\n\n✓ You may also hide UI for the following: **App & table settings**, **Users**, **Favorites & Recents**, **Search**, **Help** and **Test as anther role or user**.\n\nUse the checkbox columns to control access to which tables appear in the **Table Bar**, hide **Add Buttons**, **Import/Export Links**, **Multi-record Options**, **Email Buttons/Links** and **Print Links**.\n\n* * *\nAdding new Roles is a crucial component to building customized workflows to your Quick Base application. Once you’ve created a Role, you’ll probably want to give it a unique dashboard. For more on that, check out Chayce’s article on **[Creating a new Dashboard](/knowledge-base/reporting-and-dashboards/creating-a-new-dashboard-beginner/)**.\n* * * ","slug":{"current":"adding-a-new-user-role-beginner"},"categories":[{"id":"-3711bc9d-2dc7-582c-b894-03c210cdb205","title":"Roles & Permissions","slug":{"current":"roles-and-permissions"}}]}},{"node":{"id":"-5931518a-8e39-5db1-9ea4-45b7540ac95e","title":"Formulas + Webhooks = Dynamic Record Creation","metaDescription":"Combine Quickbase formulas within a pseudo-CSV file to generate child records out of a set of data with unknown elements. Learn to apply this dynamic process.","body":"Picture a simple scenario, your company uses Quick Base to track PTO Requests and manage timecards. When an employee enters a request, you’d like to automatically generate a timecard for each day they’ll be out.\n\nThink of another, where you are setting up a new project. Part of the set up is picking a number between 1 and 25 representing the # of Milestones. When that project is set up, you want the milestones to all auto-generate so you can assign the respective dates and descriptions in grid edit rather than adding them all one by one. \n\nFrom a technical standpoint – that kind of automation is tricky because of the ‘unknown’. You don’t have any clue what days or how long someone will be out for PTO. You don’t know how many milestones you will have for your project until you save it.\n\nWhat options do you have then?\n\n✓ Users could add them one by one via the form or via grid edit (data entry by the user)\n\n✓ You could have a custom code that looks at your data to determine how to create your time cards or milestones\n\n✓ Use an integration tool like <a href=\"https://www.workato.com\" target=\"_blank\">Workato</a> to dynamically create time cards or milestones\n\nAn alternative to all of the above though, is to combine a little creativity with Quick Base formulas to build out a pseudo-CSV, and combine it with Webhooks to dynamically generate your set of child records.\n\nTo explain that a little more, first it helps to break down exactly what a CSV means in this context. Most would think of an excel or txt file, but really a CSV is just a list of values, separated by columns and line breaks. With that in mind, you can easily incorporate both of those into standard Quick Base formulas, utilizing common formula-text fields and [if() statements](/knowledge-base/quick-base-fields-and-formulas/using-if-statements-in-formulas-intermediate/), to generate the pseudo-CSV mentioned above.\n\nLet’s say for our milestones example, my new project will need exactly 17 milestones. In my project set up, I have a numeric field for [# of Milestones]. Using If() statements in a formula-text field, you can create something like this:\n\n~~~~\nif( [# of Milestones]>=1,[Related Project] & \",\" & \"Milestone 1\" & \"\\n\", \"\") &`\n\nif( [# of Milestones]>=2,[Related Project] & \",\" & \"Milestone 2\" & \"\\n\", \"\") & \n\nif( [# of Milestones]>=3,[Related Project] & \",\" & \"Milestone 3\" & \"\\n\", \"\") & \n\nif( [# of Milestones]>=4,[Related Project] & \",\" & \"Milestone 4\" & \"\\n\", \"\") & \n\n.....\nif( [# of Milestones]>=25,[Related Project] & \",\" & \"Milestone 5\" & \"\\n\", \"\") &\n~~~~\n\n> EDITORS NOTE:\nIt is important to note that you configure this strictly using Formula-Text, not Rich Text, Number etc. Standard text inputs will allow you the entry for commas and and line breaks, without any additional input or formatting issues.\n\nThe output of which, if I want 17 milestones, will look something like this:\n\n~~~~\n**For this example - 1111 is being used for [Related Project]\n1111,Milestone 1\n1111,Milestone 2\n1111,Milestone 3\n1111,Milestone 4\n...\n1111,Milestone 17\n//END\n~~~~\n\nRemember that because a CSV is a list of values, separated by commas, make sure when you set it up that you are sure to include & “,” & between each of data point. In addition, each ‘row’ needs to end with “\\n” to tell Quick Base that you want to start a new row after that.\n\nSo now a simple Quick Base formula dynamically creates a CSV of my 17 milestones. With that in hand, Quick Base natively allows you to create an API_IMPORTFROMCSV webhook that you can pass that example into. Webhooks in this instance allow you to POST your newly created CSV to the Quick Base API. It is import to use API_IMPORTFROMCSV, as this allows you to create/update any number of records, rather than doing single [ADDRECORD](/knowledge-base/quick-base-api/api-addrecord-advanced/) / [EDITRECORD](/knowledge-base/quick-base-api/api-editrecord-advanced/) calls. Your setup is such that your formula is added as part of the <![CDATA[ ]]> like below\n\n~~~~\n<records_csv>\n   <![CDATA[\n     [My CSV Generation Field goes here]\n   ]]>\n</records_csv>\n~~~~\n\nAnd voila, a simple Quick Base formula can handle creating your milestones for any number between 1 and 25. This simple but powerful technique can be used in all sorts of circumstances where you don’t always know what your child records will look like. Some other examples you might use it for: \n\n✓ Use formula logic to set up different Task Templates for different Project Types when a new Project is created (i.e. Project Type 1 creates tasks A,B,C. Project Type 2 creates tasks D,E,F)\n\n✓ Generate a dynamic schedule for each month starting from the current month for 12 / 18 / 24 months when you set up a new forecast\n\n✓ Set up assignments for any number of people used in a List-User field automatically\n\nThe options though are really only bound by what you can put into a formula. The best part is that there is no custom code or additional services needed, and you can easily make updates by just updating your formula.\n\nTo see an example of this, head over to the [Quandary Quick Base Knowledge Center](/knowledge-base/quickbase-knowledge-center/) to test it.","slug":{"current":"formulas-webhooks-dynamic-record-creation"},"categories":[{"id":"-dc095853-fb86-5354-8647-e35dd8636ed2","title":"Quickbase Outside Of The Box","slug":{"current":"quick-base-outside-of-the-box"}}]}},{"node":{"id":"-2a32dd4d-28e0-5740-af90-fe46360427da","title":"Setting up Pie Reports in Quickbase | BASICS","metaDescription":"What is A Pie Chart? The central idea of the pie chart is that you’re comparing parts to the whole. Slices of different size are marked on a circle (i.e the pie) based on what part of the whole they represent. For example, say you have a grocery store with three departments and you look …","body":"## What is A Pie Chart?\n\nThe central idea of the pie chart is that you’re comparing parts to the whole. Slices of different sizes are marked on a circle (i.e, the pie) based on what part of the whole they represent. \n\nFor example, say you have a grocery store with three departments, and you look at revenue from each. The sum of all the revenue figures is the same as your total revenue, and you can look at each department and see how much (i.e. the percentage) it contributes.\n\nBelow is an example of what this might look like: \n\n![](https://res.cloudinary.com/dnla85pdq/image/upload/v1580457395/QuandaryCG/pie-reports-01.png)\n\n## Creating a Pie Chart in Quickbase\n\n1. From the Table bar, choose a table you would like the Pie chart to live in.\n2. Select **Reports & Charts** to open the reports and charts panel, then click **+New**.\n\n![](https://res.cloudinary.com/dnla85pdq/image/upload/v1580457395/QuandaryCG/pie-reports-02.png)\n\n3. Select **Chart** from the list and click **Create**.\n\n![](https://res.cloudinary.com/dnla85pdq/image/upload/v1580457395/QuandaryCG/pie-reports-03.png)\n\n4. Add a name and description.\n\n![](https://res.cloudinary.com/dnla85pdq/image/upload/v1580457395/QuandaryCG/pie-reports-04.png)\n\n5. In the **Reports & Charts** panel section, determine who can see this chart.\n\n![](https://res.cloudinary.com/dnla85pdq/image/upload/v1580457395/QuandaryCG/pie-reports-05.png)\n\nWhen you save this type of report, you will have several choices to choose from. Each option will have a brief description next to them to help you select the best option.\n\n> !\nEDITORS NOTE:\nAn app manager can also specify which reports a particular role can see at any time. To learn how, see: [Displaying Information for Certain Roles | BEGINNER](/knowledge-base/roles-and-permissions/displaying-information-for-certain-roles-beginner/).\n\n6. In the **Chart Details** section, there will be a drop-down menu called, **Select a type of chart**. In this drop-down, select the **Pie Chart** option.\n\n![](https://res.cloudinary.com/dnla85pdq/image/upload/v1580457395/QuandaryCG/pie-reports-06.png)\n\nOnce the chart type is selected, a picture of the chart type will appear in addition to a small section to the right known as the Legend with a brief description underneath.\n\n![](https://res.cloudinary.com/dnla85pdq/image/upload/v1580457396/QuandaryCG/pie-reports-07.png)\n\n7. Within the **Chart Details** section, select a field whose values you want to display as the **Series**.\n\n![](https://res.cloudinary.com/dnla85pdq/image/upload/v1580457396/QuandaryCG/pie-reports-08.png)\n\nQuickbase allows the option on how to group the data from the field selected by using the **Group By** option. \n\nUse this drop-down to display the data in intervals or set amounts. \n\nFor example, if your pie chart features a numeric field, you can show amounts in groups of fives, tens, hundreds, or by dates of the month, quarter, or year.\n\n> EDITORS NOTE:\nAfter selecting the field whose values you want to appear as wedges on your chart, Quickbase will display these values in the Report Builder’s Legend box. This shows you what values will eventually display. If you want to customize the colors for these values, click a color swatch to display the color-chooser.\n\n8. Within the **Chart Details** section, select the **Data values** you want to show.\n\n![](https://res.cloudinary.com/dnla85pdq/image/upload/v1580457396/QuandaryCG/pie-reports-09.png)\n\nUse the Data values section to select your measures and whether or not you want the sum or average of these values. For example, you might want to show the annual or quarterly revenue of a company by department, or measure salesperson contribution by the number of sales.\n\n> EDITORS NOTE:\nThe field you choose here contains the numbers that determine the size of each pie wedge. Please keep in mind that this field will only list numeric field types and not text.\n\n9. Use the **Sorting** and **Data labels** sections to decide how to sort and display values in your pie chart.\n\n10. Use Filters to define the results.\n\nWithin the filter section, you can tell Quickbase what records to include. If you want your chart to show only a certain kind of record or only records that meet specific conditions, you can do so here. \n\nFor example, maybe you only want to show company revenue by the department in quarter three. Or, maybe you’d only like to see sales of a particular category of products, such as headphones, and not your other products. If so, this is the section where you can make all these adjustments within your chart.\n\n![](https://res.cloudinary.com/dnla85pdq/image/upload/v1580457396/QuandaryCG/pie-reports-10.png)\n\n* * *\nTo learn more ways to customize your reports in Quick Base, check out more articles here: [Reporting & Dashboards](/knowledge-base/reporting-and-dashboards/).\n* * *","slug":{"current":"pie-reports-basics"},"categories":[{"id":"-27382539-ae20-5f0a-ace9-391d7b9a149f","title":"Reporting & Dashboards","slug":{"current":"reporting-and-dashboards"}}]}},{"node":{"id":"-2ad6fdb9-a138-5ef2-8985-abb95b9a83d3","title":"Application Diagram in Quickbase | BEGINNER","metaDescription":"When setting up a new Quickbase application, draw out your ERD (Entity Relationship Diagram) and map out what tables and relationships you may need.","body":"When setting up a new Quickbase application, it’s important before you start to plan out, and if possible, draw out your ERD (Entity Relationship Diagram) and map out what tables and relationships you think you’ll need. \n\nOnce you’re in there though – and real business needs come up, your actual system will start to morph and evolve with new tables and relationships that weren’t in your original diagram. No need to fret though – Quickbase has a built-in method that will help you visualize your system, that stays up to date as you develop.\n\nUsing this tool and keeping it organized is a great way look at your entire system and how things are connected all in one place. If you’re taking over an existing system and starting up as an admin – its a great first spot to see the entire app structure and how everything relates together.\n\n## Steps to set up a relationship diagram for your application in Quickbase\n1. From your app home page, click Settings => App Management\n2. From the App Management Page, the 3rd link on the page will be ‘Show Relationship Diagram’\n\n![](https://res.cloudinary.com/dnla85pdq/image/upload/v1580288278/QuandaryCG/application-diagram-01.png)\n\n3. Once there, you will see something like this diagram for an application currently under construction:\n\n![](https://res.cloudinary.com/dnla85pdq/image/upload/v1580288278/QuandaryCG/application-diagram-02.png)\n\n4. The above will show you all the different tables in your application as the rounded squares (and each arrow represents a relationship between 2 tables). \n\nThe direction of the arrow will be that the Parent Table is pointing at the child table. From above, for instance, \"Positions\" is pointing to \"Job Postings\". \"Positions\" is the parent table, and it has many \"Job Posting\" (child records).\n\n5. Notice that when you click on one of your tables, you can expand the detail and see information such as how many fields/records/file size that table is currently configured with:\n\n![](https://res.cloudinary.com/dnla85pdq/image/upload/v1580288278/QuandaryCG/application-diagram-03.png)\n\n6. In all likelihood though, your diagram might look something more like this:\n\n![](https://res.cloudinary.com/dnla85pdq/image/upload/v1580288278/QuandaryCG/application-diagram-04.png)\n\nIn this situation, it's the same information, but it's much harder to read. You'll want to re-organize and line it up in a more logical structure of parent/child arrows to help visualize your data model.\n\n7. To re-organize, just drag and drop your table icons around the screen until you get to a more understandable picture like so:\n\n![](https://res.cloudinary.com/dnla85pdq/image/upload/v1580288278/QuandaryCG/application-diagram-05.png)\n\nThe organization is based on how you best see your system and what the most important parts are.\n\n8. When you’re done organizing, save your layout so you can come back at a later day and review it as needed.\n\nFor more info on application set up and configuring your tables and relationships, read more about [New Relationships here](/knowledge-base/admin-application-setup-security/setting-up-a-new-relationship-beginner/).","slug":{"current":"application-diagram-beginner"},"categories":[{"id":"-14942e20-302e-57b3-a12c-de473ea4cc86","title":"Admin / Application Set Up / Security","slug":{"current":"admin-application-setup-security"}}]}},{"node":{"id":"-a6690de8-bda6-5973-8b7b-a1487d6c3fa8","title":"What Are Dashboards | BEGINNER","metaDescription":"Dashboards make data readily available at log-in and can enhance your workflow. Learn the specifics of a dashboard and see a list of what you should include.","body":"Dashboards are (also known as Home Pages in Quick Base)  personalized pages in your application that combines several elements, known as widgets all in one location. Dashboards help to make data readily available when people log in as well as enhance your workflow. Common things you include on a dashboard are:\n\n✓ Reports and charts from key data centers in your app\n\n✓ Buttons for Quick Actions to add records in various tables\n\n✓ Rich Text to add branding and personalize your application\n\nRich Text to add branding and personalize your application\n\nSince they are commonly the first thing people see when they log in, you want your Dashboard to highlight key information that someone should pay attention to right away, or keep an eye on throughout the day. \n\nAs an example, think about a remote sales team for your company – and you are using your Quick Base application to track their Sales Activities, Meetings, Travel, Expenses, and of course, their results. In this instance, you would want things like ‘Meetings Scheduled for Today’, ‘Follow Ups Needed’, ‘Expenses that need Receipts’, ‘Upcoming Travel’ to be highlighted first and foremost. Then, you can include things like ‘YTD Sales’, ‘% of Jobs Won’, ‘YTD Sales by Me’ etc. Additionally, you can include buttons for them to quickly get to the right place to add PTO requests, submit new expenses, update their existing accounts or add new ones.\n\nIf you are an admin, you typically have greater insight into the inner workings and the where/what/when of how things work in your system and how to get to where you need. But for the everyday user, Dashboards are a fantastic way to put all the tools they need at their disposal, all in the same place.\n\nNext up, take a look at [Putting Reports on a Dashboard](/knowledge-base/reporting-and-dashboards/adding-reports-to-dashboards-beginner/)","slug":{"current":"what-are-dashboards-beginner"},"categories":[{"id":"-27382539-ae20-5f0a-ace9-391d7b9a149f","title":"Reporting & Dashboards","slug":{"current":"reporting-and-dashboards"}}]}},{"node":{"id":"-c71a53ab-ce17-528d-8700-316fd6183280","title":"How to Archive Records Using Role Permissions | INTERMEDIATE","metaDescription":"Rather than delete records forever, archive them to ensure you can access them in the future. Use role permissions to archive records in Quickbase. ","body":"Sometimes you create records in an app which you no longer wish to see.  Often times the reflex is to delete records. However, if records are deleted in error or you change your mind at a later date, there is no way to bring those records back…they’re gone forever.\n\nIn this article we’ll demonstrate how avoid these issues using archiving.  Specifically **how to archive records using role permissions**.\n\nSome cases where we might want to use role permissions include:\n\n✓ Archive materials from a project so that they no longer add to project costs\n\n✓ Archive terminated employees so that users can no longer see past employee records\n\n✓ Archive records base on time (e.g. records over 2 years old)\n\nIn this article we’ll focus on the first example: Allow users to archive materials related to a project so that they no longer add to project costs\n\n**Note:** Records that users are not permitted to access will not be included in calculations.\n\nFollow these steps to set up your archiving:\n\n1. In the materials table, add a checkbox field and name it “Archive”\n2. Next, go to your materials table and observe the current total in your ‘List All” report. An overly simplified example might look like this:\n\n![](https://res.cloudinary.com/dnla85pdq/image/upload/v1580442329/QuandaryCG/how-to-archive-01.png)\n\n3. Next, go to the table ‘settings’ and click “Access”.  There you will see permission levels for each user role.\n4. For each role, create a custom rule.  Set the rule so that ‘Archive is not equal to true’:\n\n![](https://res.cloudinary.com/dnla85pdq/image/upload/v1580442329/QuandaryCG/how-to-archive-02.png)\n\nIf you’d like a role (ex. Administrator) to be able to view and/or unarchive you can omit the custom rule, or toggle it off when the use needs to unarchive a record.\n\n5. Return to the table and check your results:\n\n\n1. Check the “Archive” field you created earlier on one of your table records.  In our example we’ll archive our paint item.\n\n![](https://res.cloudinary.com/dnla85pdq/image/upload/v1580442329/QuandaryCG/how-to-archive-03.png)\n\n2. Return to your table and note that the ‘Paint item’ is no longer present:\n\n![](https://res.cloudinary.com/dnla85pdq/image/upload/v1580442329/QuandaryCG/how-to-archive-04.png)\n\nSo why would we remove the item via permissions rather than just using a condition to filter “archive” items from our reports?\n\nFirst, we’d have to apply the same filter over and over whenever we create a new report.  Second, and more importantly, records that a user doesn’t have permission to view are removed globally, meaning that items removed using this method will not be included in reports, lookup fields, formula fields or anywhere else within Quickbase.\n\nIn many ways this method is superior to deleting.  If you delete a record it is gone forever. With archiving, a mistaken archive can easily be corrected by having a role which has permission to view ‘Archived’ records uncheck the archive field on a record.  \n\n**Note:** This method of archiving will not free up space in your database because the records are still located within the database.\n\nFor more of our knowledge base articles regarding how to leverage permissions click [here](/knowledge-base/roles-and-permissions/).","slug":{"current":"how-to-archive-records-using-role-permissions-intermediate"},"categories":[{"id":"-3711bc9d-2dc7-582c-b894-03c210cdb205","title":"Roles & Permissions","slug":{"current":"roles-and-permissions"}}]}},{"node":{"id":"-787fcf32-2028-5b3e-af97-c01acb03fc9e","title":"API ImportFromCSV | ADVANCED","metaDescription":"API_ImportFromCSV is a powerful developer tool in Quickbase. Mass import or send multiple records to add or update via a CSV file structure. Learn how.","body":"**API_ImportFromCSV** is a powerful developers tool and one of my personal favorites to use via Webhooks and custom scripting. This API call would be synonymous with mass importing, or sending multiple records to add or update in Quick Base at one time via the API. The use cases and examples for using an import will be the same relative to [API_AddRecord](/knowledge-base/quick-base-api/api-addrecord-advanced/) or [API_EditRecord](/knowledge-base/quick-base-api/api-editrecord-advanced/), the difference being that you can use ImportFromCSV to do multiple adds, multiple edits, or both, all at once.\n\nSo for example, if I were setting up a project and wanted a pre-defined lists of tasks to be generated with it, let’s say 15 tasks, one option would be to string together 15 AddRecord calls together to accomplish your goal. Or, create all 15 at once using ImportFromCSV.\n\n> EDITORS NOTE:\nThis Document will cover using a POST via Quick Base to demonstrate the concept. You can use a POST in webhooks as one example. Another alternative would be to use custom scripting (Javascript, Python, Ruby etc). It is possible, but I personally don’t recommend using the URL-Alternative for using ImportFromCSV given the formatting constraints.\n\nA simple example of a basic import call might be forecasting out a calendar year when a new project is created. A new project is created, and I want a financial forecast created in a ‘Forecasts’ module, for Months 1-12. \n\nIf we’re utilizing Webhooks in this example – then what I’m hoping to have happen is that when a new record is created, I automatically create 12 forecast records so I can plan my spend. Our example POST then, might look something like below:\n\n~~~~\n<qdbapi>\n<usertoken>example</usertoken>\n<records_csv>\n<![CDATA[PROJECT #,MONTH\n1000,1\n1000,2\n1000,3\n1000,4\n1000,5\n1000,6\n1000,7\n1000,8\n1000,9\n1000,10\n1000,11\n1000,12\n]]></records_csv>\n<clist>6.7</clist>\n<skipfirst>1</skipfirst>\n</qdbapi>\n~~~~\n\nTo break down the above – let’s looks at the the individual tags themselves\n\n**<qdbapi></qdbapi>** – The opening tag for any Quick Base API call\n\n**<usertoken></usertoken>** – Where you put your User Token\n\n**<records_csv></records_csv>** – This is where you are actually putting your data. Much like the name suggests, API_ImportFromCSV interprets data like a CSV file. So think so about the way yout  might do a standard Quick Base import. You organize your data into a file structure with rows and columns, Quick Base interprets that and you confirm which field(s) you want to map your data to, and then you import it. Same thing applies here, your <records_csv> is basically your import file, so it should have a similar row/column structure. In the example above:\n\nProject #, Month represent our Column headers\n\nEach line after that,\n\n1000,1\n\n1000,2\n\n….\n\nrepresent each new ‘row’ in our data, still organized in the same column format\n\nNote, that each new row is on a new line, and each data point is separated by a comma. Again, the name importFromCSV means you are structuring your data like a CSV file, where the data is structured and formatted by having each new line interpreted by a line break, and each data point separated by a delimiter, in this case a comma (CSV -> Comma-Separated Values).\n\nIf you had additional data – say an ‘owner’ of this forecast, such as the PM assigned to the project, then you would add another value to each line after the # like so:\n\nProject #, Month, Owner\n\n1000,1,Chayce Duncan\n\n1000,2,Chayce Duncan\n\n……\n\n**<clist></clist>** – Your clist corresponds with the actual fields in Quick Base that you want to write data to. Each field ID is separated by a period delimiter, so in our example above, I want to write to fields 6 and 7 (Project # and Month), so my clist would be 6.7\n\nFor each additional field you want to write to, add another period and then the pertinent field ID. It’s important to note that the number of fields present in your clist should match the number of columns in your data set.\n\n**<skipfirst></skipfirst>** – With this, you are telling Quick Base to skip the first line of your data. This is common when you have Column headers. Putting a value of ‘1’ will mean that the first line of your data is ignored.\n\n> BEST PRACTICE:\nOne thing not discussed here is the usage of Record ID# or Key fields. ImportFromCSV has the ability to both add and update at the same time. If you pass in an existing Record ID# for example, that record will be updated. If you do not have a value entered for Record ID# when you make the API call, then Quick Base will generate a new record from the info provided. You can send rows of data where some have RIDs and some do not, and Quick Base will take the appropriate action.\n\nWhen evaluating when to use ImportFromCSV – the biggest driver in my experience is not knowing how many records might be created. In the example above – you could get away with setting up a QB Automation and chain 15 Add requests together. But what if you need 18 this time? Or 30? The unknown is where this import call comes in handy. You can utilize custom scripting, creative formulas etc. to account for that variability and achieve your desired result.\n\nFor an example of how to use formulas to achieve dynamic record creation, I suggest taking a look at [Formulas + Webhooks = Dynamic Record Creation](/knowledge-base/quick-base-outside-of-the-box/formulas-webhooks-dynamic-record-creation/) to explore further.","slug":{"current":"api-importfromcsv-advanced"},"categories":[{"id":"-46109a16-4c3d-593f-a8f1-11046af26ef6","title":"Quickbase API","slug":{"current":"quick-base-api"}}]}},{"node":{"id":"-a6069491-10dc-58ca-9bfe-74cb6661af7d","title":"Copying Quickbase App Components | BASICS","metaDescription":"Often times during development – you’ll find a situation where you need to copy a field, form, or something in Quick Base so you can create similar functionality, test different methods, develop in a safer environment, etc. If you’ve navigated around and have found yourself in the settings for a particular table – you’ll likely …","body":"Often times during development, you’ll find a situation where you need to copy a field, form, or something in Quickbase. As a user, you can create similar functionality, test different methods, develop in a safer environment, etc. \n\nIf you’ve navigated around the platform, you've probably found yourself in the settings for a particular table. And you’ll likely have come across the Fields, Forms, and Reports pages similar to below. \n\nIf not, no worries. We'll walk you through the whole process. \n\n![](https://res.cloudinary.com/dnla85pdq/image/upload/v1580288588/QuandaryCG/copying-quick-base-01.png)\n\nWhen you drill into one of these, let’s say Fields for example, you’ll likely have seen the below:\n\n![](https://res.cloudinary.com/dnla85pdq/image/upload/v1580288587/QuandaryCG/copying-quick-base-02.png)\n\nIn situations like this, Quickbase has provided a simple icon all the way to the right that gives you the ability to copy that particular element:\n\n![](https://res.cloudinary.com/dnla85pdq/image/upload/v1580288587/QuandaryCG/copying-quick-base-03.png)\n\nThis little icon does just what you’d think – it copies. When clicked, it will create a new element and save the original details in your copy. \n\nFor example, if you copy a formula field, your new copy will have the same formula that you can tweak and update. \n\nClick the icon to copy a report (the same columns and filters will pull over). On any settings page, if you see that icon, know that you can copy that particular component.\n\nThis is great in circumstances where you want to set up a lot of similar components very quickly, or if you want to try something out but don’t want to affect your existing field or table by changing the original. You can do all your testing via something that you’ve copied, and then delete it later.\n\nFor more more information about basic application set up – check out some articles on [Adding Fields to Forms](/knowledge-base/quick-base-fields-and-formulas/adding-fields-to-forms-basics/) or [setting up new reports and the various types](/knowledge-base/reporting-and-dashboards/report-and-chart-types-basics/).","slug":{"current":"copying-quick-base-app-components-basics"},"categories":[{"id":"-14942e20-302e-57b3-a12c-de473ea4cc86","title":"Admin / Application Set Up / Security","slug":{"current":"admin-application-setup-security"}}]}},{"node":{"id":"-cbf6b9a5-238f-596d-be61-7fb496ca9618","title":"Updating the Default Table Home Page and Default Report Columns | BEGINNER","metaDescription":"Quickbase displays a 'Default' table home page and report columns. Learn how to customize these defaults with this step-by-step guide.","body":"#### BACKGROUND\n\nIn an app, when a user navigates to a table, they are taken to the table home page.  Initially, Quick Base displays the ‘Default report’; it is automatically created for each table in a Quick Base application.  Initially, it is a ‘list all’ report that displays the default report columns and dynamic filters.\n\n> EDITORS NOTE:\nException: As your app grows, some tables may contain more than 10,000 records.  When this occurs, the table home page will revert to a search form to improve the performance of the app.\n\nThe default columns, dynamic filters, and report can be adjusted to suit the needs of the users by following the directions below.\n\n#### NAVIGATION\n\nTo customize the default table home page, report columns, and dynamic filters:\n\nA. Navigate to the [Table Home Page](/knowledge-base/admin-application-setup-security/organizing-the-table-bar-beginner/)\n\nB. Click ‘Customize this Page’\n\n![](https://res.cloudinary.com/dnla85pdq/image/upload/v1580706851/QuandaryCG/updating-the-default-01.png)\n\n#### CHANGING THE DEFAULT TABLE HOME PAGE\n\nOriginally, the default report will show for all users.  However, the report that displays on the table home page can be changed.  It can be the same report for all users or a different report for each role.  If you want the report on the table home page to be the same for every user, irregardless of role, then select, the ‘The same view for everyone’ radio button (C); if you want the report on the table home page to be different based on the user’s role, then select, the ‘A view based on the user’s role radio button (D).\n\n![](https://res.cloudinary.com/dnla85pdq/image/upload/v1580706851/QuandaryCG/updating-the-default-02.png)\n\nTo change the report that displays on the table home page, click the dropdown in the ‘View’ column and select the desired report (E).\n\n![](https://res.cloudinary.com/dnla85pdq/image/upload/v1580706851/QuandaryCG/updating-the-default-03.png)\n\n#### CHANGING THE DEFAULT TABLE REPORT COLUMNS AND DYNAMIC FILTERS\n\nThe default report columns and dynamic filters can be edited by clicking on the hyperlink, ‘Default report settings’ (F above). Or following the path: table -> settings -> reports and charts -> reporting defaults -> default report settings.\n\nThe first section of the settings page is ‘Default Columns’.  Columns can be added by selecting the field you want to add from the ‘Available’ box; they can be subtracted by selecting the field you want to remove from the ‘Default columns’ box and clicking the arrows (G).  The arrows (H) to the right of the boxes change the order of the default columns.\n\n![](https://res.cloudinary.com/dnla85pdq/image/upload/v1580706851/QuandaryCG/updating-the-default-04.png)\n\n> EDITORS NOTE:\nThe fields can also be clicked and dragged to their desired location.  Double clicking a field will add/subtract the field.\n\nThe radio buttons below the column boxes allow you to choose how new fields added to a table will be treated (I).\n\n![](https://res.cloudinary.com/dnla85pdq/image/upload/v1580706851/QuandaryCG/updating-the-default-05.png)\n\n✓ When fields are added and ‘automatically make it a default column’ is checked, then the new fields will become default columns,\n\n✓ If ‘ask about making it a default column’ is checked, then the user will have the option to make or not make the new fields default columns,\n\n✓ If ‘don’t make it a default column’ is checked, then the new fields will not become default columns.\n\nThe default dynamic filters can be customized or not shown on the default report (J).  A report is limited to five dynamic filters.\n\n![](https://res.cloudinary.com/dnla85pdq/image/upload/v1580706851/QuandaryCG/updating-the-default-06.png)\n\n✓ If ‘Set automatically’ is checked, then the first five, filterable, fields will become the default dynamic filters,\n\n✓ if ‘Custom’ is selected, then the user can choose the dynamic filters (similar to choosing default columns G and H),\n\n✓ if ‘None’ is selected, then the report will have no dynamic filters.\n\nFinally, the order of the records can be customized by changing the field in the ‘Default sort order’ section (K).\n\n![](https://res.cloudinary.com/dnla85pdq/image/upload/v1580706851/QuandaryCG/updating-the-default-07.png)\n\n> EDITORS NOTE:\nWhenever a user creates a new table report, the settings chosen above will be the initial columns, filters, and sort order for the new report.  They can be changed by following the instructions above as your app grows and users’ preferences and needs change.\n\nTo learn how to display your reports on dashboards, check out the article, [Adding Reports to Dashboards](/knowledge-base/reporting-and-dashboards/adding-reports-to-dashboards-beginner/).","slug":{"current":"updating-the-default-table-home-page-and-default-report-columns-beginner"},"categories":[{"id":"-27382539-ae20-5f0a-ace9-391d7b9a149f","title":"Reporting & Dashboards","slug":{"current":"reporting-and-dashboards"}}]}},{"node":{"id":"-c545e882-edc9-5f77-88a1-6ffb10df7e80","title":"Conditional Drop Downs in Quickbase | BEGINNER","metaDescription":"Conditional drop downs are a feature of table-table relationships in Quickbase that allow you to effectively filter the results. Here's how to set them up.","body":"Conditional Dropdowns are a feature of table-table relationships in Quickbase. IN shore, you can effectively filter the results you see in a Related field (referencing your parent table). Plus, you can make the options shown ‘conditional’ on the selection of another field. \n\nTo put that another way, picture [a classic CRM example](/advantage-crm-small-businesses/). You are on the phone with a potential repeat customer (a company you have done business with before), pulling up their company and contact info to enter a new project. \n\n**Step 1**. You’ve selected their company from a dropdown for ‘Related Company’. \n\n**Step 2.** You want to pull up the contact info of who you’re talking to via a field for ‘Related Contact’. However, your dropdown has too many values, making it hard to sort through. \n\nIt would be nice if (instead of all contacts) you only saw the contacts that worked for the company selected in Step 1. In other words, the options for your ‘Related Contact’ are conditional on what you choose in ‘Related Company’.\n\n> EDITORS NOTE:\nConditional Dropdowns are a feature specific to ‘Reference Fields,’ meaning those fields that link a Parent table to Child Table. Common examples of reference fields would be things like Related Company, Related Project, Related Employee, etc.\n\nTo carry out the example above, picture a simple set up similar to below:\n\n![](https://res.cloudinary.com/dnla85pdq/image/upload/v1580719235/QuandaryCG/conditional-01.png)\n\n**Where:**\n- Companies have many contacts\n- Companies have many Projects\n- Contacts have many Projects\n\nFrom our example, we are trying to set up a new ‘Project’, where two of the primary inputs from the diagram will be ‘Related Company’ and ‘Related Contact’. \n\n## Conditional Dropdown in Quickbase (Walkthrough)\nOur end goal is to make ‘Related Contact’ _conditional_ on ‘Related Company’. As a result, we only see contacts that work for the chosen company.\n\n_**Note:** We are creating a new project and selecting a company and project. Therefore, the field we are updating for ‘Related Contact’ will also be in the Contacts table._\n\n**Step 1.** Open the field properties of ‘Related Contact’ (this is the field that we want to limit our options based on the selected company).\n\n**Step 2.** In the section of the field settings screen for ‘Reference field options’ – toggle the box for ‘Conditional Values’ | ‘The values in this field depend on a selection in another field’.\n\n![](https://res.cloudinary.com/dnla85pdq/image/upload/v1580719236/QuandaryCG/conditional-02.png)\n\n**Step 3.** In the first dropdown for ‘A selection in’, select the value in the ‘Projects’ table that you want to make this field conditional on. Since we want our Related Contact to be conditional on the value in Related Company, we’ll select that in this example.\n\n![](https://res.cloudinary.com/dnla85pdq/image/upload/v1580719236/QuandaryCG/conditional-03.png)\n\n**Step 4.** For the dropdown in ‘Show choices where’, select the field in the ‘Contacts’ table that you are comparing what you selected in step (3) to. \n\nAs we are trying to only show contacts that work for our selected company, we’ll want that to be the selection here that is entered in the Contacts table.\n\n![](https://res.cloudinary.com/dnla85pdq/image/upload/v1580719236/QuandaryCG/conditional-04.png)\n\nWith the above set up, when you make a selection in ‘Related Company’ in your project, you will only be shown Contacts from your Contacts table who are also assigned to that same ‘Related Company’. \n\n> EDITORS NOTE:\nBecause a conditional dropdown is dependent on a selection in another field, it's important that for data entry, you include both fields in your form or Grid Edit report if you are using them. From our example, your form or report would have to include the Related Company and Related Contact to avoid issues in data entry\n\nFor more information about relationships, read through our guide to setting them set up [here](/knowledge-base/admin-application-setup-security/setting-up-a-new-relationship-beginner/)","slug":{"current":"conditional-dropdowns-beginner"},"categories":[{"id":"-51554930-c85d-504e-b1fc-9e93b25a4991","title":"Fields & Formulas","slug":{"current":"quick-base-fields-and-formulas"}}]}},{"node":{"id":"-d087aec7-e48e-5b33-a1f6-a827c701bd71","title":"How to Build an Operations Dashboard in Quickbase | INTERMEDIATE to ADVANCED","metaDescription":"Quickbase Dashboards provide app users a modern and engaging user interface to track their reports. Follow our step-by-step guide to set up your own Dashboard","body":"In 2020, Quickbase introduced **Dashboards** to the platform. They are a significant upgrade from the home page feature, offering the ability to create a custom view of data from one or more apps. This makes consolidating information for your app users in an engaging and modern user interface [easier than ever before](https://quandarycg.com/quandary-build/).\n\nThis tutorial provides step-by-step instructions to create a simple operations dashboard that you can easily modify or extend to support several frequently encountered use cases. You’ll find this especially useful if you’re an intermediate or advanced-level Quickbase user. \n\n_**Note**: This article is not a comprehensive Dashboard user guide._\n\n\n## Dashboard Build Summary\n\nThe dashboard built in this tutorial consists of eight elements.\n\nFour of the elements require no preparation prior to building the dashboard. However, the four widgets displaying large numbers use chart reports that you must create in the tables where you store the counted records.\n\n\n\n\n![Screenshot of an example dashboard](https://cdn.sanity.io/images/55lcecww/production/4c7f89bbd9320bc21e91d6a2ae5cdb33bb1da67e-1025x297.png)\n\n\nYou can create this simple operational dashboard in less than one hour.\n\n\n\n\n## How to Build a Gauge Chart\n\nIf you can build gauge chart reports, you probably already know the following steps. These describe how to build a gauge to count records in a table.\n\n\n\n1. Navigate to the table that stores the records you wish to count.\n2. Create a new report for the table and select “**Chart**” from the menu. \n\n\n\n\n\n\n<p align=\"center\">\n  <img src=\"https://cdn.sanity.io/images/55lcecww/production/dd2d01d8d8597773ccb4fb8585b1df9cebfaef4b-445x497.png\" alt=\"Screenshot of QuickBase Create Report UI\">\n</p>\n\n\n\n\n3. Give the report a meaningful name. \n\n\n\n<p align=\"center\">\n  <img src=\"https://cdn.sanity.io/images/55lcecww/production/20a4f5ce4d9867c38734687905f137c2f72ea607-504x98.png\" alt=\"Screenshot of Quickbase Report - Basics - Name field\">\n</p>\n \n\n\n\n\n\n\n\n\n\n4. Use the dropdown menu to select “**Gauge**” for the chart type. At the time of writing, “Gauge” is the last item on the list. \n\n\n\n\n <p align=\"center\">\n  <img src=\"https://cdn.sanity.io/images/55lcecww/production/8e306387c4a218a9ac81897738090b99286aefc0-244x75.png\" alt=\"Screenshot of Quickbase Report-Chart Details-Chart Type\">\n</p>\n\n\n\n \n\n\n\n\n5. Use the dropdown menu to select what the gauge will measure.\n6. Select the last item in the list to count the # of xx (what records in the table are called). In this example, the # of **Requests** are being counted in the **Requests** table. \n\n\n <p align=\"center\">\n  <img src=\"https://cdn.sanity.io/images/55lcecww/production/4244fc38103cdba0e6e182c6fb80ec11407a64b2-271x339.png\" alt=\"Screenshot of Quickbase Report-Chart Details-What does the gauge measure dropdown\">\n</p>\n\n\n\n\n\n\n\n\n\n7. Leave the **Gauge** limits and color ranges set to the default values. (You can adjust these settings.However, we will not cover them in this tutorial).\n\n\n\n <p align=\"center\">\n  <img src=\"https://cdn.sanity.io/images/55lcecww/production/560da8abaf0ba0d82c63ad28934e45951867cbcd-670x296.png\" alt=\"Screenshot of Quickbase Report-Chart Details-Gauge Limits and Color Ranges\">\n</p>\n \n \n\n\n\n\n8. You can also use report formulas. (However, we will not cover how to use them in this tutorial.)\n\n\n\n\n <p align=\"center\">\n  <img src=\"https://cdn.sanity.io/images/55lcecww/production/80f12287342e9329690d11ff83c10ac8eacd9aad-573x107.png\" alt=\"Screenshot of Quickbase Report-Report Formulas\">\n</p>\n\n\n \n\n\n\n\n9. Leave the **Report Caching** set to the default option: “**Use table’s cache behavior**”. \n\n\n\n\n <p align=\"center\">\n  <img src=\"https://cdn.sanity.io/images/55lcecww/production/e8784e843aab5398335880a0e82e6eafdf49f398-414x165.png\" alt=\"Screenshot of QuickBase Report-Options-Report Caching settings\">\n</p>\n\n \n \n\n\n\n\n10. Build filters as needed to target records that meet a specified set of conditions, such as request type and whether the request has been assigned. \n\n\n\n\n <p align=\"center\">\n  <img src=\"https://cdn.sanity.io/images/55lcecww/production/d99e9c4508fd17d846538720af645cbfa2bc7270-396x78.png\" alt=\"Screenshot of QuickBase Report-Options-Filters\">\n</p>\n\n \n\n\n\n\n11. **IMPORTANT:** Use the **Drilldown Report** dropdown to select the report that will be displayed when users click on the gauge. This report should contain the most important information the dashboard user needs to see when viewing records. \n\n\n\n\n <p align=\"center\">\n  <img src=\"https://cdn.sanity.io/images/55lcecww/production/f4655b37f679b95a0981255be4871afe7bbee69b-466x90.png\" alt=\"Screenshot of Quickbase Report - Drilldown Report dropdown\">\n</p>\n\n \n\n\n\n## Create and Configure a Dashboard\n\nThe steps below describe how to create and configure a dashboard.\n\n\n\n1. Navigate to the application settings of the Application where you wish to build the dashboard.\n2. Click the **+ New** button at the top of the pages section of the page. \n\n\n\n\n <p align=\"center\">\n  <img src=\"https://cdn.sanity.io/images/55lcecww/production/7e1bfca8507b647528353e4d398a297c8704ca6d-322x110.png\" alt=\"Detail screenshot of QuickBase Settings: Pages: New Page button.\">\n</p>\n\n \n \n\n\n\n\n3. Select **Dashboard** from the **Create a New Page** pop-up window. At the time of writing, **Dashboard** is the default option.\n\n\n\n \n\n\n\n \n <p align=\"center\">\n  <img src=\"https://cdn.sanity.io/images/55lcecww/production/fea07b4a644489baec40cebdcce5a3ea6ba06b98-440x405.png\" alt=\"Screenshot of QuickBase Settings: Create a New Page pop-up widnow.\">\n</p>\n\n\n\n\n4. Click the **Create** button. The browser will refresh to display the new dashboard.  \n\n\n \n<p align=\"center\">\n  <img src=\"https://cdn.sanity.io/images/55lcecww/production/8d767d5d301d16d89f3e7aed6cf366d7cb995bb8-522x99.png\" alt=\"Screenshot of QuickBase New Dashboard default name\">\n</p>\n\n\n\n\n \n\n5. The dashboard will come unlocked (editable), so you can begin adding widgets immediately. You can use the icon in the upper-right corner of the page to toggle the page between the locked and unlocked states. \n\n\n <p align=\"center\">\n  <img src=\"https://cdn.sanity.io/images/55lcecww/production/4ba3b71fecb6a9bc94b699ad785054994494ec41-497x74.png\" alt=\"Screenshot of QuickBase Dashboard menu: Unlock icon.\">\n</p>\n\n \n \n\n\n_**Note**: The name of the page will follow the Quickbase default naming convention: Dashboard + date created + time created. We recommend renaming the dashboard to something more meaningful to help you and other users of the application distinguish it from other dashboards. You can do this by hovering the mouse pointer over the dashboard name to reveal an icon that allows you to edit it._\n\n\n\n \n <p align=\"center\">\n  <img src=\"https://cdn.sanity.io/images/55lcecww/production/2ec9d416baa13595a859b045b2f378d7d7ca0613-612x46.png\" alt=\"Detail screenshot of QuickBase: Edit dashboard name.\">\n</p>\n\n\n\n\n6. Click the **Add Widget** button to begin laying out the dashboard.\n7. Select **Rich text** from the context menu. \n\n\n\n\n<p align=\"center\">\n  <img src=\"https://cdn.sanity.io/images/55lcecww/production/9796c88a70989292b46b40a6ce22c918cc8cf8fb-246x266.png\" alt=\"Screenshot of QuickBase Dashboard: Add Widget context menu.\">\n</p>\n\n\n\n\n\n\nThis will add the widget to the page canvas so you can begin adding content to it. Its default position will be in the upper-left corner of the canvas. \n\n\n\n\n8. Use the formatting tools inside the widget to apply styling to the text. Consider using text colors that match or complement your app’s branding color scheme for a more polished look.\n9. To resize the widget, hover the mouse over it, then click one of the blue circles to drag the anchor.\n10. To move the widget, hover the mouse near the top center of the widget to reveal the handle. Then, click and drag the widget to change its position on the canvas. \n\n\n\n\n\n\n<p align=\"center\">\n  <img src=\"https://cdn.sanity.io/images/55lcecww/production/f80e24f65400a8cce31eee45314b3300407909d2-481x208.png\" alt=\"Screenshot illustrating the widget anchors and handle for resizing and repositioning.\">\n</p>\n\n_**Note**: Widgets will always snap vertically and horizontally when you drop them. You can see on the gif below what you should expect when dropping widgets on the canvas._\n\n\n\n\n![ Animation illustrating the snapping behavior of the QuickBase Dashboard Canvas.](https://cdn.sanity.io/images/55lcecww/production/a1f797302bf56948451bf659c36fd07f821f47d2-1600x900.gif)\n \n\n\n\n\n11. Select **Report** from the context menu. \n\n\n\n\n<p align=\"center\">\n  <img src=\"https://cdn.sanity.io/images/55lcecww/production/9796c88a70989292b46b40a6ce22c918cc8cf8fb-246x266.png\" alt=\"Screenshot of QuickBase Dashboard: Add Widget context menu.\">\n</p>\n\n\n\n\n\n\n12. The screen will refresh to display a report previewer and a UI to browse. You must select the report you would like to see on the dashboard.\n    1. You may search for a table using the provided search bar.\n    2. Click the chevron next to the table containing the report.\n    3. Browse the list of reports from the selected table to choose a report. \n\n\n\n\n\n\n![Animation demonstrating how to use QuickBase Dashboard: Select Report context menu.](https://cdn.sanity.io/images/55lcecww/production/9fcc139e1054e4ea53f55756d94849dcb03393c6-1600x900.gif)\n\n\n\n\n13. Select one of the gauge reports created using the instructions above. An arc-shaped icon in the report list represents gauge reports. \n\n\n\n\n\n<p align=\"center\">\n  <img src=\"https://cdn.sanity.io/images/55lcecww/production/1447e4a916c9d20e2e155edf514eef4c2d63f7f4-344x58.png\" alt=\"Detail screenshot of QuickBase Guage report icon.\">\n</p>\n\n\n\n\n\nThe screen will refresh to display a preview with the selected report and a UI to customize how the report looks on the dashboard. \n\n\n\n\n\n\n![Screenshot of QuickBase Dashboard: Report preview.](https://cdn.sanity.io/images/55lcecww/production/4f38bff8734e3ff15588fb4c79f349f32f89fed1-1432x584.png)\n\n\n\n\n14. Use the **Customize** menu to replicate the settings shown below.  \n\n\n\n\n<p align=\"center\">\n  <img src=\"https://cdn.sanity.io/images/55lcecww/production/6e7ba09f8379e6c19f006799c488788a923ab04c-273x703.png\" alt=\"Screenshot of QuickBase Dashboard: Customize Report User Interface.\">\n</p>\n\n\n \n\n\n\n\n15. Configure the widget, then click the “**Add to dashboard**” button located in the lower center of the report preview panel. \n\n\n<p align=\"center\">\n  <img src=\"https://cdn.sanity.io/images/55lcecww/production/05f9b5745b825513c87a5c569740255eadaac954-512x495.png\" alt=\"Detail screenshot of QuickBase Dashboard: Report Preview: Add to dashboard button\">\n</p>\n\n\n\n\n\n \n\n\n\n\n16. To add the **Search Bar** to the Dashboard, click “**Add Widget**”, then select “**Search Bar**” from the menu. \n\n\n<p align=\"center\">\n  <img src=\"https://cdn.sanity.io/images/55lcecww/production/cc4e8b9273dd69356a776a0e6e44d00787c316c5-235x68.png\" alt=\"Detail screenshot of QuickBase Dashboard: Search Bar Widget Icon\">\n</p>\n\n \n\n\n\n\nThe screen will refresh to display a preview of the search bar and a UI to configure the widget. \n\n\n\n![Screenshot of QuickBase Dashboard: Configure Search bar preview.](https://cdn.sanity.io/images/55lcecww/production/a44aca36376d4f21b49f811763568343b1788b8c-1264x522.png)\n \n\n\n\n17. Use the customization UI to configure the widget then click the “**Add to Dashboard**” button located in the lower center of the preview window. \n\n\n    \n \n<p align=\"center\">\n  <img src=\"https://cdn.sanity.io/images/55lcecww/production/3ce07527e5dd885937bcbda5c36cf62200d595b1-232x369.png\" alt=\"Screenshot of QuickBase Dashboard: Customize search bar user interface\">\n</p>\n\n","slug":{"current":"build-an-operations-dashboard"},"categories":[{"id":"-27382539-ae20-5f0a-ace9-391d7b9a149f","title":"Reporting & Dashboards","slug":{"current":"reporting-and-dashboards"}}]}},{"node":{"id":"-8999a198-44ff-5681-af53-655ab0bfc0f7","title":"How to Build Standard Reports in Quickbase | BEGINNER","metaDescription":"Learn how to build common reports in Quickbase. We’ll review common report types, field/filter selection, and reporting best practices.","body":"Reports are a way to transform your data, depending on your ultimate goal. In Quickbase, we use reports to [visualize data](https://quandarycg.com/tech-consulting/) in charts, provide a numerical summary of data with **Summary Reports**, and shortlist data with **Table Reports**.\n\n## Reasons to Use Reporting\n------------------------\n\nReporting is vital to delivering data in a digestible format to an end user. Reports of each type serve different purposes for different audiences. \n\nFor example, some c-suite stakeholders might only need high-level summarization of data. In contrast, individual contributors might need more in-depth information about the data inside each record in QuickBase. \n\nWe tend to use reporting as one-off instances of data delivery, or as a component on a dashboard. As developers, we also use reports to assist in data validation and project management.  \n\n## How to Create and Use Reporting\n-------------------------------\n\nAll projects will need reporting in some capacity as defined by the features of your Project deliverable(s).\n\n[During development](https://quandarycg.com/quandary-build/), you will most likely create reports sporadically throughout the Project's lifespan to assist you and/or your stakeholders.\n\nYou can find Already-built reports on the “**Reports & Charts**” dropdown below the table bar:\n\n[![](https://cdn.sanity.io/images/55lcecww/production/a62e7a46f91e983c7a4ac48e8449fd73864b38c5-335x180.png)](https://cdn.sanity.io/images/55lcecww/production/a62e7a46f91e983c7a4ac48e8449fd73864b38c5-335x180.png)\n\n## How to Build Reports in Quickbase\n---------------------------------\n\nIn this example, we will create a Table Report to display records as rows.\n\n### Create a New Report Type and Name\n\n1.  Find the “**Reports & Charts”** dropdown underneath the table bar\n    \n2.  Click the **“+New”** icon.\n    \n3.  You’ll see several choices:\n    \n\n- <ol style=\"list-style-type: lower-alpha;\">\n<li><strong>Table</strong>: Presentation comparable to a spreadsheet; records are displayed as rows with fields as the column headers.</li>\n<li><strong>Summary</strong>: Presents data in the form of numerical summaries (For example, Number of projects by Status). If users want to see the data, they must click on numbers in this report or “Drill down”. </li>\n<li><strong>Kanban</strong>: Displays records as cards on a board which has ‘buckets’ based on a single field (status, assignee, etc). This allows Users to drag + drop records between buckets to make simple edits (change the status, re-assign, etc).</li>\n<li><strong>Chart</strong>: Graphical representation of data. This is what you’d click to make a pie/bar/line chart. You will be able to specify which type after making this selection.</li>\n<li><strong>Map</strong>: Provided your data has [Address] information, will plot pins on a map.</li>\n<li><strong>Calendar</strong>: Provided your data has [Date] information, it will plot blocks of time on a calendar. If your data has a [Start] and [End] date, the plots will span the duration.</li>\n</ol>\n\n\n\n\n \n&nbsp;\n \n\n        \n4.  Select **“Table”**.\n    \n5.  Give your report a **“Name”** and **“Description”**.\n    \n    a.  If you want to display your **“Description”** as a subtitle on your report, check the **\"Show Description on the Report Page\"** box.\n        \n\n### Reports & Charts Panel\n\nThe Reports & Charts Panel is where you can define who will see your report. \n\nThis is important for the cleanliness of your report structure. It also allows you to restrict visibility if this is a personal report or if it is inappropriate for users of a certain role to access the data.\n\nBy default, the report group will be selected as **“Common”.** Please note that **“Common”** may also be your only possible selection. \n\n_**Note:**_ _Once we get into the organization of reports, this will come into play._\n\n[![Screenshot of Quickbase showing Reports & Charts panel with user and group access to displayed. The example has \"everyone\" checked as the option for \"list this report in the panel for\". And the option \"common\" is selected for \"Group for this report\".](https://cdn.sanity.io/images/55lcecww/production/d1952ffbefb35d8a919381d28fa4aea8a8df5ec2-512x439.png)](https://cdn.sanity.io/images/55lcecww/production/d1952ffbefb35d8a919381d28fa4aea8a8df5ec2-512x439.png)\n\n### Columns to Display\n\n1.  Check the **“Custom Columns”** Box.\n    \n2.  Two boxes will appear below. The left box contains the fields available for you to pull into your table report as columns. The right box contains previously selected items.\n    \n[![Screenshot of Quickbase Column reporting illustrating remaining items to select and selected items for reporting.](https://cdn.sanity.io/images/55lcecww/production/492fd394d0779efeaac93a5aa5f5a839a5b9461f-358x243.png)](https://cdn.sanity.io/images/55lcecww/production/492fd394d0779efeaac93a5aa5f5a839a5b9461f-358x243.png)\n\n3.  Bring over the fields you would like to see in your report by either clicking and dragging them or double-clicking. \n    \n\n_**Note:**_ _Fields will display as columns on your report left-to-right starting at the top._\n\n_**Note:**_ _For more advanced builders, “__**Report Formulas”**_ _will allow you to write functions to calculate data specifically for this report._\n\n### Setting Filters\n\nSetting Filters is a crucial piece of report building. Filters allow you to limit the amount of data the system shares based on provided criteria. \n\nHow to set up filters:\n\n1.  Check the option **Filter Project Records** option.\n    \n\n_**Note:**_ _There are instances where you would want to show all records._\n\n1.  Start by leaving ‘**All of these conditions are true’** as is.\n    \n3.  Next, choose the fields to act on for filtering. \n    \n\nFor this example, these are selected:\n\n[![Screenshot of Quickbase filters with \"All\" of these conditions are true AND \"project name, contains, the value, testing AND status, is equal to, the value, pending\" selected](https://cdn.sanity.io/images/55lcecww/production/0c654fe645b8fbf2b64fcb16c6e5fa34612a36f5-645x95.png)](https://cdn.sanity.io/images/55lcecww/production/0c654fe645b8fbf2b64fcb16c6e5fa34612a36f5-645x95.png)\n\n**Explanation:** This says, “Show records where \\[Project Name\\] contains ‘Testing’ AND \\[Status\\] equals ‘Pending’.”\n\n4.  To add another row of filter criteria, hover your cursor over the right of your first filter row and click the blue **“+”** (plus sign)**.** To remove a row, click the red **“-”** (minus sign).\n    \n5.  Alternatively, you could select:\n\n[![Screenshot of Quickbase filters with \"ANY\" of these conditions are true AND \"project name, contains, the value, testing OR status, is equal to, the value, pending\" selected](https://cdn.sanity.io/images/55lcecww/production/a0a7fc583a944b4a455e28e89bd245d86bf7fcbb-640x85.png)](https://cdn.sanity.io/images/55lcecww/production/a0a7fc583a944b4a455e28e89bd245d86bf7fcbb-640x85.png)\n    \n\n**Explanation:** The phrasing now becomes “Show records where the \\[Status\\] is ‘Pending’ **OR** the \\[Project Name\\] contains ‘Testing’”.\n\nShould your report call for it, we can add up to three layers of filters. To the right of one of your filters, you’ll see some icons:\n\n[![Quickbase filter showing \"add filter row\" pointing to +, \"remove this filter row\" pointing to -, \"Remove from current criteria set\" with back arrow, and \"move to a new criteria set\" with right arrow showing.](https://cdn.sanity.io/images/55lcecww/production/e8b85512aa9ffb4eba24fd9dd1cdde2e2663e59b-560x190.png)](https://cdn.sanity.io/images/55lcecww/production/e8b85512aa9ffb4eba24fd9dd1cdde2e2663e59b-560x190.png)\n\n6.  Clicking the **“Move to a new criteria set”** will indent your current filter. \n    \n\nYou’ll now be presented with another **“Any/All of these conditions are true”** wherein that logic will apply to **only** the filters in the newly-created criteria set. \n\nQuickbase does a good job of visually representing this:\n\nHere is another example: If you wanted to set up a filter that communicated this: “Show records where the \\[Status\\] is ‘Pending’, and the \\[Project Name\\] can contain _either_ (‘Testing’ **OR** ‘Rollout’).\n\nThis is what the filters would look like: \n\n[![Screenshot of Quickbase filters with \"All\" of these conditions are true AND \"Any\" of these conditions are true, then listing \"project name, contains, the value, testing OR status, is equal to, the value, rollout\" And \"status, is equal to, the value, pending\" selected](https://cdn.sanity.io/images/55lcecww/production/f280a73d05a4481b6580cfc05edefcf15dd5ba70-655x145.png)](https://cdn.sanity.io/images/55lcecww/production/f280a73d05a4481b6580cfc05edefcf15dd5ba70-655x145.png)\n\n_**Note:**_ _We are going through filters in the context of a Table report in this demo. However, the user experience and logic for filtering records are the same for all types of reports in Quickbase._\n\n## Dynamic Filters\n---------------\n\nThese field choices will appear on the report page as quick ways to slice your report further.\n\nYou’ll see some options are selected by default. However, You can also choose “none” or “custom” and pick your fields.\n\nSelecting “custom” will bring up a familiar-looking interface:\n\n[![Screenshot of Quickbase illustrating \"Dynamic: Defines how your users can refine and search the report when viewing it. with the option to toggle \"use the dynamic filters defined in default report settings\" off and \"custom\" selected. There are two columns below, the left one has available filters, the one on the right has selected filters (up to five).](https://cdn.sanity.io/images/55lcecww/production/74220b38e28e021927498e88b9929b854f231365-480x145.png)](https://cdn.sanity.io/images/55lcecww/production/74220b38e28e021927498e88b9929b854f231365-480x145.png)\n\n## Sorting and Grouping\n--------------------\n\nYou can select the **‘Sort or group on other fields’** to bring up a field selection interface, similar to when you were building filters.\n\nTo add more layers of sorting or grouping, click the **“+”** (plus) or **“-”** (minus). \n\nHere’s an example of what that might look like:\n\n[![Screenshot of Quickbase sorting and grouping for reporting showing \"Sort or group on other fields\" with \"Sorta nd group from high to low by\" and \"employee - name\" grouping by \"Equal values\" then \"sort from low to high by\" and \"date created\" selected.](https://cdn.sanity.io/images/55lcecww/production/89042a27b871d851ac92a07b4bc199c1d1a63f33-780x100.png)](https://cdn.sanity.io/images/55lcecww/production/89042a27b871d851ac92a07b4bc199c1d1a63f33-780x100.png)\n\n_**Note:**_ _Quickbase will interpret these instructions top-to-bottom._ \n\nIn this example, Quickbase will first group records by \\[Employee Name\\] ‘A’ to ‘Z’. Within each grouping, the records will be sorted from oldest to newest.\n\n## Color Coding\n------------\n\nThis is useful for providing conditional formatting to records in your Table report.\n\nChoosing “**Assign colors to choices in**” will allow you to select values from fields with choice-based values, such as multiple choice and checkbox.\n\nFor more advanced builders, “**Use a formula**” will bring up the interface for writing custom code that QuickBase interprets for color choices.\n\n## Reporting Best Practices \n-------------------------\n\nConsider your audience when creating a report. \n\n**Ask yourself:**\n\n*   ◦ Is this an administrator-level report?\n    \n*   ◦ Is it a personal report? \n    \n*   ◦ Or is everyone going to want to see this?\n\n&nbsp;\nThese are controls in the “**Reports & Charts Panel**”.\n\n## Setting Report Groups\n---------------------\n\nYou will need to consider the group in which your report should live. You can do this in the **“Reports & Charts Panel”**.\n\nIt is tempting to dump everything into **“Common”.** However, this leads to disorganization and confusion about the report's intended function or feature.\n\nHere is how you add report groups:\n\n1.  Leave the report building page and go into the “Reports & Charts” dropdown.\n    \n2.  Then, click “Organize”\n    \n[![Screenshot of Quickbase projects default report, reports and charts drop down with the \"Organize\" option highlighted](https://cdn.sanity.io/images/55lcecww/production/4647604ed4edf9a531690384a200bd167d320e52-512x107.png)](https://cdn.sanity.io/images/55lcecww/production/d6fb6d677bae5af2add9786e7dbe2e2d15f07b5d-518x108.png)\n\n3.  Add a description to your report. \n    \n\n_**Note:**_ _Information such as its purpose, who built it, etc. will greatly assist you or your team down the road. Sometimes, a name is not enough to jog your memory of why you built this report._\n\nYou can prompt the viewer of your report for input on a given filter before they view it. \n\nTo do this, click the dropdown and select **“< ask the user >”**\n\n[![Screenshot of Quickbase \"Filter all projects records\" checked with Show projects records where All of these conditions are used, \"Project Name\", \"contains,\" \"<ask the user>\" and \"testing\" Checked and Screenshot of Quickbase projects default report, reports and charts dropdown with \"Show project records where project Name contains\" blank displayed. There is an option to click on \"Display Report\" or \"Cancel\"](https://cdn.sanity.io/images/55lcecww/production/af5be8d339298019b42f6a4852a1538f82ac087d-512x439.png)](https://cdn.sanity.io/images/55lcecww/production/af5be8d339298019b42f6a4852a1538f82ac087d-512x439.png)\n\n\n\n**For more information, see the following:**\n\n[https://helpv2.quickbase.com/hc/en-us/articles/4570317429908-About-Reports-and-Charts-](https://helpv2.quickbase.com/hc/en-us/articles/4570317429908-About-Reports-and-Charts-)\n\nFor more guides on Quickbase, [visit our knowledge base](https://quandarycg.com/knowledge-base/).","slug":{"current":"building-standard-quickbase-reports"},"categories":[{"id":"-27382539-ae20-5f0a-ace9-391d7b9a149f","title":"Reporting & Dashboards","slug":{"current":"reporting-and-dashboards"}}]}},{"node":{"id":"-efbc16a5-08c1-587b-8d52-505f43e86e2a","title":"Importing Data into Quickbase","metaDescription":"Quickbase's import feature allows for mass creation and updating of fields and records. Save time and get your application loaded for your users.","body":"You’ve just created an amazing application, and now all of your table data is sitting somewhere outside of Quick Base. You just can’t wait to click **+ New Record** a couple hundred times and tediously enter similar field information over and over…I’m guessing this second part isn’t you. Fortunately, Quick Base offers an **Import** feature that allows for mass creation and updating of fields and records to save you time and get your application loaded with data and ready for your users.\n\n* * *\n\n### Use Cases for Importing Data\n\nImport functionality can save you time and headache in a variety of ways:\n✓ Bulk upload of new records.\n✓ Bulk update of existing records.\n✓ Bulk field creation. What?\n✓ Multiple ways to import data.\n\n* * *\n\n### Navigating to the Import/Export page\n\nBefore we can do anything, we need to get to the correct page and explore the available options.\n\n1. From any table home page (though you’ll save a step by being on the table you’d like to import to), navigate to the right side of the table bar, click **More ▾** and select **Import/Export** from the dropdown list.\n2. The **Import/Export/Copy** page provides six options. This article will focus on importing into a table using a **file** or the **clipboard**.\n\n![](https://res.cloudinary.com/dnla85pdq/image/upload/v1580193913/QuandaryCG/importing-data-01.png)\n\n* * *\n\n### Importing new data from a File (or the Clipboard)\n\nEDITORS NOTE: This example will demonstrate using a file (TSV, CSV or XLS) to import data. If you choose to paste from your clipboard, the only difference will be a text area rather than a file selection. Please note that your pasted data will need to be tab or comma delimited.\n\n1. Select the “Import into a table from a **file**” action to expand your import options.\n\n![](https://res.cloudinary.com/dnla85pdq/image/upload/v1580193913/QuandaryCG/importing-data-02.png)
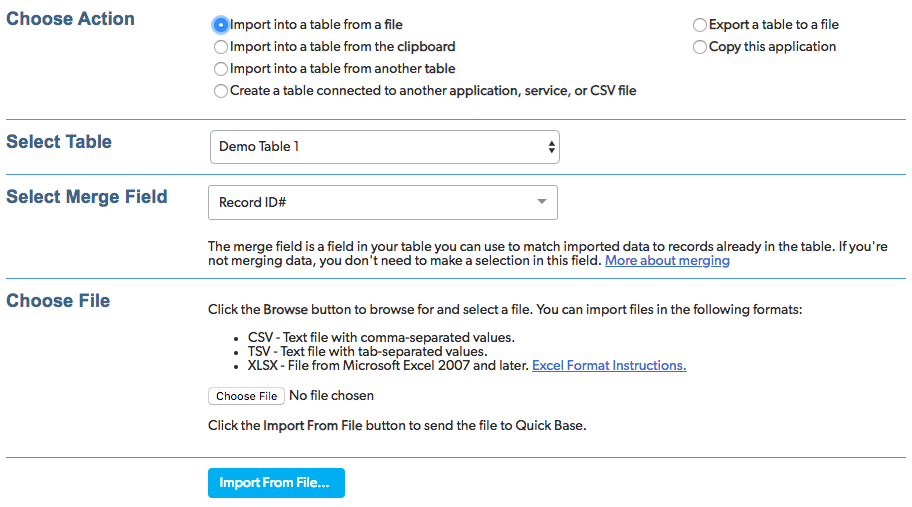
\n\n2. Select the **Table** you would like to import into. This will default to the table you were previously on.\n\n3. Select the **Merge Field**. This is used to update existing records and will be either Record ID# or another field with a **unique value**.\n\n4. To upload your data, click **Choose File** to load your data, then click **Import From File…** to continue.\n\n5. Now it’s time to finalize your import. To make things easy on myself, I typically include Field Names at the top of each column. This lets Quick Base intuitively determine how your data will be mapped. You can always change these using the dropdown options.\n\n![](https://res.cloudinary.com/dnla85pdq/image/upload/v1580193913/QuandaryCG/importing-data-03.png)\n\n6. Once you’ve finalized your options, click **Import**. A small table will appear on the next window with the output of everything that just occurred. In our case, we’ve created three new records and one new field.\n\n![](https://res.cloudinary.com/dnla85pdq/image/upload/v1580193912/QuandaryCG/importing-data-04.png)\n\n### Updating data from a File (or the Clipboard)\n\nThis scenario is almost identical to importing new records, but with one caveat…you’ll need to have the key field value of all records that you wish to update. I’ve found it easiest to export a table report that is ordered identically to the data you wish to update and includes the key field of each record.\n\n1. After adding the appropriate key field values to the data you wish to update and importing the file, you will be taken to the same finalization page.\n\n![](https://res.cloudinary.com/dnla85pdq/image/upload/v1580193913/QuandaryCG/importing-data-05.png)\n\n2. In the image above, we’re updating the records that we previously imported and also adding a fourth record. You may choose to assign it a Record ID# but use caution as you may overwrite another record. We’ll leave it blank. A message will appear letting you know that your import may be updating existing records (which is exactly what we want to do).\n\n![](https://res.cloudinary.com/dnla85pdq/image/upload/v1580193912/QuandaryCG/importing-data-06.png)\n\n3. Click Import (with Update) to upload your records to Quick Base. On the next screen you’ll see that we’ve created one new record and updated our three existing records from the previous import.\n\n![](https://res.cloudinary.com/dnla85pdq/image/upload/v1580193912/QuandaryCG/importing-data-07.png)\n\n* * *\n\n### Using Import to create fields.\n\nUsing the standard + **New Fields** option, you can add up to twelve fields at a time. This sounds great until you’ve got a table that requires 400 fields…thankfully we can just import them! We’re going to assume you’ve read the above examples and jump straight to the point.\n\n1. Create a file with a single line of all the fields you want to create, then import it.\n\n2. In the finalization screen, select **Create New Field** for every column. Field Labels populate automatically from your file, but you can still change them if you’d like.\n\n![](https://res.cloudinary.com/dnla85pdq/image/upload/v1580193913/QuandaryCG/importing-data-08.png)\n\n3. Click Import and bask in the glory of Quick Base efficiency!\n\n* * *\n\nNow that you’ve learned how to import data into Quick Base via a file or your clipboard, check out how to load data using a [Table-to-Table](/knowledge-base/quick-base-tables/table-to-table-import-intermediate/) import.\n\n* * *","slug":{"current":"importing-data-into-quick-base"},"categories":[{"id":"-5bed183e-fc97-5f28-8c58-da9094825c0d","title":"Tables","slug":{"current":"quick-base-tables"}}]}},{"node":{"id":"-662f743b-316d-5155-b368-0ddcd14f0958","title":"How to Use Quickbase Pipelines to Elevate Your Notifications | INTERMEDIATE to ADVANCED","metaDescription":"Quickbase's native notifications have many limitations. Using Pipelines to streamline your notifications allows for higher accuracy and ease of access","body":"## Why Is It Better, How to Use, and Use Cases to Demonstrate\n\nMost of the time, native notifications in Quickbase are sufficient for your application. However, if you find yourself limited and stuck with a notification you have options in Pipelines. \n\nWith Pipelines, you can centralize your notifications into one table. Schedule reminders outside of the normal cadence. And even let end users control their own settings.\n\nI’m going to show you how to transform these notifications into Pipelines that create a more immersive experience and a more effective notification for your [Quickbase Application](https://quandarycg.com/quandary-build/).\n\n\n## The Limitations of Quickbase Notifications\n\nQuickbase notifications are great for performing the most functionalities in Quickbase Apps. However, there are limitations:\n\n\n\n<ul style=\"list-style: disc\">\n<li><strong>Who gets notified</strong>: Administrators are limited to what notifications end users can receive. Notifications are permission-based and limited to users with set permissions within Quickbase. For Example, Reports are limited to internal QB Users. </li>\n<li><strong>When you receive notifications</strong>: With native notifications, you can only receive alerts during specific daily, weekly, or monthly cadences.</li>\n<li><strong>Reliability</strong>: There is no way of knowing if a notification is sent properly without extensive testing. In Pipelines, you can review if the process was complete.</li>\n</ul>\n\n\n&nbsp;\n\n\nThese are all limitations I’ve encountered that affect how you can use native notifications. If any of these cause a problem, you need to find a workaround or risk not delivering the notification. \n\nAlternatively, you can avoid all of these issues by using Pipelines for notifications.\n\n\n## Overcome These Limitations With Pipelines\n\n\n### Set Up a Customized Notification Cadence\n\nYou can use [CRON expressions](https://helpv2.quickbase.com/hc/en-us/articles/4418148767892-Using-CRON-to-schedule-pipelines) or the typical Schedule UI (pictured below) to schedule a pipeline to run on a unique cadence. You can set it to receive notifications in a specific hour, day, week, month, year, or even time zone. \n\nThis is especially beneficial for end users who do not work in the Quickbase native notification’s automatic Pacific Standard Time zone. \n\nUsing CRON expressions can further expand these capabilities by allowing users to run pipelines on a specific day of the year (say every 3<sup>rd</sup> Friday of the Fiscal Quarter at 3:20 am).  \n\n<p align=\"center\">\n  <img src=\"https://cdn.sanity.io/images/55lcecww/production/181e0c3b97928a022209fc9005acc3fd8bb0cf3a-417x512.png\" alt=\"Quickbase screenshot of scheduling notification cadence in Pipelines.\">\n</p>\n\n\n\n### Send Notifications to Everyone\n\nIn a native notification, you can only send notifications to users inside Quickbase with set permissions. In pipelines, however, you can send notifications to anyone and can actually build out a list of email recipients. \n\nYou can do this by hardcoding an email into the pipeline or through a generated email list in Quickbase. This provides access to the information inside of Quickbase that outside users wouldn’t have without necessarily adding them to the app.\n\nFor example, if you need new Quickbase users to sign an NDA or contract, you can send them an email notifying them before they are able to sign into Quickbase. \n\n\n### Adjust Conditionals\n\nWhen setting up a notification pipeline, you can easily set up your conditionals. Similar to cadence, conditional settings do exist inside the feature of custom email notifications. However, there are limitations in email structure, content or reports, and recipient. \n\nConditionals are set up easily using the search action inside of quickbase pipelines, utilizing the filters and specific criteria to trigger on. The advantage here is the ability to maximize all tools inside of quickbase pipelines to adjust your notification to your liking, even going as far as using the Jinja, the pipelines language, to manipulate your data into a structured table. \n\n\n### Ensure the Notifications Work\n\nOne of the most overlooked benefits of Pipelines is the ability to use notification to notify you when your pipelines work properly. While there is a “Send Test Email” button in the native notifications UI, if anything goes wrong, you cannot pinpoint where the issue started. You will only see the email not sent. \n\nThis can be frustrating and time-consuming for the developer.\n\n \n\nInside Pipelines, you can easily read the activity log and make changes to fix any problems.\n\n_**Note**: When using pipelines to create notifications, you need an integrated email service, such as Gmail or Outlook. Setting up a connection is similar to any other integrated service._\n\n\n## General Structure of a Pipeline Notification\n\nLet’s break down the general structure of what a notification will look like in a pipeline. Here are a couple of ways you can use this in your application.\n\n<p align=\"center\">\n  <img src=\"https://cdn.sanity.io/images/55lcecww/production/3b010f0dbe5a23fc13e126576b4d0d9ce47d79ce-578x302.png\" alt=\"Quickbase screenshot of the general structure of Pipelines.\">\n</p>\n\nFirst, decide what will trigger your notifications. This can be a scheduled pipeline or an event change. For an event change, you can simply include the email action after the event occurs. And then from there you can modify the email action and include necessary criteria. \n\n<p align=\"center\">\n  <img src=\"https://cdn.sanity.io/images/55lcecww/production/cb424e7276423a0de486ddc9cfbb53065bff7e99-445x635.png\" alt=\"Screenshot of body of message and subject line in an outgoing email notification.\">\n</p>\n\nHere you can develop the body of an email, set the recipients, and decide whether to CC or BCC anyone. \n\nAdditionally, you can include the importance of the email and save a copy in the Quickbase app for record keeping. Inside the body, you can drag and drop as many fields as you’d like without needing to format them. You can also add links to tables if you want to show more information. \n\n\n### Using the Make Request Action for Unique Subscriptions\n\nWhat if you want to develop a subscription to a notification without a specific schedule in mind?\n\nIn this case, you need to approach the pipeline slightly differently. There are two ways to accomplish this. I will show the most advanced method I have used. \n\nThis method requires setting up and knowing how to use the **[Make Request](https://helpv2.quickbase.com/hc/en-us/articles/4418310888980-Understanding-the-API-call-reference)** action. Once you have all the pieces together, it isn’t as complicated as it seems. \n\n\n\n1. Use the  **search records function** to start the pipeline. You need to identify your conditions so you can pull out specific records that meet your criteria. A thing to note, the criteria here **Need to match **the filters in the report that you are going to be pulling data from. \n2. If there are no records, you can make the pipeline stop to prevent sending out a blank report.\n3. Otherwise, set the pipeline logic flow to where you have records in your criteria. Then, develop your notification. (See an example of a specific flow in the image below.)\n\n<p align=\"center\">\n  <img src=\"https://cdn.sanity.io/images/55lcecww/production/fb2c8f282af310feade364fce8d89dd3c332e2c8-1094x630.png\" alt=\"Screenshot of an example of a Pipeline flow in Quickbase.\">\n</p>\n\n4. Next, we use the **Make Request** action. You only need to do this if you want to build a specific report without using an existing table report in Quickbase. \n5. Inside **Make Request,** you need to pull the **Table ID** and the specific report. (In this example below, I’m pulling the report ID ‘**124**’ and the table ID ‘**bp29ifiyi**’.) \n\n<p align=\"center\">\n  <img src=\"https://cdn.sanity.io/images/55lcecww/production/97636d849564249f884892fd206da68074883d30-433x116.png\" alt=\"Screenshot of how to pull the Table ID inside the Make Request Action in Quickbase Pipelines.\n\">\n</p>\n\n\n6. Next, you will set up the **API Authorization**. This requires a Quickbase **User Token** (found in **My Personal Settings**). The typical method is **POST.** And you need to identify the application and User Token in the **Value** field. You can simply copy what is here and replace the value field with your own Quickbase realm/app and User Token. \n\n_**Note**: Under additional fields, the content type will be application/json for this example._\n\n<p align=\"center\">\n  <img src=\"https://cdn.sanity.io/images/55lcecww/production/302af124ee35a99cc0b133960dafd480079e75ef-319x220.png\" alt=\"Screenshot of how to set up API Authorization using User Tokens in Quickbase.\">\n</p>\n\n\n\n7. Now that you retrieved the data from the search parameters, you need to develop a unique table using Jinja. This will be inside of the **Send Email Action**. (You need to link your email client. In my example, I’m using Outlook).   \n\n<p align=\"center\">\n  <img src=\"https://cdn.sanity.io/images/55lcecww/production/d4e393bee37510b4495a7564980c55248c0a0eb6-438x491.png\" alt=\"Send and Email function using Outlook as a linked email client to Quickbase.\">\n</p>\n\n\n\n8. Inside the Body, I’m going to use this code snippet pictured below. This creates a table of data we pulled from our Make Request Action and only pulls the data values. As a result, it removes all Quickbase formatting and presents it in a very simple table format. (Feel free to copy this for your own efforts.)\n\n<table style=\"margin-bottom: 30px\">\n  <tr>\n    <td style=\"\"><img src=\"https://cdn.sanity.io/images/55lcecww/production/8669ed0105af3511b2271309ab7e99df6850fad6-577x527.png\" alt=\"Screenshot of Quickbase widget placement focusing on the vertical movement of the widget.\" width=\"100%\">   </td>\n    <td style=\"padding-right: 20px;\">\n <img src=\"https://cdn.sanity.io/images/55lcecww/production/241da4167dd1c185e7f1d82685d1f419e9915b35-102x69.png\" alt=\"Screenshot of Quickbase widget placement focusing on the horizontal movement of the widget.\" width=\"100%\">\n </td>\n    <td>\n      <p align=\"center\">\n      One that looks like this. \n      </p>\n<table border=\"1\" cellpadding=\"10\" cellspacing=\"0\" style=\"border-collapse: collapse;\">\n  <tr>\n    <td style=\"border: 1px solid black;\">Name</td>\n    <td style=\"border: 1px solid black;\">Email</td>\n  </tr>\n  <tr>\n    <td style=\"border: 1px solid black;\">Joe Smith</td>\n    <td style=\"border: 1px solid black;\">email@outlook.com</td>\n  </tr>\n</table>\n</td>\n  </tr>\n</table>\n\n9. Once the body of the email is completed, you can now select and choose the emails you wish to send. This can be a bit tricky as the logic needs to be correct. The emails can be hardcoded in. You can also utilize an email list or a specific email field. (I’m using an email list here for my example.) \n10. By using the search action in the pipeline, this has generated an array of data. Therefore, you must decide what part of the array you would like to use. In the example below, I selected the first value notated by brackets **[0]**. And to translate this value into jinja, the user must insert the brackets between the periods. **{{a.[0].birthday_milestones……}}**. \n\nThis is how we create and set notifications.\n\n<p align=\"center\">\n  <img src=\"https://cdn.sanity.io/images/55lcecww/production/906b6b63161fb3c3005fbbbc00ee57fcbbc29a5e-441x152.png\" alt=\"Screenshot of filtering code to reduce email addresses from a wide array of data gathered.\">\n</p>\n\nIn conclusion, this is a very effective way of sending data outside the Quickbase Realm of users, and in a way that is readable through a table format. \n\n\n## Specific Use Case: User Notifications Table\n\nNow that I have shown you how to set up a general pipeline notification, I will show you a creative way to bring extra functionality to your Quickbase application. \n\nSay the users in your Quickbase application want to control their own notifications and receive only relevant notifications. You can do this through a few formula queries and a connected table. \n\n\n\n\n1. The first thing we must have in the system is a table of contacts with names and emails. This is in addition to the already built in Users Table. So let’s create a brand new contacts table and connect it through a table-to-table connection that pulls those specific fields into the new table. This table will have additional fields for checkboxes that allow the system users to turn on/off. \n\n<p align=\"center\">\n  <img src=\"https://cdn.sanity.io/images/55lcecww/production/6165af836c7ea5c30e6b7c5adf2c61a360cc7f3f-512x360.png\" alt=\"Screenshot of a table of contacts in Quickbase.\">\n</p>\n\n\n2. Now we are going to go over to the **Contacts Table** and set up two fields: A formula query checkbox and a formula query list.\n \n<ol type=\"a\" style=\"padding-left: 60px;\">\n  <li>The checkbox notification will have a query like that shown here. With this, we can view if the user is indeed to receive the email notification. Now that we have the checkbox, we are going to set up the list of people. </li>\n<p align=\"center\">\n  <img src=\"https://cdn.sanity.io/images/55lcecww/production/67e78fb81bd32a4484067e324cad4ce5e710fb89-890x30.png\" alt=\"Example of a checkbox notification query code.\">\n</p>\n  <li>This will be our formula query for our email list, where we retrieve all emails that have a checkbox associated with them. </li>\n<p align=\"center\">\n  <img src=\"https://cdn.sanity.io/images/55lcecww/production/2645cde918c580e51d74196a8772d44b8f455019-931x25.png\" alt=\"Example of a formula query code.\">\n</p>\n</ol>\n\n3. Now that we have our list, we can insert it into our notifications in our pipelines in the above field of “To Addresses”  in Step 10 of setting up a Notification.  \n\n4. Now you have the tools to allow your end users more flexibility for notifications inside of Quickbase. This is the end result of our queries. \n\n<p align=\"center\">\n  <img src=\"https://cdn.sanity.io/images/55lcecww/production/19b6bc5e37ce873a7793f14c44052164e31931b4-1034x386.png\" alt=\"Example of a table of contacts with formula queries and checkboxes enabled.\">\n</p>","slug":{"current":"using-pipelines-for-notifications"},"categories":[{"id":"-95a5c11c-fb39-526f-a713-ac5e88ca2f1d","title":"Pipelines","slug":{"current":"pipelines"}}]}},{"node":{"id":"-622a476d-790e-5cb8-b385-e038ef2f1dcd","title":"How to Add Users to Quickbase Applications","metaDescription":"Follow this step-by-step guide (with pictures) to learn how to add new users to your Quickbase application easily.","body":"This course will help you understand what a user is and how you can add people to a Quickbase account. Follow this step-by-step guide to learn how to add users on an app level, at the Admin Console level, and add multiple users at the same time.\n\n## What Can Quickbase Users Do?\nIf you want someone to interact with an application you [created in Quickbase](https://quandarycg.com/quandary-build/), you need to add them as a user. Otherwise, no one can use the app. \n\n**Users can:**\n<ul style=\"list-style: disc\">\n  <li>Manage or build apps</li>\n  <li>Add, edit, and delete records</li>\n  <li>Interact with multiple functionalities to test</li>\n  <li>Access applications in any account they have access to</li>\n</ul>\n\n\nAn administrator will control whether a user can create an application in each account and what type of permissions a user will have based on their role. \n\n## Step-by-Step Guide to Add Users to Your Quickbase Application\nThere are two ways you can add users to your application.\n\n### Adding Users via the Users Page in the Admin Console\n\n1. First, you need to get to the **Admin Console**. You can do this in three ways:\n<ol style=\"list-style-type: lower-alpha;\">\n  <li>\n    By clicking on the arrow next to your name on the top right, select <strong>“Manage billing account”</strong> from the dropdown.\n    <p style=\"margin: 20px 0; text-align: center;\">\n      <img src=\"https://cdn.sanity.io/images/55lcecww/production/1842a7a3f88d7ed4cc9d323deb0d071b4dd9763e-322x335.jpg\" alt=\"Screenshot to help the reader find the 'Manage billing account' in Quickbase.\" >\n    </p>\n  </li>\n  <li>\n    From the <strong>My Apps</strong> page, click <strong>QuickBase Admin</strong> and then click <strong>“Manage my account”</strong> or <strong>“Manage the realm”</strong> if you are the realm administrator.\n<p style=\"margin: 20px 0; text-align: center;\">\n      <img src=\"https://cdn.sanity.io/images/55lcecww/production/e5e651c83ea3f9b4770fb0cc68c7e91b1681596a-1910x233.jpg\" alt=\"Screenshot to help the reader find the 'Manage my account' button in Quickbase.\">\n    </p>\n  </li>\n  <li>\n    In the <strong>Account Admin</strong> section on the My Apps page, you can click <strong>“Manage My Account.”</strong>\n   <p style=\"margin: 20px 0; text-align: center;\">\n      <img src=\"https://cdn.sanity.io/images/55lcecww/production/e5e651c83ea3f9b4770fb0cc68c7e91b1681596a-1910x233.jpg\" alt=\"Screenshot to help the reader find the 'Manage my account' button in Quickbase.\" >\n    </p>\n  </li>\n</ol>\n\n\n2. When you are in the Admin Console, click on the **Users Tab** on the left-hand side.\n<p style=\"margin: 20px 0; text-align: center;\">\n  <img src=\"https://cdn.sanity.io/images/55lcecww/production/948e55d7054d62b348c4459314b5c52695f977ea-224x596.png\" alt=\"Screenshot to help the reader find the \"User\" button on the left side of the screen in Quickbase.\" >\n</p>\n\n3. Next, click the button **“+ New User”** to add a user.\n\n<p style=\"margin: 20px 0; text-align: center;\">\n  <img src=\"https://cdn.sanity.io/images/55lcecww/production/de59cda5db31e8bc4c13c3fc649f5b316ad7d016-1431x192.png\" alt=\"Screenshot to help the reader find the \"+ New User\" button in Quickbase.\">\n</p>\n\n4. After you click the button, you will have an option to enter the email address of the user you want to add.\n\n<p style=\"margin: 20px 0; text-align: center;\">\n  <img src=\"https://cdn.sanity.io/images/55lcecww/production/8f1e9fe47450c9da174b1e8f65974e0010257e6a-879x299.png\" alt=\"Example screenshot of putting in an email address as a test to add a new user in Quickbase.\" >\n</p>\n\n5. The last step will be to click **Save**.\n\n### How App Managers Can Add Users\n\n1. If you are the application administrator, you can access the **User** table at the application level.\n\n<p style=\"margin: 20px 0; text-align: center;\">\n  <img src=\"https://cdn.sanity.io/images/55lcecww/production/35e989f45157d4b9c392e43922d9b49aba163140-1431x180.png\" alt=\"Screenshot to show the reader where the User table is in Quickbase on an application level.\" >\n</p>\n\n2. Once you are there, click on the **“+ Share app with new user”** button.\n\n<p style=\"margin: 20px 0; text-align: center;\">\n  <img src=\"https://cdn.sanity.io/images/55lcecww/production/dd4a6607f029867bd6bed62f3b50a415ee45d4d1-1432x152.png\" alt=\"Screenshot to help the reader find the \"Share app with new user\" button in Quickbase.\" >\n</p>\n\n3. The third step will be to enter the email address and set the role of the user. \n<p style=\"margin: 20px 0; text-align: center;\">\n  <img src=\"https://cdn.sanity.io/images/55lcecww/production/c329b1908658abcb35e568a6f03315c53f5e1507-785x300.png\" alt=\"Screenshot example of a test email inserted to invite a new user to an application on Quickbase.\" >\n</p>\n\n_**Note**: you can add multiple users at the same time before you send the invitation._\n\n\n4. The last step to add a user this way is to send the invitation by hitting the **“Send”** button. \n\n\n## Tips for Adding Users to Quickbase Applications\n\nIt is important to know what role the new user will play before you add them to your application. This will help determine what type of permissions and access you should give them.\n\nIt is also useful to regularly check the users at the Admin Console level to make sure that you remove users who no longer need to be in an app.","slug":{"current":"how-to-add-users"},"categories":[{"id":"-dc095853-fb86-5354-8647-e35dd8636ed2","title":"Quickbase Outside Of The Box","slug":{"current":"quick-base-outside-of-the-box"}}]}},{"node":{"id":"-8747f676-873d-5064-9455-b52af034ccd6","title":"Changing A Table Key And When To Use It | INTERMEDIATE","metaDescription":"Each record you create in Quickbase generates a unique numerical identifier: a table key or Record ID#. Learn how to modify it with this simple guide.","body":"When you create a new table in your Quick Base application several built-in fields are added automatically, one of which is Record ID#.  The field Record ID# is referred to as your primary keyor key field and is a unique numerical identifier for each record you create.  \n\nIn Quick Base Record ID# is a sequential number starting at Record ID# 1.  This is a useful way for you, and your Quick Base application, to keep track of records and make sure they all have at least one feature that makes them entirely unique.  For every record, the corresponding Record ID# is located in the upper left of the record:\n\n\n![](https://res.cloudinary.com/dnla85pdq/image/upload/v1580194500/QuandaryCG/changing-a-table-01.png)
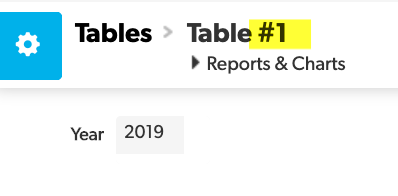
\n\nYou can change this field anytime, but before doing so, make sure this is something you want to do.  Why? Because this can cause your table and its relationships to become unstable. If you need to change the field ID, the connection between that field and all the child records previously associated to it, will be broken.  Before you change the Key field it’s a good idea to export child records in a spreadsheet, including the key field, in order to have a record of past relationships.  \n\nSo let’s discuss some cases where you might want to change the Key Field (Record ID#):\n\n✓ Changing the Key Field can make syncing or importing data simpler.  This way you can keep your system synced to another, such as Salesforce, using the same ID as that outside system.  This way, when updates are made to records in Salesforce, these records can be updated in Quickbase using the Key field found in Salesforce\n\n✓ Changing the Key Field can make creating associations to child tables automatic using a Key Field such as year.  When a child field is assigned a year, it will automatically make an association. Let’s take a closer look at setting up our second example: **Make associations to child tables automatic using a Key Field such as year**.  In this example let’s imagine you have a table of ‘Years’.  Next, you’ll have a table of ‘Credentials’ associated to the ‘Years’ table as child records.\n\nIn order to change your Primary key from Record ID# to a different field:\n\n1. Go to your ‘Years’ table. Make sure there is a field called ‘Year’.\n\n2. Create a record and fill in one record with the year ‘2019’\n\n![](https://res.cloudinary.com/dnla85pdq/image/upload/v1580194500/QuandaryCG/changing-a-table-02.png)
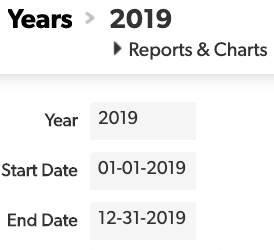
\n\n3. Go to your table settings\n\n4. Click ‘Fields’\n\n5. Note the Record ID# field has a key icon to the right of the field name\n\n6. Then click the checkbox next to the ‘Year’ field and click ‘Set Key’.  ‘Years’ will now take the place of ‘Record ID#’ as the Key Field\n\n![](https://res.cloudinary.com/dnla85pdq/image/upload/v1580194501/QuandaryCG/changing-a-table-03.png)
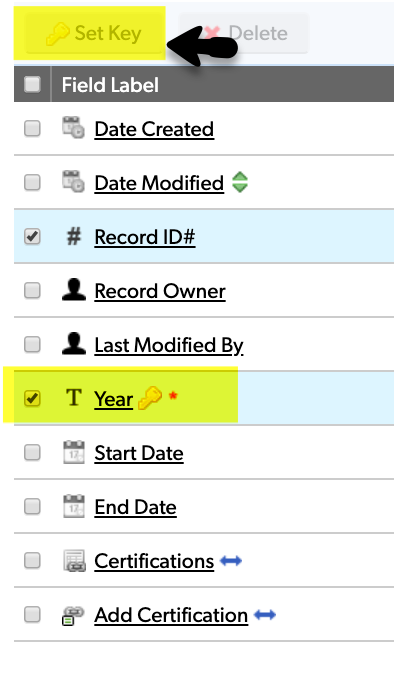
\n\n7. Now, in the ‘Years’ table settings, go to table-to-table relationships and add a relationship to the ‘Credentials’ table, where there are many credentials to one year.\n\n![](https://res.cloudinary.com/dnla85pdq/image/upload/v1580194501/QuandaryCG/changing-a-table-04.png)\n\n8. In the ‘Credentials’ table, add a record and select a year of ‘2019’. Now, if you go to the year table, you’ll find the credential associate to you 2019 record.\n\n![](https://res.cloudinary.com/dnla85pdq/image/upload/v1580194501/QuandaryCG/changing-a-table-05.png)\n\nFor more articles on imports and managing you table click [here](/knowledge-base/quick-base-tables/)","slug":{"current":"changing-a-table-key-and-when-to-use-it-intermediate"},"categories":[{"id":"-5bed183e-fc97-5f28-8c58-da9094825c0d","title":"Tables","slug":{"current":"quick-base-tables"}}]}},{"node":{"id":"-acc865b2-6ad7-56f6-87e2-1e2cb7f3b2b5","title":"Changing the Record Title Seen on Forms | BEGINNER","metaDescription":"The Record Title appears in the header section of any given table and is used to identify the record you are viewing. Learn more.","body":"The **Record Title** appears in the header section of any given table and is used to identify the record you are viewing. \n\nBy default, the title will display the **Record ID#**. \n\nThis can be useful for some tables. But more often than not, you'll want to display more relevant information about the record.\n\n* * *\n\n## How to change the Record Title:\n\n1. From the table you want to update, navigate to **Settings > Advanced Settings** and scroll to **Identifying Records > Record Title**\n\n![](https://res.cloudinary.com/dnla85pdq/image/upload/v1580361032/QuandaryCG/record-title-01.png)\n\n2. To pick a new field for **Record Title**, click the “This field Select a field…” radio button and choose the field you want to use. \n\nIn this example, we will be using **Article Title**.\n\n![](https://res.cloudinary.com/dnla85pdq/image/upload/v1580361030/QuandaryCG/record-title-02.png)\n\n3. Click **Save** to update your changes. When you go back and view a record you will see the updated title.\n\n_Before:_\n\n![](https://res.cloudinary.com/dnla85pdq/image/upload/v1580361030/QuandaryCG/record-title-03.png)\n\n_After:_\n\n![](https://res.cloudinary.com/dnla85pdq/image/upload/v1580361031/QuandaryCG/record-title-04.png)\n\n* * *\nFor more on customizing application preferences, take a look at our article about **[Updating the Default Table Home Page and Default Report Columns](/knowledge-base/reporting-and-dashboards/updating-the-default-table-home-page-and-default-report-columns-beginner/)**.\n\n* * * ","slug":{"current":"changing-the-record-title-seen-on-forms-beginner"},"categories":[{"id":"-14942e20-302e-57b3-a12c-de473ea4cc86","title":"Admin / Application Set Up / Security","slug":{"current":"admin-application-setup-security"}}]}},{"node":{"id":"-4273344e-3a41-5688-b4cb-f995a6f03f30","title":"Workato For Handling Files | BEGINNER","metaDescription":"Almost every platform today allows for some version of file attachments. Take a project management system where you are working amongst engineers or technical resources, handing back and forth technical drawings or specifications. Or a sales system, where you are downloading / revising / re-uploading each version so everyone is always on the same page. …","body":"Almost every platform today allows for some version of file attachments. Take a project management system where you are working amongst engineers or technical resources, handing back and forth technical drawings or specifications. Or a sales system, where you are downloading / revising / re-uploading each version so everyone is always on the same page.\n\nWhats the best way to communicate that? How best do you notify everyone when a new version is available? What if you want to make that file available in a place like DropBox or Box where you can publish documents to your entire team to access once a deal has been signed?\n\nLuckily – Workato has plenty of built in features for accessing, transferring and storing files. The process is such that you host your files in your primary system – Workato acts as the middle man for downloading it – and then re-uploading or sending it where you’d like\n\nAmong the various file processing options at your disposal – common examples might include\n\n✓ Transferring the scope of work to a new Jira project when a deal is Won\n\n✓ Archiving Documents to DropBox to archive older versions from your main system\n\n✓ Upload a new Document in Quick Base and have Workato send it as an attachment via Outlook to all of the internal and external stakeholders involved\n\n✓  Copying attachments received in a Shared Email Inbox and transferring them to a secure server using FTP\n\nLets take the third item as an example:\n\n_When I upload a new Project document in Quick Base – I want that to be sent to all of the stakeholders on my project and attach that file in the email_\n\nFor more info about the basics around setting up a new Recipe – check out this article on [Creating your first Workato Recipe](/knowledge-base/workato-knowledge-center/creating-your-first-workato-recipe-intermediate/)\n\n1. First off – establish your trigger. In this example – we’re saying that I want this to occur when I add a new document to my Quick Base project\n\n![](https://res.cloudinary.com/dnla85pdq/image/upload/v1580277134/QuandaryCG/workato-for-handling-01.png)\n\n2. Next – depending on what system you’re interacting with – you likely have to take the step of actually downloading the file in order to get the actual ‘File Contents’. Using Workato with Quick Base, it looks something like this:\n\n![](https://res.cloudinary.com/dnla85pdq/image/upload/v1580277134/QuandaryCG/workato-for-handling-02.png)\n\nYou would do something similar in Box if your files were being hosted there:\n\n![](https://res.cloudinary.com/dnla85pdq/image/upload/v1580277134/QuandaryCG/workato-for-handling-03.png)\n\n3. With the actual File Contents in hand – you can now move on to sending your email through Outlook. A more structured example of using Outlook can be found here [Using Workato to Send an Email Through Outlook](/knowledge-base/workato-knowledge-center/using-workato-to-send-an-email-through-outlook-beginner/)\n\n![](https://res.cloudinary.com/dnla85pdq/image/upload/v1580277134/QuandaryCG/workato-for-handling-04.png)\n\n4. In your Outlook send email action – there is a space for adding file attachments. In that section, you will include the file content as a new attachment – and you will have completed set up of sending out an email with this document as a new attachment\n\n![](https://res.cloudinary.com/dnla85pdq/image/upload/v1580277135/QuandaryCG/workato-for-handling-05.png)\n\n![](https://res.cloudinary.com/dnla85pdq/image/upload/v1580277135/QuandaryCG/workato-for-handling-06.png)\n\nUsing Workato in a workflow such as this can be a great time saver when it comes to documents. It eliminates the need for you to open open where the file is hosted – download it to your machine – and then transfer or send it to the next link in the chain. More so – using Workato also empowers you to add and create more comprehensive workflows as extensions of examples like the above, such as utilizing [Workato for logging things like email communication](/knowledge-base/quick-base-outside-of-the-box/workato-for-logging-quick-base-emails/)","slug":{"current":"workato-for-handling-files-beginner"},"categories":[{"id":"-19639513-515e-5bd2-b0ac-4fddcab7d3be","title":"Workato Knowledge Center","slug":{"current":"workato-knowledge-center"}}]}},{"node":{"id":"-4fc8c68c-e9cd-5787-a77c-66faeb0bdd1c","title":"How to Use and Adjust Roles in Quickbase | Beginner","metaDescription":"Understanding and assigning roles accurately is critical for creating secure Quickbase apps and protecting sensitive data. Discover how with practical tips..","body":"A [Quickbase application](https://quandarycg.com/custom-quickbase-application-development/) can have a variety of users who need different levels of access. Effective use of these permissions doesn’t just ensure everybody sees the right information. It’s also critical to the security and privacy of applications.\n\nIn this article, we’ll show you how to set up a role, create and edit custom access rules, and manage access permission for a role in Quickbase.\n\n#### What Is a Quickbase Role? \n\nQuickbase roles allow you to control numerous aspects of an application. The most common use of roles is to limit the records a user can view and modify based on table-level rules. Each role has rules for access to each table and the records in it.\n\n#### Default Quickbase Roles\n\nQuickbase applications include three default roles:\n\n1. **Administrator:** The Administrator role is granted to the application owner by default. Users in this role have access to the application settings. Administrators typically have wide-ranging responsibilities within the application, including development, governance, compliance, and oversight roles.\n2. **Viewer:** The Viewer role has the ability to look at tables, records, and associated reports but cannot add or modify records.\n3. **Participant:** The Participant role has the same permission as the Viewer role and can add and modify records in the database.\n\n**Custom Roles** can also be created and tailored to meet the more granular access and security requirements of applications.\n\n#### The Importance of Roles in a Quickbase Application\n\nYou will use Quickbase roles each time you give access to a new user. These roles limit access to sensitive information, improve the user experience, and govern the behavior of users. It is just as important to think about what you are enabling the user to do as what you are restricting when designing user roles. \n\nCustom roles are often designed to only allow users to view the records they create or that have been assigned to them. \n\nThe following examples are provided to illustrate the importance of effective role design and management.\n\n- In an HR application that automates the hiring and credentialing of employees, the product owner does not want everyone accessing the application to see sensitive data like salaries or performance reviews. Custom User roles are designed to prevent unauthorized access.\n- In a project management application, you may improve the user experience and reduce errors, by restricting the roles to view and modify only the projects they are assigned.\n- In a healthcare application, you want to limit the visibility of entire elements of the application. For example, you allow only licensed medical professionals to have access to PHI in compliance with defined HIPAA policies.\n- You may want to limit access to a specific table or group of records, for example, an archive of legacy records subject to a data retention policy.\n\nThe decision of which user gets which role should be discussed with the product owner, and determined before the application goes live.\n\n### Roles UI Overview for Administrators.\n<p style=\"margin: 20px 0; text-align: center;\">\n  <img src=\"https://cdn.sanity.io/images/55lcecww/production/e3c928c9b8f8957e64cbdbefc5452de11fa67646-734x241.png\" alt=\"Quickbase screenshot of the three major roles and default settings.\">\n</p>\n\nRoles are listed in order of precedence. Users in multiple roles have access to the role nearest the top of the list.\n\nParticipant is the default application role unless another role has been designated. The blue checkmark to the right of the role name signifies the default role.\n\nThe default role can be changed by application administrators. To change the default role, you need to toggle the checkbox to the right of the role, and click the Set as Default button. (Note: the Set as Default button is hidden unless a change is pending)\n\nAn existing role can be copied to use as a starting point for a new role by clicking the copy icon located in the last column of the role record.\n\nAdd a new role from scratch by clicking the New Role button in the upper right corner of the UI above the role list. \n\nTo modify an existing role, click the role name to open the configuration UI for the role. \n\n### Modify Role Permissions and UI Access\n\nThe UI for managing roles consists of 3 pages utilizing tab navigation to organize the settings.\n\n#### Permissions Tab\n\nYou can set up the permissions to the app and individual tables for users in the selected role here. The screenshot below shows the Participant role. The key elements of the tab are as follows:\n\n1. Role Name (Edit on the Properties tab)\n2. Navigation Tabs\n3. App Access settings\n4. Table Access settings\n\n<p style=\"margin: 20px 0; text-align: center;\">\n  <img src=\"https://cdn.sanity.io/images/55lcecww/production/375a0deb6a62cb8307f5c735cbda2cc203288c74-948x470.png\" alt=\"Quickbase screenshot showing where users can modify role access, and what the options are.\">\n</p>\n\nThe **App Access** settings determine the role’s permission to:\n\n- **Log in to the application**: In the example screenshot below, the Participant role has access to the application. (Unchecked by default. Enable the checkbox to deny access)\n- **Manage users and share the application**: In the example screenshot below, the Participant role has permission to manage the users of the application. (Enabled by default for the Participant and Administrator roles)\n- **Change the application’s structure and permission**: DOES NOT have permission to change the application structure (build) or permissions. (The checkbox IS NOT enabled by default for the Viewer and Participant roles)\n\n  <img src=\"https://cdn.sanity.io/images/55lcecww/production/6c270d8cc294b77d1bab29355c49fd72d37af2bc-952x466.png\" alt=\"Quickbase screenshot showing App access options in the Permissions tab.\">\n</p>\n\nThe **Table Access** settings control table specific permission for the role. The UI is arranged in a matrix format. Each row of the matrix relates to the name of a table in the application. Settings in the row determine how the role interacts with the records, reports, and information in it.\n\nIn the example screenshot below, these are the table access permission settings of someone in the Participant role:\n\n1. **View Records:** has permission to view all records in all tables in the app.\n2. **Modify Records:** has permission to modify all records in all tables in the app.\n3. **Add Records:** has permission to add records to all tables in the app.\n4. **Delete Records:** has permission to delete records from all tables in the app.\n5. **Save Common Reports:** does not have permission to save common reports in any of the app tables. (All users can create reports for personal use.)\n6. **Edit Field Properties:** does not have permission to edit field properties in any of the app tables.\n7. **Fields:** has full access to all fields in all tables in the app.\n\n<p style=\"margin: 20px 0; text-align: center;\">\n  <img src=\"https://cdn.sanity.io/images/55lcecww/production/fef2cf228b9fb4c7e0fc8b7b7397634f35b5427d-956x501.png\" alt=\"Screenshot in Quickbase setting showing table access options for a user in the Participant role.\">\n</p>\n\nThe **View**, **Modify**, and **Fields** settings utilize multiple choice “drop-down” style UI controls. \nThe **View** and **Modify** settings offer the choices as illustrated in the following screenshot.\n\n<p style=\"margin: 20px 0; text-align: center;\">\n  <img src=\"https://cdn.sanity.io/images/55lcecww/production/7dc0668b2e0c0eddcc26261859d63a1c578552b6-812x253.png\" alt=\"Screenshot of dropdown menu options in Quickbase role settings.\">\n</p>\n\nThe **Fields** setting offers the choices illustrated in the following screenshot.\n\n<p style=\"margin: 20px 0; text-align: center;\">\n  <img src=\"https://cdn.sanity.io/images/55lcecww/production/19ce1e7a85d087e9d743656b929a99721eaa8614-618x162.png\" alt=\"Screenshot of dropdown menu options in Quickbase role settings for Fields.\">\n</p>\n\nThe **Add**, **Delete**, **Save Common Reports** and **Edit Field Properties** checkboxes are toggled on/off with a single mouse click. The following illustration shows a detailed view of an enabled and disabled checkbox. \n\n- When the option is enabled (Allowed) for the table, the checkbox is colored green. \n- When the option is disabled (Not Allowed) for the table, the checkbox is “grayed out.”\n\n<p style=\"margin: 20px 0; text-align: center;\">\n  <img src=\"https://cdn.sanity.io/images/55lcecww/production/73e91ada16a720b3a8afc0848d694330e11d6e70-239x158.png\" alt=\"Screenshot in Quickbase showing what enabled and disabled role permission settings look like.\">\n</p>\n\n#### User Interface Tab\nThe settings and controls on the User Interface tab allow the UI to be customized to fit the needs of users in the selected role. This tab is densely populated with controls that can be easily overlooked. \n\nThe example screenshot on the next page continues following the Participant role. It is labeled to show the location of each of the controls listed below:\n\n1. The **application homepage** users in the role will see when logging in is set using the two dropdown fields on this tab. The home pages you have created inside of the current application will be available in each select list. In the example screenshot below, the role is using default settings. <div style=\"margin-left: 20px;margin-bottom:20px;\">\n     <p style=\"margin-bottom:0px\">a. <strong>Desktop home page</strong>: for users that sign in from a desktop, laptop, notebook, etc.</p>\n     <p>b. <strong>Mobile home page</strong>: for users that sign in with a mobile device.</p>\n   </div>\n2. **Report Display settings** include the number of reports the role has access to and a link to the admin UI for managing report access.\n3. Allow users to **create and customize reports** in the application.\n4. Allow users to **manage personal reports**, **notifications**, a**nd other customized views** within the application; essentially, controlling what data you see and how you interact with it on a personal level.\n5. Menu and Table Display settings **hide application UI elements**. Hiding in this context means denying the permission to use it. The application-level elements that can be hidden are: <ul style=\"margin-left: 40px; margin-bottom: 10px;\">\n  <li>App and Table settings</li>\n  <li>Users</li>\n  <li>Favorites &amp; Recents</li>\n  <li>Search</li>\n  <li>Help</li>\n  <li>Text as Another Role</li>\n</ul>\n\n6. Menu and Table Display settings **hide table UI elements**, such as: <ul style=\"margin-left: 40px; margin-bottom: 10px;\">\n  <li>Table Bar</li>\n  <li>Add Button/Links</li>\n  <li >Import/Export Links</li>\n  <li>Save as a Spreadsheet Link</li>\n  <li>Multi-Record Options</li>\n  <li>Email Button/Links</li>\n  <li>Print Links</li>\n</ul>\n\nIn the example screenshot below, the Participant role is using a custom home page for desktop and mobile devices. It has access to 104 reports but cannot customize them or create new ones. Access to personal links is allowed. Within the UI, the role may not Test as another role or user. The role has full access to the table-level settings.\n\n<p style=\"margin: 20px 0; text-align: center;\">\n  <img src=\"https://cdn.sanity.io/images/55lcecww/production/e74145e1172d81a95318a9029ad80d27cb486f0f-880x464.png\" alt=\"Screenshot in Quickbase showing the role adjustments and hiding UI.\">\n</p>\n\n#### Properties Tab \nThe properties tab is where the role name and description can be set and modified. When using the default roles it isn’t necessary to enter a description. But when creating custom roles you should always describe why the role exists in terms of what it can do that other roles cannot.\n\n### Tips for Using Roles in Quickbase\nIt is important to remember that you must assign the most suitable role for each user, giving them the most appropriate level of control and not more. \n\nWhen creating a new role, keep the necessary requirements for that role in mind and make sure you are not allowing users to have access to sensitive data that they should not see.  \n\nFinally, you can associate a custom form with roles, providing different add, view, and edit forms for each role, or a different form per role for users accessing your application.  \n","slug":{"current":"how-to-use-and-adjust-roles-in-quickbase"},"categories":[{"id":"-3711bc9d-2dc7-582c-b894-03c210cdb205","title":"Roles & Permissions","slug":{"current":"roles-and-permissions"}}]}},{"node":{"id":"-c6c823da-b494-5d0e-b466-40c7e55e74fc","title":"Syncing your Survey Monkey Data | BEGINNER","metaDescription":"SurveyMonkey is a leading tool for collecting survey information. Combine your survey data with Workato and enhance your efficiency. Learn how with this guide.","body":"Surveys are a great way to collect information, with SurveyMonkey being one of the leading tools to do so.  When your surveys are completed you can sign into SurveyMonkey and look at all your data. But wouldn’t it be better if the same data was in your central database rather than in yet another system?  Reasons for storing your survey results might include:\n\n✓ Providing visibility to people who are not SurveyMonkey users\n\n✓ Allow for reporting across multiple surveys\n\n✓ Associate responses with users in your database\n\nIn this article we’ll discuss how to setup a Workato recipe which save the results of your survey to your Quick Base database application.\n\nFirst, you’ll want to set up your Quick Base table where you want survey information to be stored. **Log into your Quick Base application and take the following action:**\n\n1. Create a new table\n2. Add a text field and call it ‘Question 1’.\n3. Add another text field and call it ‘Survey ID’ \n\n**Now log into your SurveyMonkey account:**\n\n1. Create a new survey\n2. Select ‘Start from Scratch’\n3. Name your survey and add a multiple-choice question or text question.\n\n> EDITORS NOTE:\nAt the time of this article, several SurveyMonkey question types will not work with Workato (ex. Matrix and Star types).  Workato is actively working on an update at the time this article was written.\n\n4. Save your new survey4Go to collect ‘Responses’ section of your new survey on the tabs in the upper ribbon and click ‘Add a New Collector’ and select ‘Web Link’\n5. Go to collect ‘Responses’ section of your new survey on the tabs in the upper ribbon and click ‘Add a New Collector’ and select ‘Web Link’\n6. Copy the resulting URL into your browser and complete at least one survey (This will be used later to display values in the triggers of your Workato recipe).\n\n**Now sign into your Workato account:**\n\n1. Click ‘Create a new recipe’\n\n2. Assign the trigger as shown below:\n\n![](https://res.cloudinary.com/dnla85pdq/image/upload/v1580276387/QuandaryCG/syncing-01.png)\n\nClick ‘Next’\n\n3. Assign a connection:\n\n![](https://res.cloudinary.com/dnla85pdq/image/upload/v1580276388/QuandaryCG/syncing-02.png)\n\nClick ‘Next’\n\n4. Designate which survey will be used (the one you set up at the beginning of this article)\n\n![](https://res.cloudinary.com/dnla85pdq/image/upload/v1580276388/QuandaryCG/syncing-03.png)\n\n5. Now you’ll create your action.  Select your Quick Base app and the action ‘create record’:\n\n![](https://res.cloudinary.com/dnla85pdq/image/upload/v1580276388/QuandaryCG/syncing-04.png)\n\nClick ‘Next’\n\n6. Select your Quick Base connection and select your sub-domain and authentication information:\n\n![](https://res.cloudinary.com/dnla85pdq/image/upload/v1580276388/QuandaryCG/syncing-05.png)\n\nClick ‘Next’\n\n7. Now we’ll configure our action.  First, select the application where your Quick Base newly created Quick Base table is located.  Enter your application token and select the table you want your survey data sent:\n\n![](https://res.cloudinary.com/dnla85pdq/image/upload/v1580276388/QuandaryCG/syncing-06.png)\n\nOnce the table is selected additional fields will become available.  Select the fields that you want to add from your survey to your Quick Base application.  To do, start by selecting the desired fields from the ‘Table field list’:\n\n![](https://res.cloudinary.com/dnla85pdq/image/upload/v1580276388/QuandaryCG/syncing-07.png)\n\nThe fields you’ve selected will now appear below.  In each field you’ll select the SurveyMonkey response that will be mapped to Quick Base.  In the screen below you can see that we are assigning values for the fields on the right side of the screen from our list of values in the left side under ‘Completed survey response’\n\n![](https://res.cloudinary.com/dnla85pdq/image/upload/v1580276389/QuandaryCG/syncing-08.png)\n\nOnce completed, click ‘Finish\n\n8. Now that you’ve completed your recipe it’s time to test.  Click the green button in the upper right of your screen to run your first test:\n\n![](https://res.cloudinary.com/dnla85pdq/image/upload/v1580276388/QuandaryCG/syncing-09.png)\n\nWhen clicked a test job will be run, creating a record based on the last survey response that was completed in SurveyMonkey.  When the test is complete you should see this message:\n\n![](https://res.cloudinary.com/dnla85pdq/image/upload/v1580276388/QuandaryCG/syncing-10.png)\n\nYou should also see a newly created record in your Quick Base table based on the test you just ran.\n\nIf Workato is unable to find any jobs, return to your SurveyMonkey account and complete a test survey.  Once completed, rerun your test in Workato.\n\n9. Check to make sure a record has been created in Quick Base. It should look like this:\n\n![](https://res.cloudinary.com/dnla85pdq/image/upload/v1580276388/QuandaryCG/syncing-11.png)\n\nWe’ve included the Survey ID here to show that you can not only extract information entered by the user, but also underlying information about the survey itself.  In this case we can use the survey ID for the purposes of categorizing and reporting on the survey to which the Quick Base record corresponds. You can imagine that if you have multiple surveys entering the same table it might be very useful to have a record of which survey was used to create the record.\n\nKeep in mind that this is the simplest version of a SurveyMonkey to Quick Base Workato recipe. Once you’ve mastered this basic recipe you can go on to add more fields to your Quick Base table, map additional survey answers or [add additional logic](/knowledge-base/workato-knowledge-center/adding-conditional-actions-to-your-workato-recipe-intermediate/).  \n\nKeep an eye out for additional Workato articles coming soon in our Workato section of Quandary’s Knowledge Base here.","slug":{"current":"syncing-your-survey-monkey-data-beginner"},"categories":[{"id":"-19639513-515e-5bd2-b0ac-4fddcab7d3be","title":"Workato Knowledge Center","slug":{"current":"workato-knowledge-center"}}]}},{"node":{"id":"-5b3eeeb6-fe59-594c-b0ba-af20401e8cdf","title":"How to Utilize API AddRecord in Quickbase (Guide) | ADVANCED","metaDescription":"Quickbase's API_AddRecord call is one of the most basic API calls. It empowers a user to create a single record based on pre-defined conditions. Learn More.","body":"The API_AddRecord call is one of the most basic API calls in [Quickbase](/quick-base-solutions/). In short, it empowers a user to create a single record based on pre-defined conditions.\n\nCommon use cases for using the API_AddRecord might include:\n- Creating a custom button in Quickbase that creates a new record with one click\n- Implement in Quickbase Webhooks to add a record once certain changes occur\n- Custom Scripting (either client or server-side)\n\nLet’s picture a scenario where you have a system where users ‘vote’ on a particular item or issue. \n\nIn this example, you want them to click a button to ‘vote’. And by doing so, a record is added that logs their user and a ‘yes’ response on whatever topic is being discussed.\n\nAn easy solution would be putting an API_AddRecord into a button to save several steps.\n\n## 6 Steps to Setting up an API_Add Record in Quickbase\n\n> EDITORS NOTE:\nThis document will only cover the URL Alternative for utilizing API_AddRecord. The URL alternative is applicable for use in nativeQuickbase buttons, Webhooks, as well as GET requests in custom scripting. This article does not cover POST Requests (although the details are transferrable).\n\n_Please reference the Quickbase <a target=\"_blank\" href=\"https://help.quickbase.com/api-guide/index.html\">API documentation</a> for\n<a href=\"https://help.quickbase.com/api-guide/add_record.html?tocpath=Quick%20Base%20API%20Call%20Reference%7C_____6\" target=\"_blank\">API_AddRecord</a>\n   for any additional information that is not included below_\n\nLet’s start with the example provided in the Quickbase API Documentation:\n\n~~~\nhttps://target_domain/db/target_dbid?a=API_AddRecord&_fnm_second_year=1776&_fid_8=changed&ticket=auth_ticket&apptoken=app_token\n~~~\n\n### Step 1: The Target\n\nThe target is the Quickbase table you want to add a record in. The colored text below represents the target.\n\n~~~\nhttps://target_domain/db/target_dbid?a=API_AddRecord&_fnm_second_year=1776&_fid_8=changed&ticket=auth_ticket&apptoken=app_token\n~~~\n\nThe **target_domain** is your Quickbase realm. In my case, my Quickbase realm is quandarycg.quickbase.com. So, the first part of my URL would look like this:\n\n`https://quandarycg.com/db/`\n\nThe **target_dbid** is the table you want to add a record in. Every table in Quickbase is uniquely identified by a table id. To find your unique table id, navigate your browser to the table where you are trying to add a record. \n\nOnce there, take a look at your browser's URL. The text you are looking for is the string of characters that immediately follow after the “/db/”, and stops before the “?a”. \n\nIn the case of the <a href=\"https://quandarycg.quickbase.com/db/bnz6hr7j9\" target=\"_blank\">Quandary CG Knowledge Base</a>, we have a table for ‘External Records’ to hold test data from Knowledge Base users. \n\nThat table is found via the following link for us:\n<a href=\"https://quandarycg.quickbase.com/db/bn6wwekqv?a=td\" target=\"_blank\">https://quandarycg.quickbase.com/db/bn6wwekqv?a=td</a>\n \n\nThe Target DBID then, is **bn6wwekqv**.\n\nOnce you have your Quickbase realm and your target DBID, you bring it all together to build your Target for this API call. From the above examples:\n<a href=\"https://quandarycg.quickbase.com/db/bn6wwekqv\" target=\"_blank\">https://quandarycg.quickbase.com/db/bn6wwekqv</a>\n\n### Step 2: The API Call\n\nThe API call is how you tell Quickbase what you are trying to do. It is the core piece that determines how Quickbase interprets everything else and what it needs from you. \n\nEverything in the API call should start with “?a=API_”. Since this document is about adding records, your full API call should read as “?a=API_AddRecord”. **Make sure you do not forget the “API_” piece**. \n\nThe updated URL will be as follows:\n<a href=\"https://quandarycg.quickbase.com/db/bn6wwekqv?a=API_AddRecord\" target=\"_blank\">https://quandarycg.quickbase.com/db/bn6wwekqv?a=API_AddRecord</a>\n\n### Step 3: Using App Tokens\n\n[Depending on your app](/quandary-build/), Application Tokens may or may not be required. For more info on how to use app tokens, please reference the Application Tokens article. \n\nIf they are required, then your URL needs to call out that essential piece. Doing so requires that you add “&apptoken=” as the next part of your URL. \n\nThe updated URL would be as follows:\n<a href=\"https://quandarycg.quickbase.com/db/bn6wwekqv?a=API_AddRecord&apptoken=itgoeshere\" target=\"_blank\">https://quandarycg.quickbase.com/db/bn6wwekqv?a=API_AddRecord&apptoken=itgoeshere</a>\n\n### Step 4: Authentication/Ticket\n\nA requirement of an API call is that the user or process making the call be logged in or authenticated in some form. For simplicity, go with User Tokens. For an explanation of user tokens, please reference the User Tokens article. \n\nIncorporating a user token is similar to using apptokens, whereby you add an additional URL param to your API call for Quickbase to read. That string is “&usertoken=”. \n\nThe updated URL will be as follows:\n<a href=\"https://quandarycg.quickbase.com/db/bn6wwekqv?a=API_AddRecord&apptoken=itgoeshere&usertoken=usertokengoeshere\" target=\"_blank\">https://quandarycg.quickbase.com/db/bn6wwekqv?a=API_AddRecord&apptoken=itgoeshere&usertoken=usertokengoeshere</a>\n\n\n### Step 5: Setting Field Values\n\nSetting field values means that when your new record is created, you can set certain field values to automatically fill and save. From the example at the beginning with voting on a topic, we want to pre-define fields to capture who the user is and what their answer is on a certain topic.\n\n> BEST PRACTICE:\nIt is strongly recommended that you use field ID’s in all API calls. While the QuickbaseAPI documentation/examples will show that you can use Field Names in lieu of Field ID’s, it is advised you do not use them given that they can change over time while the Field IDs are immutable.\n\nSetting different field values is just a matter of rinse and repeat using _fid_#=. Make sure the field ID of the various inputs you want to set in the **target table**. \n\nBefore you actually set up your API call, you should identify the various inputs you want to set and their associated Field IDs. \n\nWith those identified, you will append _fid_#=value to your URL string for each field you want a value set for. For example,\n\n__fid_6=value1&_fid_7=value2&_fid_8=value3_\n\nNotice each new field value is separated by &, but the general format is the same. That string should be appended to what you have set up from Parts 1-4. To set up our button to vote on a topic described in the very beginning.\n\nIt would look something like this:\n\n`https://quandarycg.quickbase.com/db/bn6wwekqv?a=API_AddRecord&apptoken=itgoeshere&usertoken=usertokengoeshere&_fid_6=_curuser_&_fid_7=I’m voting Yes&_fid_8=The Topic I’m voting on is this Article being awesome`\n\n### Step 6: Test it\n\nTo see a simple example in action, click the link below:\n\n<a href=\"https://quandarycg.quickbase.com/db/bn6wwekqv?a=API_AddRecord&_fid_6=I created a new record through the API&_fid_10=today\" target=\"_blank\">https://quandarycg.quickbase.com/db/bn6wwekqv?a=API_AddRecord&_fid_6=I created a new record through the API&_fid_10=today</a>\n\n**You should see a result like this:**\n\n![](https://res.cloudinary.com/dnla85pdq/image/upload/v1580798648/QuandaryCG/api-add-01.png)\n\nYou can also try it out in the <a href=\"https://quandarycg.quickbase.com/db/bn22wn4cx?a=dr&rid=5&rl=bee3\" target=\"_blank\">Quandary Knowledge Base</a> to see it live in Quickbase.\n\n![](https://res.cloudinary.com/dnla85pdq/image/upload/v1580798648/QuandaryCG/api-add-02.png)\n\nTo take the next step, take a look at the article on [API_EditRecord](/knowledge-base/quick-base-api/api-editrecord-advanced/) to modify existing records\n\n> EDITORS NOTE:\nIn March 2019, Quickbase released a clist Parameter that can now be included in all AddRecord and EditRecord calls. By including this in your API call, you can define a list of field ids such as “&clist=1.2.3.4.5” such that the XML response returns the value of these fields in the record","slug":{"current":"api-addrecord-advanced"},"categories":[{"id":"-46109a16-4c3d-593f-a8f1-11046af26ef6","title":"Quickbase API","slug":{"current":"quick-base-api"}}]}},{"node":{"id":"-2eb7b721-d75a-5cce-a9d8-fd8be02cbeae","title":"Creating Your First Workato Recipe | INTERMEDIATE","metaDescription":"Every Workato recipe consists of a trigger and an action. Make your system actionable by learning how to create a Workato recipe step-by-step. ","body":"In this article we’ll cover how to create a Workato recipe step-by-step. Here are a few concrete examples of what a Workato recipe can do:\n\n✓ When emails are sent to a specific address add the email attachment(s) to your database\n\n✓ When an invoice is generated in your database reformat the information and enter it into Quickbooks Online\n\n✓ When a new row is added in Google Sheets add a record to your Quick Base database\n\nIn this article we’ll walk through the 3rd example (Google Sheets > Quick Base) because its quite simple.  Once you grasp a simple example you’ll be able to build upon your success to tackle more complex recipes.\n\nAt its core, every recipe consists of a trigger and an action. In our Google Sheets to Quickbase example the recipe trigger will be the addition of a new row in our Google Sheet.  Our action will be the addition of a new record in Quickbase\n\nLet’s look at how to set this up:\n\n1. Sign in to your Workato account\n2. Make sure you are on the ‘Recipes’ tab and click the green button labeled ‘Create a new recipe’.\n\n![](https://res.cloudinary.com/dnla85pdq/image/upload/v1580282267/QuandaryCG/creating-your-01.png)\n\n3. Now select your application (Google Sheets) and your trigger (When a new row is added).  The result should look like this:\n\n![](https://res.cloudinary.com/dnla85pdq/image/upload/v1580282267/QuandaryCG/creating-your-02.png)\n\nOnce complete, click ‘Next’\n\n4. Now you will be asked to select a ‘connection’ to your Google Sheets. A connection is simply you supplying information to access your Google Sheets account.  If you’ve done so before you can select from an existing connection. Otherwise you will need to create a new one.  If you need help setting up one of these connections, check out our article about creating a connection here. Once complete, your connection should appear as shown in the pic below:\n\n![](https://res.cloudinary.com/dnla85pdq/image/upload/v1580282268/QuandaryCG/creating-your-03.png)\n\n5. Once you select your ‘Connection’ you’ll be prompted to select a spreadsheet from your Google Sheets account as well as the sheet/tab in your spreadsheet you wish to use.\n\n![](https://res.cloudinary.com/dnla85pdq/image/upload/v1580282268/QuandaryCG/creating-your-04.png)\n\nClick ‘Next’\n\n6. Now, you’ll tell Workato what app you want your action to take place in and what kind of action you want to perform.  In our case, our action is creating a new record in our Quickbase application as shown below:\n\n![](https://res.cloudinary.com/dnla85pdq/image/upload/v1580282267/QuandaryCG/creating-your-05.png)\n\nThen click ‘Next’\n\n7. Now you will be asked to create a connection for your Quickbase app.  Select from your existing accounts. If you have not already created a Quickbase connection do so now.  Remember to use the article here to learn how to create a connection.\n\n![](https://res.cloudinary.com/dnla85pdq/image/upload/v1580282268/QuandaryCG/creating-your-06.png)\n\nWith your connection selected, click next\n\n8. Now we’re ready to configure our action.  Select your application from the list of applications you have access to. [Add an ‘Application Token’ if required](/knowledge-base/admin-application-setup-security/application-tokens-intermediate/).  Then, specify the table within your application where you would like to add records.\n\n![](https://res.cloudinary.com/dnla85pdq/image/upload/v1580282268/QuandaryCG/creating-your-07.png)\n\nClick ‘Finish’ \n\n9. Once you have selected your table from the previous step, fields will appear, allowing you to map fields from Google Sheets to Quickbase. Select the fields you’d like to use from the ‘Table field list’:\n\n![](https://res.cloudinary.com/dnla85pdq/image/upload/v1580282268/QuandaryCG/creating-your-08.png)\n\nThe fields you’ve chosen will appear below the ‘Table field list’. In each Quickbase field choose the Google Sheets field/column whose value you’d like to have entered:\n\n![](https://res.cloudinary.com/dnla85pdq/image/upload/v1580282268/QuandaryCG/creating-your-09.png)\n\nClick ‘Finish’\n\n10. If there are no errors in your recipe, you should see the following screen:\n\n![](https://res.cloudinary.com/dnla85pdq/image/upload/v1580282269/QuandaryCG/creating-your-10.png)\n\n11. Click the green ‘ Test Recipe’ button in the above pic.  This looks for new rows in Google Sheets and, if one is found, will create a new record in Quickbase.  If there are no items in your Google Sheet, no jobs will be processed. If no jobs exist, simply go to your Google Sheet and add one to perform the test.\n\n>  EDITORS NOTE:\nKeep in mind that each recipe configuration will be slightly different based on the application(s) you use and the triggers and actions you wish to implement.\n\nCongratulations!  You’ve now successfully built a recipe in Workato.  For more articles and how-tos on Workato click [here](/knowledge-base/workato-knowledge-center/)","slug":{"current":"creating-your-first-workato-recipe-intermediate"},"categories":[{"id":"-19639513-515e-5bd2-b0ac-4fddcab7d3be","title":"Workato Knowledge Center","slug":{"current":"workato-knowledge-center"}}]}},{"node":{"id":"-84ecb0d4-39f5-5cb8-9cab-dcd6463c9055","title":"Using a Formula-URL Field in Quickbase - INTERMEDIATE","metaDescription":"Quickbase Formula-URL fields are a great way to create custom links, helping users navigate to forms and pages. This walkthrough shows you how to set them up.","body":"Formula-URL fields are a great way to create custom links, helping users navigate to forms and pages within and outside of [Quickbase](/quick-base-solutions/).  \n\n**Here are a few examples:**\n1. Create URLs to your company profile page\n2. Switch from one form to another\n3. Update a record\n\nLet’s go through these examples one at a time: \n\n## 1. Example: Create URLs to your company profile page\n\nSay your company stores a biography of each employee on its public website. The link to each profile follows a similar file path. For example, [www.]mycompany.com/profiles/tina_bradley'. \n\nIn this case, ‘tina_bradly” at the end of the URL will direct the user to Tina Bradley’s profile\n\nUsing an employee’s [FirstName] and [LastName] from their employee record you can construct a URL-Formula creating a link on each employee’s profile using the following formula:\n\n~~~~\n[www.]mycompany.com/profiles/' & [FirstName] &”_”& [LastName]\n~~~~\n\nThe first part of the formula is hardcoded with \"www[.]mycompany.com/profiles/\". Then we use the ‘&’ symbol to append the root URL with the employee’s [FirstName].  \n\nAfter that, we add an underscore with ‘&”_”’. Last we add the last name to the URL string with ‘& [LastName]’\n\n## 2. Example: Switch from one URL form to another\n\nIn this case, suppose you have a table where your company stores time cards. You’d want to show different fields depending on whether the timecard is for regular hours or time-off.  \n\nIn this case, you can create one form for ‘regular’ time cards and a different form for ‘time-off’ time cards.  \n\n**Once you’ve created your two forms you can create your formula-URL field in Quickbase:**\n1. Create a Formula-URL field\n2. Name the field ‘Time-off’\n3. In the formula area paste this formula: URLRoot()&”db/”&Dbid()&”?a=dr&rid=”&ToText([Record ID#])&”&dfid=YOUR_FORM_ID”\n4. Once you have your two forms created, open the time card table ‘settings’ and locate the form ID# of your ‘time-off’ form\n5. Update your formula in step 3 by replacing the last section _(YOUR_FORM_ID)_ with the form ID# you just located.  Your formula should now look something like this:\n\n~~~~\nURLRoot()&\"db/\"&Dbid()&\"?a=dr&rid=\"&ToText([Record ID#])&\"&dfid=10\"\n~~~~\n\n6. Now go to your ‘regular’ time card form and place the formula-URL field you’ve just created on the bottom of the form.\n\n7. Now, let’s look at what our Quickbase formula is doing in each component part:\n\n - _urlroot(): your Quickbase root URL (https://[companyname].quickbase.com)_\n - _“db/”: in every QBase URL_\n - _dbid(): table ID where you’re adding this field_\n - _“?a=dr: Action = Display Record_\n - _rid=”: tells Quickbase to look for the Record ID_\n - _[record ID#]: brings in the record ID field_\n - _“&dfid=5”:tells the formula to use the form with formID 5_\n\n## 3. Example: Modify a record by clicking the URL button\n\nOne great feature of Quickbase formula-URL fields (and Rich Text fields) is the ability to create buttons, which can incorporate [API capabilities](/quandary-connect/) (including things like modifying or adding records). \n\nLet’s say your company has a number of projects. When a project is complete, you’d like the project manager to open the record and click a button to mark the project complete. \n\nIn this example, we’ll create a checkbox field called ‘Project Complete’. When checked, the project will be considered complete. Then we’ll create another field to store our button. When the button is clicked it will check the ‘Project Complete’ field. \n\n1. Create a checkbox field and name it ‘Completed’\n2. Create a new formula-URL field. Name it: ‘Mark Project Complete’\n3. Add the following text to your formula:\n\n~~~~\nURL=URLRoot() & \"db/\" & Dbid()  & \"?act=API_EditRecord\"& \"&rid=\" & URLEncode ([Record ID#])& \n\"&_fid_Your Field ID=1\" & \"&apptoken=\" & \"Your app token\";\n~~~~\n\n4. Now replace ‘Your Field ID’ with the ID of your ‘Completed’ checkbox field and ”Your app token” with the application token from your Quickbase App\n\nSo, why create a button to check the ‘Project Complete’ checkbox field? Why not just have the user click the checkbox?  \n\nFirst, by creating a workflow of a button, you can make actions (such as completing a project) more explicit to users.  \n\nSecond, this is just a basic example that can be used as a building block for more sophisticated buttons. For example, your Quickbase formula might stipulate that the button be shown on a record only if certain conditions are met.  For instance, the button might only appear on a project if that project has already been awarded.\n\nIf you want to take it to the next step you can start doing such things as inserting JavaScript into your field to redirects, add pop-ups, and a whole variety of cool tricks.\n\n>EDITOR'S NOTE: \nQuickbase Formula-URL Fields are synonymous with ‘Buttons’.  A Quickbase formula-URL can either be read as its URL string or can be converted into button format within field settings.\n\nVisit here to demo examples <a href=\"https://quandarycg.quickbase.com/db/bn22wn4cx?a=dr&r=e\" target=\"_blank\">in this article</a>.","slug":{"current":"using-a-formula-url-field-intermediate"},"categories":[{"id":"-51554930-c85d-504e-b1fc-9e93b25a4991","title":"Fields & Formulas","slug":{"current":"quick-base-fields-and-formulas"}}]}},{"node":{"id":"-07f4490b-3e3c-5659-91f7-26fdca3b510b","title":"Navigating the My Apps Page in Quickbase | BASICS","metaDescription":"Learning to navigate the My Apps Page is an important beginning step in familiarizing yourself with the Quickbase environment. Learn more.","body":"Learning to **navigate the My Apps Page** is an important beginning step in familiarizing yourself with the Quickbase environment.  \n\nYour Quickbase realm contains all apps for your organization.\n\nAn app in Quickbase is a collection of related tables within a single environment.  Some organizations choose to locate all business information within a single application. Others find a need to create multiple applications within their realm to manage discrete processes, such as sales and accounting.  \n\n## Navigating the My Apps Page in Quickbase\nThe \"My Apps\" page is a dashboard within your realm where you can view, categorize, search, add and remove apps within your organization’s realm.  \n\nTo view the My Apps page, click the “My Apps” icon in the upper-left of your screen in the tables ribbon:\n\n![](https://res.cloudinary.com/dnla85pdq/image/upload/v1580350109/QuandaryCG/navigating-01.png)\n\n### 1. VIEWING YOUR APPS\n\nHere is what a typical My Apps Page looks like:\n\n![](https://res.cloudinary.com/dnla85pdq/image/upload/v1580350200/QuandaryCG/navigating-10.png)\n\n> EDITORS NOTE:\nThe My Apps page will only display the apps in your realm which you currently have access to.  Apps which do you do not have access to will not appear in your ‘My Apps’ page.\n\nThis view displays the name and an icon for each app in your realm.  An additional ‘indicator’ may appear on the upper-left of the icon indicating what level of access you have in that application. Click here for a full list of indicators.  \n\nIf you would like to view the same apps in list format, switch your view by clicking the icon with three horizontal line:\n\n![](https://res.cloudinary.com/dnla85pdq/image/upload/v1580350105/QuandaryCG/navigating-02.png)\n\nYou will now see your apps in ‘list’ view, which provides a bit more information:  \n\n![](https://res.cloudinary.com/dnla85pdq/image/upload/v1580350109/QuandaryCG/navigating-03.png)\n\nNow you can see multiple columns, including the last time the app was visited, the category and the apps manager.  \n\n### 2. CATEGORIZING YOUR APP\n\nWhile this example realm contains four applications, your realm might contain dozens, or even hundreds of apps. In this case there is likely a need to sort and search in order to find your application.  \n\nOne method to make it easier to find your app is to assign a category.  To do so, click the dropdown field in the ‘category’ column:\n\n![](https://res.cloudinary.com/dnla85pdq/image/upload/v1580350108/QuandaryCG/navigating-04.png)\n\nIn this case, our “Sales CRM” has been categorized as ‘Demo’.  If I want to add a category or edit an existing one, use the ‘Add’ and ‘Edit’ options from the dropdown.\n\n### 3. LOCATING YOUR APP\n\nIf you need to search for an application from a long list of apps, you can now filter by your assigned categories using the funnel icon next to the search box:\n\n![](https://res.cloudinary.com/dnla85pdq/image/upload/v1580350107/QuandaryCG/navigating-05.png)\n\nYou may also use the search box to specify the name of your app.\n\n### 4. ADDING AN APP\n\nYou can also add an application from this screen or <a href=\"https://quandarycg.zendesk.com/hc/en-us/articles/360021164771-Creating-an-App-from-the-Quick-Base-Exchange-BEGINNER\" target=\"_blank\">explore sample applications</a>, which others have created:\n\n![](https://res.cloudinary.com/dnla85pdq/image/upload/v1580350110/QuandaryCG/navigating-06.png)\n\n### 5. REMOVING APPS\n\nIf you have a large number of apps, it’s possible these are cluttering your ‘My Apps Page’ with applications that are not currently relevant to your work.  In this case you will want to remove some of the applications from the page. To do so, click the eyeball-shaped icon next to the app you wish to remove:\n\n![](https://res.cloudinary.com/dnla85pdq/image/upload/v1580350110/QuandaryCG/navigating-07.png)\n\n### 6. MANAGE MY ACCOUNT\n\nIf you are a Realm Manager, and therefore have account level access across your Quickbase applications, you will also see a link to ‘Manage My Account’:\n\n![](https://res.cloudinary.com/dnla85pdq/image/upload/v1580350108/QuandaryCG/navigating-08.png)\n\nClick the link to enter your account, where you can view all of your apps, groups, users and permissions across your Quickbase realm:\n\n![](https://res.cloudinary.com/dnla85pdq/image/upload/v1580350108/QuandaryCG/navigating-09.png)\n\nFor more ideas and information regarding app navigation and administration click [here](/knowledge-base/admin-application-setup-security/)","slug":{"current":"navigating-the-my-apps-page-basics"},"categories":[{"id":"-14942e20-302e-57b3-a12c-de473ea4cc86","title":"Admin / Application Set Up / Security","slug":{"current":"admin-application-setup-security"}}]}},{"node":{"id":"-2a153b79-679a-534c-bdd4-a58f4599a832","title":"Quickbase Developers’ Guide: Webhooks 101 | BEGINNER","metaDescription":"This Quickbase Developers' guide to webhooks will cover what webhooks are, why they are important, and how to set them up. Learn more.","body":"Quickbase Webhooks are a useful way to connect different web applications and services. [Quickbase](https://quandarycg.com/quick-base-solutions/) supports webhooks to trigger actions in response to events in the platform (usually an action performed by a user.)\n\n \n\nUsing Quickbase Webhooks, you can [automate workflows and streamline processes](https://quandarycg.com/quandary-connect/) easily. As a Quickbase developer, knowing how to use webhooks will significantly enhance and expand the solutions you can create.\n\nBy the end of this article, you will know what a webhook is, why they’re important, and how to set one up.\n\n\n## What Is Quickbase Webhooks?\n\nA webhook is a way to communicate data across the internet, usually triggered by a user event–for example, adding, updating, or deleting a record in Quickbase. \n\n**For example:** You can set up a webhook to automatically create a new task in the same Quickbase application when a new record is added to a Quickbase table. You could also set it up to create a different application in Quickbase (or an entirely separate and external platform, such as the project management tools Asana or Trello).\n\n\n\n<p style=\"margin: 20px 0; text-align: center;\">\n  <img src=\"https://cdn.sanity.io/images/55lcecww/production/9e9346fe1121a867eecaf51737c2040f9ae034c7-451x252.png\" alt=\"Diagram showing how Quickbase Webhooks moves event from System A to System B with a message through a webhook HTTP Post\">\n</p>\n \n\nWebhooks can trigger actions (such as sending notifications to team members in Slack or updating records in other systems) when a record is updated or deleted.\n\n \n\nWith the webhook connector, you can send HTTP requests to external services, pass data in JSON or XML format, and receive responses in Quickbase (usually to confirm the data was received). \n\n\n### The Importance of Webhooks\n\nThe main reason for using Webhooks is to avoid having users enter data in multiple places.  \n\nThe Webhook ensures the same data is communicated to other systems in real time (instead of having a user enter data repeatedly in different places).  possibly forgetting to update one system or even entering the data incorrectly from one system to the next. \n\n\n### When to Use Quickbase Webhooks\n\n\n<ul style=\"list-style: disc\">\n    <li>You have an available API.</li>\n    <li>You need to enter data into multiple systems automatically from one entry point.</li>\n    <li>You need real-time notifications to other services or applications.</li>\n    <li>You need an alternative to Quickbase Pipelines for creating, updating, or deleting records.</li>\n</ul>\n\n### When to Not Use Quickbase Webhooks\n\n**You use too many webhooks.**\n\n\n\n- Quickbase has a hard limit of 10 webhooks per table. \n\n\n**There is a high volume of events.**\n\n\n\n* If your application generates a large number of events that trigger webhooks, it can put a strain on the receiving server.\n* _**Note:**  In such cases, you should consider polling the API to retrieve the data periodically as Quickbase limits webhooks to 50._\n\n**The message is too large.**\n\n\n\n* Quickbase limits payload size to 4MB. \n\n\n**The records are too large.**\n\n\n\n* Quickbase sets a hard limit on the size of a record triggering a webhook to 1MB. \n\n\n**The application requires a synchronous response.**\n\n\n\n* Webhooks are asynchronous, meaning that the response is not immediate. \n* If your application requires a synchronous response, such as in a payment gateway, webhooks may not be the best option. \n* _**Note:** In such cases, you may want to consider a different approach, such as a direct API integration._\n\n**You need to guarantee delivery.**\n\n\n\n* Webhooks rely on the reliability of the network and the endpoint to deliver messages. \n* If your application requires guaranteed message delivery, webhooks may not be the best solution. \n* _**Note:**  In such cases, you may want to consider a different approach, such as a message queue or a retry mechanism. [Pipefy](https://quandarycg.com/pipefy/) and [Workato](https://quandarycg.com/workato-solutions/) both offer this feature._\n\n\n### Benefits of Webhooks\n\n\n\n* **Webhooks broadcast information users enter once in a single place to numerous places in real time.** This increases productivity and reduces the need to poll or check for updates.  \n    * Unlike polling (which creates constant server traffic) webhooks are event-based and generally require fewer resources.\n* **With webhooks, applications can respond to events as they happen without waiting (i.e. polling on a schedule).** This leads to more efficient workflows and improved performance. \n    * For example, an email service can automatically send a welcome email when a new user registers.\n    * You can also create multiple child records (for example, a questionnaire) from a single event.\n\n\n### Challenges of Webhooks \n\n\n\n* **It can be difficult to tell if a webhook fails.** Only the developer who created the webhook receives an email notification if there is a problem. \n    * Other developers must go to the webhook section of the table settings and review the error history. \n    * If the receiver (endpoint) is down, messages can be lost unless there’s a retry mechanism in place. \n\n* **If a webhook source is high-traffic, it can overwhelm the receiving application**. This is especially true if there’s no throttling in place. \n    * Rate limits might need to be enforced to prevent overloading your systems. \n\n* **If the structure of your app or the service you send data to changes, you will likely have to update your webhook as well.**\n\n\n## How to Create a Webhook in Quickbase \n\nHere is a step-by-step guide for creating a webhook in Quickbase. Follow these steps to create a successful webhook automation every time.\n\n\n### Step 1: Create a +New Webhook\n\nGo to the **Table Settings** for the table where the user will trigger the webhook. Look for the Webhooks section and click the **+New** button *(See Fig 1*).\n\n\n\n<p style=\"margin: 20px 0; text-align: center;\">\n  <img src=\"https://cdn.sanity.io/images/55lcecww/production/c481e8d1f6f19b6a7508ece2c33b6e6bca6ddbe9-561x204.png\" alt=\"Screenshot of Quickbase Webhooks menu item under workflow and permissions.\">\n</p>\n<p style=\"margin: 20px 0; text-align: center;\">\n<i>Fig. 1</i>\n</p>\n\n\n\n_**Note:** The interface is very similar to the Quickbase Notifications interface (See Fig. 2)._\n\n\n\n<p style=\"margin: 20px 0; text-align: center;\">\n  <img src=\"https://cdn.sanity.io/images/55lcecww/production/48212628a9575058ee6ac3d10f867fda10dcbe59-351x362.png\" alt=\"Screenshot of Quickbase Webhooks showing the Quickbase notification interface.\">\n\n</p>\n<p style=\"margin: 20px 0; text-align: center;\">\n<i>Fig. 2</i>\n</p>\n\n\n\n\n### Step 2: Name the Webook\n\nGive your webhook a concise and meaningful name so you will remember what it does. Your future self and any developers who follow you will be grateful for a detailed description.\n\n\n### Step 3: Set the Trigger\n\nYou need to be specific with the webhook trigger. Do you want the webhook to fire when a record is modified, added, or deleted? Some combination of those or all three? If you want it to fire when a record is modified, is it when any field changes or just a particular field? \n\nThink carefully about what causes your webhook to fire. Then, set the trigger *(See Fig. 3)*. \n\n\n\n<p style=\"margin: 20px 0; text-align: center;\">\n  <img src=\"https://cdn.sanity.io/images/55lcecww/production/6719a70d1d598ca05b5fc1405489b107c11000d4-194x204.png\" alt=\"Screenshot of Quickbase Webhooks showing how to set a trigger with \"Modified\" selected out of the options.\">\n</p>\n<p style=\"margin: 20px 0; text-align: center;\">\n<i>Fig. 3</i>\n</p>\n\n\n\n\n### Step 4: Set the Endpoint URL\n\nSet the endpoint URL your webhook will hit. \n\nFor example, if you want to create a record in another table in Quickbase, enter the full URL, including the tableID (without any additional modifiers). \n\n**In this case:** \n\nhttps://myrealm.quickbase.com/tableID \n\n**NOT:**  \nhttps://myrealm.quickbase.com/tableID?a=td \n\n\n\n\n<p style=\"margin: 20px 0; text-align: center;\">\n  <img src=\"https://cdn.sanity.io/images/55lcecww/production/e6f4bcb9841e3a2ec65cb37a793de8b0b4dc80ba-624x42.png\" alt=\"Screenshot of Quickbase Webhooks showing how to set the endpoint URL for the webhook to hit.\">\n</p>\n<p style=\"margin: 20px 0; text-align: center;\">\n<i>Fig. 4</i>\n</p>\n \n\n\n_ **Note:** You can add dynamic data to your URL based on fields and markers from the application and table (See Fig. 4)._\n\n\n### Step 5: Select the HTTP Method\n\nSelect the HTTP Method you want to use *(See Fig. 5*). \n\nFor example, you will use POST for Adding, Modifying, or Deleting records in Quickbase. \n\n\n \n\n<p style=\"margin: 20px 0; text-align: center;\">\n  <img src=\"https://cdn.sanity.io/images/55lcecww/production/ec6392347a80e4dbf80f4bc10cbafeffadaa2ca9-91x124.png\" alt=\"Screenshot of Quickbase Webhooks with POST selected out of the HTTP methods (Adding, Modifying, or Deleting records)\">\n</p>\n<p style=\"margin: 20px 0; text-align: center;\">\n<i>Fig. 5</i>\n</p>\n\n\n\n_**Note:** You will most often use POST. Still, you should know what kind of method your endpoint requires._\n\n\n### Step 6: Select Message Format\n\nSelect the message format you want to use (*See Fig. 6)*. Again, this might depend on the requirements of the URL endpoint. Make sure to read the documentation.  \n\nIn Quickbase, the HTTP API Methods are set up to receive [ XML](https://www.w3schools.com/whatis/whatis_xml.asp). The newer API Portal is set up to receive[ JSON](https://www.w3schools.com/whatis/whatis_json.asp).  \n\n\n\n\n<p style=\"margin: 20px 0; text-align: center;\">\n  <img src=\"https://cdn.sanity.io/images/55lcecww/production/76ef938c9a131d59f79649c3a5278246076c1336-126x126.png\" alt=\"Screenshot of Quickbase Webhooks message format with XML selected for the API method\">\n</p>\n<p style=\"margin: 20px 0; text-align: center;\">\n<i>Fig. 6</i>\n</p>\n\n\n\n\n### Step 7: Set Message Headers\n\nNext, set your[ Message Headers](https://developer.mozilla.org/en-US/docs/Web/HTTP/Headers). You will usually use the[ HTTP API Methods](https://helpv1.quickbase.com/api-guide/intro.html), API_AddRecord for example *(See Fig. 7)*. \n\n\n\n\n<p style=\"margin: 20px 0; text-align: center;\">\n  <img src=\"https://cdn.sanity.io/images/55lcecww/production/598af6dae5df534183cf7939a301f9fb0c5938f2-624x84.png\" alt=\"Screenshot of Quickbase Webhooks HTTP API Method with message header\">\n</p>\n<p style=\"margin: 20px 0; text-align: center;\">\n<i>Fig. 7</i>\n</p>\n \n\n \n\n\n### Step 8: Enter the Message Body\n\nEnter the[ Message Body](https://developer.mozilla.org/en-US/docs/Web/HTTP/Messages#body). Remember that each tag in the XML must have a corresponding closing tag. \n\nThe starting parent tag is &lt;qdbapi>.  \n\nYou should include a security token (either user or app token depending on your app setup).  \n\nNext, include the fields on the record that you want to create or update. You can either use field IDs or names for this. You can either hard-code data within the tags for each field or supply dynamic values from the fields in the table where the webhook lives, placing the field name wrapped in brackets within the tag *(See Fig. 8).*\n\n\n\n<p style=\"margin: 20px 0; text-align: center;\">\n  <img src=\"https://cdn.sanity.io/images/55lcecww/production/120ae0ccfbb1e3a69919b1f90be79685fbb569a2-351x134.png\" alt=\"Screenshot of Quickbase Webhooks hard-code data with the field name wrapped in brackets within the tag\">\n</p>\n<p style=\"margin: 20px 0; text-align: center;\">\n<i>Fig. 8</i>\n</p>\n\n\n\n\n\n### Step 9: Save and Test the Webhook\n\nNow, you are ready to save and test your webhook. After you click **Save** at the bottom of the webhook form, you will be taken to the list of Webhooks for that table.  \n\nMake sure the **Active** checkbox is checked *(See Fig. 9).*  Then test the webhook by adding, modifying, or deleting a record (depending on the entry criteria you set up in step 3). \n\n \n\n\n\n<p style=\"margin: 20px 0; text-align: center;\">\n  <img src=\"https://cdn.sanity.io/images/55lcecww/production/62c6cd0b3ee2aed04497392d7eb4830f3441bc14-142x110.png\" alt=\"Screenshot of Quickbase Webhooks Active Checkbox checked\">\n</p>\n<p style=\"margin: 20px 0; text-align: center;\">\n<i>Fig. 9</i>\n</p>\n\n\n\n\n\n### Step 10: Check for Errors\n\nIf there are any errors, you will see an exclamation mark in a red circle by the name of your webhook *(See Fig. 10).* \n\n\n\n\n<p style=\"margin: 20px 0; text-align: center;\">\n  <img src=\"https://cdn.sanity.io/images/55lcecww/production/27c203dd8ceef3b9ec9ec23488eb4c621407a4d5-176x86.png\" alt=\"Screenshot of Quickbase Webhooks Testing record add task with exclamation point showing.\">\n</p>\n<p style=\"margin: 20px 0; text-align: center;\">\n<i>Fig. 10</i>\n</p>\n \n\n \n\nIf you see the error icon by the name of your webhook, you can find the details at the top of the webhook page next to the **New Webhook** button *(See Fig. 11).*\n\n\n<p style=\"margin: 20px 0; text-align: center;\">\n  <img src=\"https://cdn.sanity.io/images/55lcecww/production/bbc443adcedcc3808051d6642b446ceafe5cf72c-343x60.png\" alt=\"Screenshot of Quickbase Webhooks error icon with view error history showing.\">\n</p>\n<p style=\"margin: 20px 0; text-align: center;\">\n<i>Fig. 11</i>\n</p>\n \n\n \n\nError messages are simply numeric error codes *(See Fig. 12)*. Refer to the[ Quickbase Error Codes Guide](https://helpv2.quickbase.com/hc/en-us/articles/4418287674516-Error-codes) for details on the error. \n\n\n\n\n<p style=\"margin: 20px 0; text-align: center;\">\n  <img src=\"https://cdn.sanity.io/images/55lcecww/production/ec263c4ff9d296f399868c05d8f887e1011c1288-567x79.png\" alt=\"Screenshot of Quickbase Webhooks numeric error codes.\">\n</p>\n<p style=\"margin: 20px 0; text-align: center;\">\n<i>Fig. 12</i>\n</p>\n\n\n\n\n \n\nThat’s it. \n\nCongratulations on making your first webhook! ","slug":{"current":"quickbase-developer-guide-webhooks-101"},"categories":[{"id":"-dc095853-fb86-5354-8647-e35dd8636ed2","title":"Quickbase Outside Of The Box","slug":{"current":"quick-base-outside-of-the-box"}}]}},{"node":{"id":"-582b1cdb-096c-5eef-9f22-7351d780dc1b","title":"How to Set Up Notifications in Quickbase  | BEGINNER","metaDescription":"Notifications are useful when alerting team members that a record got added, changed, or deleted in Quickbase. Follow this guide to learn how you set up notifications. ","body":"There are numerous ways to use notifications in Quickbase. \n\nFor example, notifications need to be sent anytime a record gets added, changed, or deleted in [Quickbase](https://quandarycg.com/quick-base-solutions/). You should also send notifications when clients add new tasks in the **Issues Table** or when a project is urgent.\n\nBy setting up notifications for these events, you will alert relevant teammates and keep everyone on your team in the loop. This will lead to more successful projects with fewer issues and faster completion time.\n\n## What Are Quickbase Notifications?\n\nA Notification is an automatic email sent by Quickbase to let specific users know under specific conditions when a record in a given table is added, updated, or deleted.\n\nThere are two types of notifications in Quickbase:\n\n1. **Recipient:** Use this type of notification to send notifications to app users. You can create notifications based on user roles, showing only the fields and records they can access.\n\n2. **Open:** Open notifications send emails to people who do not have access to your app (done by typing in their email). \nThe notification recipient can see all fields and information in the record(s). \nOnly application managers can create this type of notification. \nYou can control what fields display in an open notification by specifying a custom form or creating a custom notification.\n<ol style=\"list-style-type: lower-alpha;\">\n  <li>\n  The notification recipient can see all fields and information in the record(s). \n  </li>\n  <li>\n    Only application managers can create this type of notification. \n  </li>\n  <li>\n    You can control what fields display in an open notification by specifying a custom form or creating a custom notification.\n  </li>\n</ol>\n<p style=\"margin: 20px 0; text-align: center;\">\n  <img src=\"https://cdn.sanity.io/images/55lcecww/production/097e2ee029777aa86db89b7e49b35b2d8fe1bcce-553x65.png\">\n</p>\n\n_**Note**: A notification will not be sent when the owner no longer has access to the table or the app. The user may no longer have admin rights or have been removed from the app (for example, if the user has left your company)._\n\n### When Not to Use Notifications\n\nDo not use notifications when a user needs to be reminded or receive a consistent report. In those cases, you would use an automated **Reminder** or **Subscription Email**. \n\n## How to Set Up Record Change Notifications (Step-By-Step)\n\nYou can easily create record change notifications in Quickbase by following these steps.\n\nApplication Managers or users with Full Administration rights have more options than regular users of an application. Managers can send to multiple recipients, while users can only send to themselves.\n\n_**Note:** The steps in this procedure may be different if you do not have access permission to modify records._\n\n**Step 1:** Choose between a General or a Personal notification (A or B).\n<ol style=\"list-style-type: upper-alpha;\">\n  <li>\n  <strong>General Notification:</strong> Open the table that contains the record that you want. Click <strong>Settings</strong>, click the <strong>New</strong> button above <strong>Notifications, subscriptions, & reminders,</strong> select <strong>Notification</strong>, and click <strong>Create</strong>.\n<p style=\"margin: 20px 0; text-align: center;\">\n  <img src=\"https://cdn.sanity.io/images/55lcecww/production/289be83cfd0123554f5c07c7331b9da1b2439f71-305x132.png\" alt=\"Quickbase screenshot of Notifications, Subscriptions, and reminders showing 0\">\n</p>\n\n  </li>\n  <li>\n    <strong>Personal Notification:</strong> Select <strong>My personal settings</strong> in this app from the user dropdown on the Global bar. Click <strong>My email notifications, subscriptions & reminders</strong>, then click <strong>+New Email</strong>. Select <strong>Notification</strong> and click <strong>Create</strong>.\n<p style=\"margin: 20px 0; text-align: center;\">\n  <img src=\"https://cdn.sanity.io/images/55lcecww/production/dd2af9509b7c51a505d4b4c85cb64fdd004cd439-626x552.png\" alt=\"Quickbase screenshot of starting notifications set up process.\">\n</p>\n  </li>\n</ol>\n\n**Step 2:** Select a Permission Type from one of the following options:\n\n<ul style=\"list-style: disc\">\n<li><strong>Recipient:</strong> Use this type of notification to notify users who participate in your application. Quickbase knows what you want these users to see based on the roles you assign each. This lets Quickbase construct each notification based on each individual's role, showing only those fields and records you granted them the right to see.\n</li>\n<li>\n<strong>Open:</strong> Use this option to notify someone who does not have access to your application (non-users). \n</li>\n</ul>\n\n_**Note:** Do not use Open Notifications to send sensitive information because they can be sent to individuals who are not application users, potentially compromising security._\n\n<p style=\"margin: 20px 0; text-align: center;\">\n  <img src=\"https://cdn.sanity.io/images/55lcecww/production/707b587f7efd0db47ec3700bc23edf632c067dba-778x380.png\" alt=\"Quickbase screenshot of Open permission type in notification settings.\">\n</p>\n\n**Step 3:** In the **Notification Name** text box, enter a name for the notification.\n\n**Step 4:** Select recipients from the **Notify Whom** list:\n<ul style=\"list-style: disc\">\n<li><strong>Me:</strong> This will only send you the notification.</li>\n<li><strong>All users with access to &lt;table name&gt;:</strong>  This choice will notify all users with access to the table. </li>\n<li><strong>A specific list of users:</strong> Use this option to choose a specific set of users or groups. Separate entries using a semi-colon, comma, or carriage return. Click the <strong>Browse Users</strong> button to select users with the User Picker. You can also send a one-time message out to all email addresses that appear in a table report.</li>\n</ul>\n\n_**Note:** If you're creating a Recipient notification, the email entries must have access to your application._\n\n<ul style=\"list-style: disc\">\n<li><strong>Me when I am listed in the field &lt;name&gt;:</strong> Quickbase lists a choice like this for each user field in the table. If you want Quickbase to send the notification only when you are the user listed in a specific user field, select this option. </li>\n\n<li><strong>The user listed in the field &lt;name&gt;:</strong> Sends the notification to all users listed in a particular user or list-user field. For example, you can let team members know their assigned tasks have changed (or whatever record change(s) you choose in the next step). To do so, select the option for the Assigned to field.\n</li>\n</ul>\n<p style=\"margin: 20px 0; text-align: center;\">\n  <img src=\"https://cdn.sanity.io/images/55lcecww/production/8bcbb96472f58c58f351c33f0936a53223651381-690x483.png\" alt=\"Quickbase screenshot of selecting recipients for notification emails.\">\n</p>\n\n**Step 5:** In the **Notify When** box, select the actions that trigger a notification. You can send a notification whenever a record changes.\n\nIn addition to these \"record changed\" options, you can impose criteria users must meet to cause the notification. For example, you may only want a notification when someone modifies a task's Status field.\n\n**Step 6:** Click the **Additional Criteria** arrow to the right of the **Notify When** box.\n\n**Step 7:** Under **AND when**, select one of the following options:\n<ul style=\"list-style: disc\">\n<li><strong>When any field changes:</strong> Send this email notification about changes to any field. </li>\n<li><strong>When specific fields change:</strong> Opens a list of fields you can select and sends this email notification about changes made to the fields that you select from the list. </li>\n</ul>\n\n**Step 8:** You can create even more filer criteria under **AND When the following conditions are true after the change**.\n\n<p style=\"margin: 20px 0; text-align: center;\">\n      <img src=\"https://cdn.sanity.io/images/55lcecww/production/0ed40a4e470aac896d4f33e0cec89abe4c1ff6d9-770x330.png\" alt=\"Screenshot in Quickbase showing notification settings.\">\n    </p>\n\n\n**Step 9:** Select one of the following message types from the **Message Type** list:\n<ul style=\"list-style: disc\">\n<li><strong>Default:</strong> Generates a simple notification informing viewers who made the change, what it was, and where they can find it. It also includes some text explaining that Quickbase sent the email automatically. To see the default message, click <strong>Preview</strong> in the Page bar. </li>\n<li><strong>Custom message:</strong> You compose the message yourself.</li>\n</ul>\n\n_**Note:** If you include a file attachment field in the message and that field has been set to allow open access, the file is available to anyone who clicks the link in the notification email._\n\n<p style=\"margin: 20px 0; text-align: center;\">\n      <img src=\"https://cdn.sanity.io/images/55lcecww/production/c1f250253d7f1cbfbdc6eb007f87c356f6d6a481-812x158.png\" alt=\"Quickbase screenshot of message type settings.\">\n    </p>\n<p style=\"margin: 20px 0; text-align: center;\">\n      <img src=\"https://cdn.sanity.io/images/55lcecww/production/8124d128f4f6850ccd96ccb46a8ea4974025ab38-952x707.png\" alt=\"Screenshot of a custom message set up in Quickbase.\">\n    </p>\n\n**Step 10:** If you want Quickbase to compose the subject line, leave the **Subject** field blank. Otherwise, type the subject of your email in the field.\n\nA Fields and Markers list appears to the right of the box. You can insert field references and other information from your application into the subject line by selecting or searching for the field(s) you want.\n\n**Step 11:** Select one of the following options for the Message Format:\n<ul style=\"list-style: disc\">\n<li><strong>HTML:</strong> Your messages appear in a specific font with special formatting, such as bold and italics. Most email programs can handle emails in HTML format.</li>\n<li><strong>Plain Text Only:</strong> All email programs understand plain text format. If you're sure that most recipients use email programs that can't read HTML emails, select this option.</li>\n</ul>\n\n_**Note:** Even if one of your recipients can only receive text-based emails, you can still select HTML because the format will change automatically. This is why you can see both modes when you preview the notification in HTML format._\n\n<p style=\"margin: 20px 0; text-align: center;\">\n      <img src=\"https://cdn.sanity.io/images/55lcecww/production/e2967cd7bb52329cfe6030fbe96d59e63821d820-571x147.png\" alt=\"Quickbase screenshot of message format options for notification emails.\">\n    </p>\n\n**Step 12:** Tell Quickbase if you want it to include a copy of the record:\n<ul style=\"list-style: disc\">\n<li>If you select Default in Step 9, Quickbase will compose your notification message.</li>\n<li>Under the <strong>Single record options</strong> section, select the <strong>Include a copy of record</strong> checkbox to include a copy of the record in the message. </li>\n</ul>\n\n_**Note:** If you include a copy of the record and the record has a file attachment field set to allow open access, the file is available to anyone who clicks the link in the notification email._\n\n**Step 13:** Select a form from the **Form to use when displaying the record** dropdown to display the record in a custom data-entry form\n\n<p style=\"margin: 20px 0; text-align: center;\">\n      <img src=\"https://cdn.sanity.io/images/55lcecww/production/398b6aa5b62bbd441fb5cb5630911b9dd9732f28-742x280.png\">\n    </p>\n\nUnder **Advanced Options**, you can select additional optional settings.\n\n**Step 14:** Choose when to send the notification under **Operations**.\n\nImagine that you do not want Quickbase to send out the notification when someone makes changes to many records in grid-edit mode (or the opposite). Maybe you want Quickbase to notify you only when several records change at once (for example, someone imports a large number of records). Whatever your preference, you would tell Quickbase what kind of edit or add operation will cause the notification under Operations.\n\n**Step 15:** Set which email address the notification should be sent **From**:\n<ul style=\"list-style: disc\">\n<li><strong>The application manager (your email address):</strong> this is the default setting.</li>\n<li><strong>notify@quickbase.com:</strong> If Quickbase recognizes your company as the owner of its email domain, select application users from your company list. You can use this list to send an email to someone else. For example, your manager may be the public face of your application while you handle all management tasks, such as creating notifications. This user must be an individual who has access to your application. If you email someone else, they will receive an alert from Quickbase.</li>\n<li><strong>The user listed in the field &lt;name&gt;:</strong> This option appears if you set up single-record operations to send notifications. Select a User field from the application so that Quickbase sends the email notification from the user in that field. </li>\n</ul>\n\n_**Note:** Quickbase will only send the notification from this user if there is a value in the field for the record and the user listed there has access to the table and has the company’s domain in their email address. Otherwise, Quickbase will send the notification with the app manager's email address and send an email to the app manager notifying them that the email was sent out using their address._\n\n<p style=\"margin: 20px 0; text-align: center;\">\n      <img src=\"https://cdn.sanity.io/images/55lcecww/production/c5112918202b8fe5fb150a3c549384f0a144f79e-637x257.png\" >\n    </p>\n\n**Step 16:** Click **Preview** on the Page bar to view a preview of your email, or click **Save** to save your changes.\n\n## Conclusion\n\nWhen a table is updated with a new, modified, or deleted record and someone or a group needs to be aware of it, the Notifications feature in QuickBase is your solution. \n\n\n","slug":{"current":"how-to-create-quickbase-notifications"},"categories":[{"id":"-dc095853-fb86-5354-8647-e35dd8636ed2","title":"Quickbase Outside Of The Box","slug":{"current":"quick-base-outside-of-the-box"}},{"id":"-14942e20-302e-57b3-a12c-de473ea4cc86","title":"Admin / Application Set Up / Security","slug":{"current":"admin-application-setup-security"}}]}},{"node":{"id":"-28adead1-cc4f-5fbf-a580-3705ad2e341c","title":"Mastering Pipefy Interfaces: A Comprehensive How-To Guide | BEGINNER","metaDescription":"Discover how to create and customize Pipefy Interfaces for efficient data management. This step-by-step guide covers essential elements and practical use cases.","body":"The Interface feature in [Pipefy](https://www.pipefy.com/) is a powerful tool that helps you interact with and manage data. Think of an Interface as Pipefy’s version of a dashboard—a customizable space where you can view, access, and manipulate information all in one place. \n\nWhile it shares similarities with dashboards in other low/no-code platforms, Pipefy's Interface brings its own unique set of capabilities tailored to streamline workflows and enhance user collaboration.\n\nWe'll dive into key insights on how this feature works, explore a practical use case to illustrate its benefits, and [guide you through a step-by-step process](https://quandarycg.com/pipefy/) to help you implement it in your own Pipefy environment.\n\n\n## Overview of Pipefy’s Interface\n\nYou can create multiple interfaces tailored to specific roles, with each interface containing its own set of pages. These pages function as tabs, allowing for easy navigation between them. \n\nThe available elements serve as customizable components. You can drag and drop them into the workspace, allowing you to design your interface to suit your needs.\n\n<p style=\"margin: 20px 0; text-align: center;\">\n  <img src=\"https://cdn.sanity.io/images/55lcecww/production/a0600cb45cf7036a0fdf506e723a9678e7a2d61b-1316x573.png\">\n</p>\n\n## Getting Started: Use Case Description\n\nIn this example use case, we will be using the template process for HR Recruitment.\nBefore getting started, you’ll need to create a free account in Pipefy. \n\nOnce you are in, you’ll need to set up your Company. In Pipefy, each realm is called a “Company”. \n\n<p style=\"margin: 20px 0; text-align: center;\">\n  <img src=\"https://cdn.sanity.io/images/55lcecww/production/57f3ba47ddd53371063ccdd700c1c0c380b184ac-526x546.png\" alt=\"Pipefy screenshot to show how to set up a Company.\">\n</p>\n\nFor this tutorial, let’s select Human Resources as the process we want to manage. For your template, select the **Human Resources Workflow Processes Pack**.\n\n<p style=\"margin: 20px 0; text-align: center;\">\n  <img src=\"https://cdn.sanity.io/images/55lcecww/production/c1e56e7e98e7fff28d82f8cb9d16cb963af2a776-1084x666.png\" alt=\"Screenshot of Pipefy dashboard showing various template options to choose from.\">\n</p>\n\nOnce you select this, the platform will direct you to the first pipe. You can return Home by clicking the Pipefy logo.\n\nLet’s create an interface that allows the user to access all candidates who have been qualified and have accepted the job and complete the onboarding for that candidate, all in one place! \n\nWithout the interface, the user must search the **\\[HR\\] Recruitment pipe** for applicable candidates and then navigate to the onboarding pipe to onboard the candidate.\n\n## Steps to Implement Interfaces\n\n**Step 1:** To begin, navigate to **Interfaces** in the top menu bar. \n\n<p style=\"margin: 20px 0; text-align: center;\">\n  <img src=\"https://cdn.sanity.io/images/55lcecww/production/c16904789b428e22efb782138a5f642f31c3bc86-870x80.png\" alt=\"Pipefy screenshot to show readers where they can find the \"Interfaces\" button.\">\n</p>\n\n**Step 2:** Create a new **Interface**. Name it “Recruitment Dashboard” or something along those lines.\n\n<p style=\"margin: 20px 0; text-align: center;\">\n  <img src=\"https://cdn.sanity.io/images/55lcecww/production/906d5e8c2053becac8ec2e30ca9948e62a373d52-519x329.png\" alt=\"Pipefy screenshot showing an example name given to a new Interface.\">\n</p>\n\n**Step 3:** Go to **Settings** to name the first page and create the header. You have the option to show or hide the header. The header displays the page title, description, and cover photo.\n\n<p style=\"margin: 20px 0; text-align: center;\">\n  <img src=\"https://cdn.sanity.io/images/55lcecww/production/325604232eb466cbe8c0a55b8b75e098a3cd3d82-1359x641.png\" alt=\"Screenshot taken from Pipefy to show the reader how to set up a header.\">\n</p>\n\n**Step 4:** Return to the **Elements** tab to add to your interface. With the header, we have the title and a divider already in place. Let’s display some data! Drag the Data element to the workspace and adjust sizing. \n\n**Step 5:** For this interface, you want to display data from the **Recruiting** pipe. Select the **\\[HR\\] Recruitment pipe**.\n\n<p style=\"margin: 20px 0; text-align: center;\">\n  <img src=\"https://cdn.sanity.io/images/55lcecww/production/3f16ed8372a69219c6bceedc090b9154f2639867-1250x643.png\" alt=\"Screenshot of importing data to a new Pipefy Interface.\">\n</p>\n\n\n**Step 6:** The data element displays a table on the interface. You can customize the data by actions, records, and fields. \n\nLet’s start with actions. \n\nIf you turn the actions off, you will not be able to click into any individual records. With actions on, we have the option of opening the record in a new tab or viewing it within the interface. \n\nWhen we select the option to view record details, we then customize the record view. Select the option to view record details, then in the dropdown, select **+New record detail template**.\n\n\n<p style=\"margin: 20px 0; text-align: center;\">\n  <img src=\"https://cdn.sanity.io/images/55lcecww/production/331205a5431ff94fd5d7958624cf01a59fbbb2d0-346x332.png\" alt=\"Pipefy screenshot showing how to turn on record actions to manage data in Interface easily.\">\n</p>\n\n<p style=\"margin: 20px 0; text-align: center;\">\n  <img src=\"https://cdn.sanity.io/images/55lcecww/production/0811d8ce63c16d6af0979a21cd83789b11f3384a-345x397.png\" alt=\"Screenshot of a dropdown menu and its option to show what users can do in Pipefy Interface to manage data.\">\n</p>\n\n**Step 7:** The record detail template is the layout of the record details when a user clicks on a record on the table. You can completely customize how you display and organize these fields. \n\nYou also have the option to add any of the elements to your record view as well by clicking on the **General** tab. \n\nLet’s put a few fields on the template and head back to our Interface to customize our data table further. Once you have created the perfect layout, click on the arrow next to **Recruitment** to return to your Interface.\n\n<p style=\"margin: 20px 0; text-align: center;\">\n  <img src=\"https://cdn.sanity.io/images/55lcecww/production/d2ea0d222b189345618bba32bde65ec3d94f3973-1381x563.png\" alt=\"Screenshot showing a customizable field in Pipefy.\">\n</p>\n\n**Step 8:** Click on the data table to continue editing. Now that you have your layout, let’s customize which records you will display on your table. The options are to show all records or to filter records. \n\nLet’s **filter** your records. Select the filter option, then open the dropdown to create your filter. \n\n<p style=\"margin: 20px 0; text-align: center;\">\n  <img src=\"https://cdn.sanity.io/images/55lcecww/production/cfb21d2083fa3cf7793a1a40785974575e5a7f7e-701x265.png\" alt=\"Pipefy screenshot showing where users can create filters.\">\n</p>\n\n**Step 9:** For this use case, you want to see all candidates ready for onboarding. Let’s create a condition where the **Label** is “Qualified” and the candidate accepted the job. \n\n<p style=\"margin: 20px 0; text-align: center;\">\n  <img src=\"https://cdn.sanity.io/images/55lcecww/production/bf47185150d97ec2d0056757b9f4d3a00337f666-693x280.png\" alt=\"Screenshot of an example of how a user can filter records in Pipefy Interface.\">\n</p>\n\n\n**Step 10:** Once you have your filter, you can allow users to use filters on the data table. Let’s leave this on.\n\nThe options for filtering on the table depend on the displayed fields. Let’s add some fields to your table. Click **+Add field** and select fields. For this use case, let’s display the position, recruiter, the assignee responsible for interviewing, and the status label.\n\n<p style=\"margin: 20px 0; text-align: center;\">\n  <img src=\"https://cdn.sanity.io/images/55lcecww/production/aec03dd4544848712d9db513a80efe01853ffb9e-324x241.png\" alt=\"Pipefy screenshot showing what fields are displayed in this use case.\">\n</p>\n\n**Step 11:** Let’s add a form beneath your data table. Adding a form embeds a start form from the selected pipe. In this use case, let’s add the **\\[HR\\] Onboarding start** form. \n\n<p style=\"margin: 20px 0; text-align: center;\">\n  <img src=\"https://cdn.sanity.io/images/55lcecww/production/81bcc6ce6de437df2264c340f4c0bb40f9b59aba-1420x785.png\" alt=\"Screenshot showing how a user can add a form in Pipefy's Interface feature.\">\n</p>\n\n**Step 12:** Add in any more elements you would like to your interface! In the **Elements tab**, drag and drop elements like **Text**, **Links**, **Dividers**, **Images**, **Embed**, or **Forms**. \n\n\n<ul style=\"list-style: disc\">\n<li><strong>Text Element</strong>: Add descriptions, instructions, or headers within the interface.</li>\n<li><strong>Link Element</strong>: Embed clickable links to external resources like websites or documents.</li>\n<li><strong>Divider</strong>: Visually separate different sections of the interface.</li>\n<li><strong>Image</strong>: Embed images such as logos or visual aids.</li>\n<li><strong>Video</strong>: Add video content for training or guidance.</li>\n<li><strong>Embed</strong>: Insert external content, like web pages or interactive tools, using URLs.</li>\n<li><strong>Form</strong>: Embed a Pipefy form directly, such as an HR onboarding form.</li>\n</ul>\n\n**Step 13:** Once you are ready, click **View Live** to test out your new interface. \n\n<p style=\"margin: 20px 0; text-align: center;\">\n  <img src=\"https://cdn.sanity.io/images/55lcecww/production/8d91f3cf9b1bf7f97215827d6fabab802b03c393-242x53.png\" alt=\"Screenshot of the \"View Live\" button that lets users test a new Interface in Pipefy.\">\n</p>\n\n\n**Step 14:** Click into a record to view your record detail layout. Return to the interface by clicking the arrow next to **Recruitment**. \n\n**Step 15:** Click on your form to view the user experience. With the new interface, a user can quickly see which candidates are ready for onboarding and then complete the **\\[HR\\] Onboarding form to Onboard** the candidate.\n\n<p style=\"margin: 20px 0; text-align: center;\">\n  <img src=\"https://cdn.sanity.io/images/55lcecww/production/09549755f71b6092d640278c7aa2369134db9580-604x587.png\" alt=\"Screenshot of the front end of the newly set up employee onboarding form in Pipefy.\">\n</p>\n\n## Conclusion\n\nPipefy’s Interface feature empowers users to tailor their experience and streamline processes within the platform. In this tutorial, we developed an interface that optimizes the workflow of onboarding candidates from recruitment. With various templates at your disposal, you can easily create interfaces for any workflow. \n\nDive in and explore the possibilities—customizing your Pipefy environment has never been easier!\n\n","slug":{"current":"pipefy-interface-guide"},"categories":[{"id":"-f68d4f8a-0604-5b70-a9d0-441d118b24ba","title":"Pipefy Knowledge Center","slug":{"current":"pipefy-knowledge-center"}}]}},{"node":{"id":"-b078d9e8-c370-50a1-98ae-f17d720a10e3","title":"Creating High-Quality Quickbase Forms (with Examples)","metaDescription":"This is how you create a high-quality form in Quickbase and a few examples of what not to do. Follow this guide to create better forms.","body":"Forms allow users to view, add, and edit data in [QuickBase](https://quandarycg.com/quick-base-solutions/). Creating a form is straightforward. However, creating a well-designed form requires thoughtfulness and attention to detail. \n\nIt is easy for anyone to put fields on a QuickBase form and call it a day. As an expert consultant, you should strive to do more than the basics. This article will show you how to build a form in Quickbase. We will also examine examples of poor, average, and high-quality forms.\n\nThere are forms anyone can build. And there are forms you should build. You will learn how to build the best forms in Quickbase.\n\n## Why You Use Quickbase Forms\nForms are the main way of interacting with a single record in Quickbase. The form UI is straightforward, allowing for rapid app development.\n\n**You should use forms to:**\n<ul style=\"list-style: disc\">\n  <li>Add, edit, or view data.</li>\n  <li>Interact with a single record.</li>\n  <li>Interact with a record’s child data via an embedded report.</li>\n</ul\n\n**When not to use form:**\n<ul style=\"list-style: disc\">\n  <li>If you need filtering (reports or dashboards may be more appropriate).</li>\n  <li>If users must add many records simultaneously, filling out a form could be tedious.</li>\n</ul\n\n\n_**Note:** Dynamic form rules are only triggered in the form. If you need an automated form rule, you may need an automation or pipeline with the form rule._\n\n## How to Create an Effective Quickbase Form\nCreating an effective form requires several elements. Knowing these elements, where to add them, and what they do will help you create more impactful forms.\n\n**Every Quickbase form should:**\n<ul style=\"list-style: disc\">\n  <li>Group similar fields together into sections or tabs</li>\n  <li>Minimize the amount of scrolling and clicking around</li>\n  <li>Insert custom HTML elements </li>\n  <li>The client’s corporate branding</li>\n</ul>\n\n\nIf there is budget available, you should create and present multiple versions of a form to the client. This will help them decide which version best fits their needs.\n\n\n_**Note:** Some clients may like sections, while others may like tabs._\n\n## Form Creation Steps\nYou can create forms in QuickBase by first going to a Table’s Form Settings and clicking New Form in the top right:\n<p style=\"margin: 20px 0; text-align: center;\">\n      <img src=\"https://cdn.sanity.io/images/55lcecww/production/3ad0adb6882624c33130d4c4fff9d4563f905ca2-1951x785.png\" alt=\"Screenshot of Quickbase form creation process showing the Form Settings.\" >\n    </p>\n\n\nBuilders have the option to create new UI forms or Legacy Forms. \n\nThis is an important choice because the form style should be consistent across an app to provide a reliable user experience. \n\nAs of 2024, many Quickbase apps have been built using the “Legacy” forms. These forms have UI elements that may appear slightly dated. However, they load quickly. If you create a form for an existing app with other Legacy forms, then this is the recommended approach. If you create a new app from scratch, the new UI forms are likely a better option. \n\nThe general concepts of organization and thoughtfulness are the same regardless.\n\nOnce you select the form type, you should enter a name. Including the current date in the form name is an effective way to handle multiple versions. \n<p style=\"margin: 20px 0; text-align: center;\">\n      <img src=\"https://cdn.sanity.io/images/55lcecww/production/f8193d9068b6eef77c07ec89fdf86d59018fee0c-1365x925.png\" alt=\"Screenshot of Quickbase form creation process showing \"create new form\" pop up.\" >\n    </p>\n\nOnce you initialize the form, you improve the design by configuring the Elements, Properties, and Dynamic Form Rules.\n\nElements are the various fields, tabs, and sections that make up the form:\n\n<p style=\"margin: 20px 0; text-align: center;\">\n      <img src=\"https://cdn.sanity.io/images/55lcecww/production/fdeb218853a00741bbc2aa7c4e585ce223931c89-1246x661.png\" alt=\"Screenshot of Quickbase form creation process showing various elements users can choose from.\" >\n    </p>\n\nProperties is where designers can rename a form and specify general page behavior. \n\nMany of these options come down to personal preference. However, we recommend you remain consistent across the app.\n\n<p style=\"margin: 20px 0; text-align: center;\">\n      <img src=\"https://cdn.sanity.io/images/55lcecww/production/5598eca683968695db5e658d1dc15970c43c250c-1169x716.png\" alt=\"Screenshot of Quickbase form creation process showing various properties settings users can choose from.\" >\n    </p>\n\nDynamic Form Rules are powerful logic statements that can control how people use the form. \n\nThey can control aspects such as required fields and detailed business logic. For example, it can warn users if they enter a given Project’s Start Date before the current date.\n\n<p style=\"margin: 20px 0; text-align: center;\">\n      <img src=\"https://cdn.sanity.io/images/55lcecww/production/599a528b635e4f86ac0609dde73502be2ed886bc-1272x867.png\" alt=\"Screenshot of Quickbase form creation process showing the Dynamic Form Rules, displaying various options users can select to control form logic.\" >\n    </p>\n\n## Bad Quickbase Forms\nYour form should be more than a collection of fields placed on the page with little effort. You also want to go beyond the standard form that Quickbase generates when you add fields to the table. \n\n**Here is an example of a bad Quickbase form:**\n<p style=\"margin: 20px 0; text-align: center;\">\n      <img src=\"https://cdn.sanity.io/images/55lcecww/production/48c57f92d908b9052e570f98073dd6cf57c78772-881x1036.png\" alt=\"Example of a bad, but functional, Quickbase form with minimal. The form does not group fields into sections, tabs, or the same line.\" >\n    </p>\n\nNotice how the form does not group fields into sections, tabs, or the same line. Additionally, there is no customization or uniqueness.\n\nEven though it’s a bad form, it is functional. The form displays all the required information. It allows users to add, edit, and view tasks. Bad forms may be acceptable if there are very few fields on a table (e.g. less than 5) or if a table does not need extensive form interaction. \n\n_**Note:** For tables with more than the minimum interaction, a basic grouping of fields should at least be performed._\n\n## Acceptable Quickbase Forms\nAcceptable Quickbase forms require some thought to ensure they deliver a better user experience. \n\nThe form usually captures relevant information and optimizes the user's options. However, it lacks elements of customization that improve the overall experience and make the form remarkable.\n\n**This is an example of an acceptable Quickbase form:**\n<p style=\"margin: 20px 0; text-align: center;\">\n      <img src=\"https://cdn.sanity.io/images/55lcecww/production/87a91fefd86244e72a180c278046b48470b7923b-1081x1059.png\" alt=\"Example of acceptable quickbase form with appropriate grouping, sections, and a smooth user experience without custom elements.\" >\n    </p>\n\nNotice how the form groups the fields into appropriate sections, adding relevant form fills on the same line for a better user experience. As a result, users can quickly find the right information, and they do not have to scroll as much as the first form.\n \nHowever, the form is boring and barebones. This form may be acceptable for some use cases, depending on client preferences (some clients prefer simple forms), budget, workflow needs, and table complexity. \n\n## High-Quality Quickbase Forms\nEvery client has different, specific preferences. A high-quality form combines those requirements with best practices and a high level of design.\n\n**This is an example of a high-quality form:**\n<p style=\"margin: 20px 0; text-align: center;\">\n      <img src=\"https://cdn.sanity.io/images/55lcecww/production/3c12c46cc6bf5d056b002aefe7624ac08ca4fa77-1600x932.png\" alt=\"Example of a high-quality Quickbase form that uses Custom section headers to insert the client’s brand colors.\" >\n    </p>\n\nNotice how the form uses tabs to group fields but keeps the **Import Project Details** and **Task Details** above the tabs so users can always view them. \n\nThe form uses Custom section headers to insert the client’s brand color onto the page. It also has the same brand color with various shades for the tabs.  \n\n_**Note:** The HTML needed for these custom section headers is simple and does not require extensive coding knowledge:_\n<p style=\"margin: 20px 0; text-align: center;\">\n      <img src=\"https://cdn.sanity.io/images/55lcecww/production/6d874efe983af652dab657cc7d92b946e6d1c3d6-1448x511.png\" alt=\"Example of HTML for coding custom section headers in Quickbase forms\" >\n    </p>\n\n[Quandary’s Consultants](https://quandarycg.com/quandary-build/) use custom section headers on their forms. However, this is not required. In fact, the “Acceptable” version of this task form may be preferred by some clients due to its simpler layout. \n\nWhat makes a form “good” can be subjective, as client needs and expectations vary. Still, it is important to consider how the users will access the form to ensure the optimal experience.\n\n## Quickbase Form Creation: Best Practices \n\nTo create high-quality Quickbase forms every time, you must follow a set of best practices. This ensures your users have an optimal experience and the client is satisfied with the outcome.\n\nThese are the best practices we use when creating forms at Quandary:\n\n1. When updating forms in a live app, work from a copy of the form (never the original).\n<p style=\"margin: 20px 0; text-align: center;\">\n      <img src=\"https://cdn.sanity.io/images/55lcecww/production/e673277335846d74e51144ac30cb264453a57b8d-1746x781.png\" alt=\"Screenshot of Quickbase forms showing how to save a copy of the form.\n\">\n    </p>\n2. Create an Admin/Dev tab or section for fields that end-users don’t need to see (but are useful for debugging issues) and hide this tab/section with a dynamic form rule.\n<p style=\"margin: 20px 0; text-align: center;\">\n      <img src=\"https://cdn.sanity.io/images/55lcecww/production/2bb6ae7c4e990720f68c92f148210e2e4c7aac71-1044x842.png\" alt=\"Screenshot of Quickbase form creation process showing how to create an Admin/Dev tab or section for fields that end-users don’t need to see.\">\n    </p>\n3. Turn off the “automatically add fields to form” under properties once a form has been designed.\n<p style=\"margin: 20px 0; text-align: center;\">\n      <img src=\"https://cdn.sanity.io/images/55lcecww/production/f5c880ac5a0c21cb4e4064cb43f03c8b37e2accc-1141x778.png\" alt=\"Screenshot of Quickbase form properties setting showing how to turn off the “automatically add fields to form” under properties once a form has been designed.\">\n    </p>\n4. Hide field labels for buttons. \n<p style=\"margin: 20px 0; text-align: center;\">\n      <img src=\"https://cdn.sanity.io/images/55lcecww/production/e32a56326bb013b47138a7946f602b03ba3c6def-1098x690.png\" alt=\"Screenshot of Quickbase form properties setting showing how to hide field labels for buttons.\">\n    </p>\n5. Don’t use too many tabs or sections. Users can get lost. If you need numerous forms or tabs, consider multiple forms instead. \n6. Use “breadcrumb” style links for forms on child tables that are many relationships deep. In the example below, “Remediation Plans” is nested below three levels of parent tables. Links to the parent records are placed at the top of the form so users don’t get lost. \n<p style=\"margin: 20px 0; text-align: center;\">\n      <img src=\"https://cdn.sanity.io/images/55lcecww/production/bb54292591ccc10bc40199370fa8aec8699f65fd-920x412.png\" alt=\"Screenshot of an example using breadcrumb links in a Quickbase form with child tables that are many relationships deep.\">\n    </p>\n<ul style=\"list-style: disc\">\n  <li>List required inputs in a Formula-Rich Text field to help users know what to fill out so they can progress to the next status or phase in the form: </li>\n<p style=\"margin: 20px 0; text-align: center;\">\n      <img src=\"https://cdn.sanity.io/images/55lcecww/production/5fc0966419fc5ea60bda3339479c3f89675170d6-954x309.png\" alt=\"Showing how Quickbase users can list out required inputs in a Formula-Rich Text field to guide users through a form.\">\n    </p>\n</ul>","slug":{"current":"creating-high-quality-quickbase-forms"},"categories":[{"id":"-dc095853-fb86-5354-8647-e35dd8636ed2","title":"Quickbase Outside Of The Box","slug":{"current":"quick-base-outside-of-the-box"}}]}},{"node":{"id":"-c41c1109-10d1-5e33-bd6e-df813e938f07","title":"How to Set Up Reminders in Quickbase | BEGINNER","metaDescription":"With Quickbase, you don't have to forget about an event or task ever again. Follow these 9 simple steps to set up reminders for you or your team.","body":"Reminders in Quickbase allow you and other registered Quickbase users in your realm to receive messages in your emails about dates, which can be filtered by various conditions.\n\n[The possibilities](https://quandarycg.com/quandary-build/) of reminders are endless. For example, you can use reminders to inform your team about an approaching event or ensure a new hire completes their onboarding steps on time. You can even let a project lead know that their task is overdue with reminders.\n\n## Why Use Quickbase Reminders?\nA reminder is an emailed message from [Quickbase](https://quandarycg.com/quick-base-solutions/). While initially set based on dates, you can also set them up with various conditions, such as statuses or specific users. Reminders send a report of all records that fit the set criteria.\n\nThe benefits of using reminders are task tracking and accountability. You can send them out if you don’t want a team member (or yourself) to forget something important. On the other hand, you should not use reminders if the date or span of time for an event is not important.\n\nYou can only create and edit reminders if you have full admin access. And you can only send them out to registered Quickbase users.\n\n## How to Create a Reminder in Quickbase\nYou can create an automatically emailed Quickbase reminder to your specifications in 9 steps.\n\n**Step 1:** Select the table from the table bar that contains the date field you want to use for the reminder. Click **Settings**. Then, click **+** next to **Notifications, subscriptions, & reminders**. \n\n<p style=\"text-align: center\">\n<img src=\"https://cdn.sanity.io/images/55lcecww/production/5344799f0492d466d7155679571b88b025a61d3c-447x407.png\" alt=\"Quickbase screenshot of which button you need to press to get started on setting up reminders.\" />\n</p>\n\n**Step 2:** Select **Reminder**, then click **Create**.\n\n<p style=\"text-align: center\">\n<img src=\"https://cdn.sanity.io/images/55lcecww/production/765e3aae7a3ef693984dbbc26c43ed40b944f431-512x446.png\" alt=\"Screenshot of choosing reminders out of notification options in Quickbase.\" />\n</p>\n\n**Step 3:** In the Reminder Name text box, enter a name for the reminder.\n\n<p style=\"text-align: center\">\n<img src=\"https://cdn.sanity.io/images/55lcecww/production/4a320e0794cdf123b87702d7314bad129b34d954-512x68.png\" alt=\"Example of what you can name a reminder when you set it up in Quickbase.\" />\n</p>\n\n**Step 4:** Select recipients from the **Remind Whom** list:\n\n<ul style=\"list-style: disc\">\n<li style=\"list-style-type: disc !important;\"><strong>Me:</strong> Send the reminder only to you.</li>\n<li style=\"list-style-type: disc !important;\"><strong>All users with access to &lt;table name&gt;:</strong> Sends the reminder to all users with access to the table.</li>\n<li style=\"list-style-type: disc !important;\"><strong>A specific list of users:</strong> Sends the reminder to a specific set of users or groups. \n    <ul style=\"list-style: circle; margin-bottom: 0;\">\n    <li>Type the email addresses, user names, or group names of registered Quickbase users. </li>\n    <li>Separate the entries using a semicolon, comma, or by entering each user/group on a separate line. </li>\n    <li>Click the “Browse Users” button to select users with the ”User Picker”.</li>\n    <li>Email addresses are pasted into the field as text. If the email address changes, you must update the reminder manually.</li>\n    </ul>\n</li>\n<li style=\"list-style-type: disc !important;\"><strong>Me when I am listed in the field &lt;name&gt;:</strong> Quickbase lists this choice for each user field in the table. If you want Quickbase to send the reminder to you only when you are the user listed in a specific user field, select this option where the field name is the one you want.</li>\n<li style=\"list-style-type: disc !important;\"><strong>The user listed in the field name:</strong> Sends the reminder to all users listed in a particular user or list-user field. For example, you can let team members know their assigned tasks have changed (or whatever record change or changes you choose in the next step). To do so, select the option for the assigned field.\n</p>\n</li>\n</ul>\n\n<p style=\"text-align: center\">\n<img src=\"https://cdn.sanity.io/images/55lcecww/production/a1b45091951826bbe78b30d72136913e48d5ed67-637x321.png\" alt=\"Screenshot of options to set up the recipient of the reminder in Quickbase.\" />\n\n_**Note:** Reminders can only be sent to registered Quickbase users._\n\n**Step 5:** On the **Remind When** line, use the following options to set up when you want to send the reminder:\n\n<ol style=\"list-style: decimal; margin-top: -1.25em;\">\n<li style=\"list-style-type: decimal !important;\">Enter the number of days before or after the date that Quickbase will send the reminder.</li>\n<li style=\"list-style-type: decimal !important;\">Select <strong>Before</strong> or <strong>After</strong> from the list to the right of <strong>Days</strong>.</li>\n<li style=\"list-style-type: decimal !important;\">Select the field you based the reminder on from the date in the field list. For example, <strong>Finish Date</strong> or <strong>Start Date</strong>.</li>\n</ol>\n\n<p style=\"text-align: center\">\n<img src=\"https://cdn.sanity.io/images/55lcecww/production/4e3f2db18e6eb03f672e1eabaffb3719de665f43-512x46.png\" alt=\"Quickbase screenshot of when a reminder should be sent out.\" />\n\n**Step 6:** Optionally, under **Additional Criteria**, set up a filter to specify conditions that send a reminder.\n\nFor example, you may want to specify that Quickbase sends a reminder if the status is ”Incomplete”.\n\n<p style=\"text-align: center\">\n<img src=\"https://cdn.sanity.io/images/55lcecww/production/6463c52864cfad9dc0677beb7dc4cbc88755e000-662x222.png\" alt=\"Screenshot from Quickbase depicting optional additional criteria you can set when creating reminders.\" />\n\n**Step 7:** Optionally, type your **Subject** and **Message** to customize the email. If you like the text that Quickbase provides, make no changes.\n\n<p style=\"text-align: center\">\n<img src=\"https://cdn.sanity.io/images/55lcecww/production/6a3f697f2fe9197315e0b8436d4915c89f36ab1b-908x383.png\" alt=\"Example Quickbase screenshot of sending personalized email reminders.\" />\n\n**Step 8:** Under Email Options, choose the email address you will send the reminder from:\n<ul style=\"list-style: disc; margin-top: -1.25em;\">\n<li style=\"list-style-type: disc !important;\">notify@quickbase.com</li>\n<li style=\"list-style-type: disc !important;\">The application manager (your email address)</li>\n</ul>\n\n<p style=\"text-align: center\">\n<img src=\"https://cdn.sanity.io/images/55lcecww/production/b310efd123a968414a6d6d75b8c8df1039504d60-766x210.png\" alt=\"Screenshot from Quickbase showing the outgoing email address for reminders, which can be automatic or have the application manager's email address.\" />\n\n**Step 9:** Click **Preview** on the Page bar to view the email before you save it, then click **Save**.\n\n<p style=\"text-align: center\">\n<img src=\"https://cdn.sanity.io/images/55lcecww/production/9cbc563b1b4c4d1ef0f869f0b1329e0bace9003f-292x62.png\" alt=\"Screenshot of save, preview, cancel options in Quickbase page bar\" />\n\n_**Note:** The reminder email includes the default report for the table. You may want to ensure the settings for the default report are suitable for those receiving the reminders._","slug":{"current":"how-to-create-quickbase-reminders"},"categories":[{"id":"-14942e20-302e-57b3-a12c-de473ea4cc86","title":"Admin / Application Set Up / Security","slug":{"current":"admin-application-setup-security"}}]}}]}},"pageContext":{"slug":"quick-base-outside-of-the-box","previous":{"id":"-b055b1e3-c062-5785-865b-8ca556d0886f","title":"Quickbase News","icon":"fa fa-bullhorn","slug":{"current":"quick-base-news"}},"next":{"id":"-8fc0a1e5-ff85-5026-a772-2cf6f31be45c","title":"Quickbase Knowledge Center","icon":"fa fa-pie-chart","slug":{"current":"quickbase-knowledge-center"}}}},
    "staticQueryHashes": ["2126550398","63159454"]}